- Release Notes
- Introduction to CelerData Cloud Serverless
- Quick Start
- Sign up for CelerData Cloud Serverless
- A quick tour of the console
- Connect to CelerData Cloud Serverless
- Create an IAM integration
- Create and assign a warehouse
- Create an external catalog
- Load data from cloud storage
- Load data from Apache Kafka/Confluent Cloud
- Try your first query
- Invite new users
- Design data access control policy
- Warehouses
- Catalog, database, table, view, and MV
- Overview of database objects
- Catalog
- Table types
- Asynchronous materialized views
- Data Loading
- Data access control
- Networking and private connectivity
- Usage and Billing
- Organization and Account
- Integration
- Query Acceleration
- Reference
- AWS IAM policies
- Information Schema
- Overview
- be_bvars
- be_cloud_native_compactions
- be_compactions
- character_sets
- collations
- column_privileges
- columns
- engines
- events
- global_variables
- key_column_usage
- load_tracking_logs
- loads
- materialized_views
- partitions
- pipe_files
- pipes
- referential_constraints
- routines
- schema_privileges
- schemata
- session_variables
- statistics
- table_constraints
- table_privileges
- tables
- tables_config
- task_runs
- tasks
- triggers
- user_privileges
- views
- Data Types
- System Metadatabase
- Keywords
- SQL Statements
- Account Management
- Data Definition
- CREATE TABLE
- ALTER TABLE
- DROP CATALOG
- CREATE TABLE LIKE
- REFRESH EXTERNAL TABLE
- RESTORE
- SET CATALOG
- DROP TABLE
- RECOVER
- USE
- CREATE MATERIALIZED VIEW
- DROP DATABASE
- ALTER MATERIALIZED VIEW
- DROP REPOSITORY
- CANCEL RESTORE
- DROP INDEX
- DROP MATERIALIZED VIEW
- CREATE DATABASE
- CREATE TABLE AS SELECT
- BACKUP
- CANCEL BACKUP
- CREATE REPOSITORY
- CREATE INDEX
- Data Manipulation
- INSERT
- SHOW CREATE DATABASE
- SHOW BACKUP
- SHOW ALTER MATERIALIZED VIEW
- SHOW CATALOGS
- SHOW CREATE MATERIALIZED VIEW
- SELECT
- SHOW ALTER
- SHOW MATERIALIZED VIEW
- RESUME ROUTINE LOAD
- ALTER ROUTINE LOAD
- SHOW TABLES
- STREAM LOAD
- SHOW PARTITIONS
- CANCEL REFRESH MATERIALIZED VIEW
- SHOW CREATE CATALOG
- SHOW ROUTINE LOAD TASK
- SHOW RESTORE
- CREATE ROUTINE LOAD
- STOP ROUTINE LOAD
- SHOW DATABASES
- BROKER LOAD
- SHOW ROUTINE LOAD
- PAUSE ROUTINE LOAD
- SHOW SNAPSHOT
- SHOW CREATE TABLE
- CANCEL LOAD
- REFRESH MATERIALIZED VIEW
- SHOW REPOSITORIES
- SHOW LOAD
- Administration
- DESCRIBE
- SQL Functions
- Function List
- String Functions
- CONCAT
- HEX
- LOWER
- SPLIT
- LPAD
- SUBSTRING
- PARSE_URL
- INSTR
- REPEAT
- LCASE
- REPLACE
- HEX_DECODE_BINARY
- RPAD
- SPLIT_PART
- STRCMP
- SPACE
- CHARACTER_LENGTH
- URL_ENCODE
- APPEND_TAILING_CHAR_IF_ABSENT
- LTRIM
- HEX_DECODE_STRING
- URL_DECODE
- LEFT
- STARTS_WITH
- CONCAT
- GROUP_CONCAT
- STR_TO_MAP
- STRLEFT
- STRRIGHT
- MONEY_FORMAT
- RIGHT
- SUBSTRING_INDEX
- UCASE
- TRIM
- FIND_IN_SET
- RTRIM
- ASCII
- UPPER
- REVERSE
- LENGTH
- UNHEX
- ENDS_WITH
- CHAR_LENGTH
- NULL_OR_EMPTY
- LOCATE
- CHAR
- Predicate Functions
- Map Functions
- Binary Functions
- Geospatial Functions
- Lambda Expression
- Utility Functions
- Bitmap Functions
- BITMAP_SUBSET_LIMIT
- TO_BITMAP
- BITMAP_AGG
- BITMAP_FROM_STRING
- BITMAP_OR
- BITMAP_REMOVE
- BITMAP_AND
- BITMAP_TO_BASE64
- BITMAP_MIN
- BITMAP_CONTAINS
- SUB_BITMAP
- BITMAP_UNION
- BITMAP_COUNT
- BITMAP_UNION_INT
- BITMAP_XOR
- BITMAP_UNION_COUNT
- BITMAP_HAS_ANY
- BITMAP_INTERSECT
- BITMAP_AND_NOT
- BITMAP_TO_STRING
- BITMAP_HASH
- INTERSECT_COUNT
- BITMAP_EMPTY
- BITMAP_MAX
- BASE64_TO_ARRAY
- BITMAP_TO_ARRAY
- Struct Functions
- Aggregate Functions
- RETENTION
- MI
- MULTI_DISTINCT_SUM
- WINDOW_FUNNEL
- STDDEV_SAMP
- GROUPING_ID
- HLL_HASH
- AVG
- HLL_UNION_AGG
- COUNT
- BITMAP
- HLL_EMPTY
- SUM
- MAX_BY
- PERCENTILE_CONT
- COVAR_POP
- PERCENTILE_APPROX
- HLL_RAW_AGG
- STDDEV
- CORR
- COVAR_SAMP
- MIN_BY
- MAX
- VAR_SAMP
- STD
- HLL_UNION
- APPROX_COUNT_DISTINCT
- MULTI_DISTINCT_COUNT
- VARIANCE
- ANY_VALUE
- COUNT_IF
- GROUPING
- PERCENTILE_DISC
- Array Functions
- ARRAY_CUM_SUM
- ARRAY_MAX
- ARRAY_LENGTH
- ARRAY_REMOVE
- UNNEST
- ARRAY_SLICE
- ALL_MATCH
- ARRAY_CONCAT
- ARRAY_SORT
- ARRAY_POSITION
- ARRAY_DIFFERENCE
- ARRAY_CONTAINS
- ARRAY_JOIN
- ARRAY_INTERSECT
- CARDINALITY
- ARRAY_CONTAINS_ALL
- ARRAYS_OVERLAP
- ARRAY_MIN
- ARRAY_MAP
- ELEMENT_AT
- ARRAY_APPEND
- ARRAY_SORTBY
- ARRAY_TO_BITMAP
- ARRAY_GENERATE
- ARRAY_AVG
- ARRAY_FILTER
- ANY_MATCH
- REVERSE
- ARRAY_AGG
- ARRAY_DISTINCT
- ARRAY_SUM
- Condition Functions
- Math Functions
- Date and Time Functions
- DAYNAME
- MINUTE
- FROM_UNIXTIME
- HOUR
- MONTHNAME
- MONTHS_ADD
- ADD_MONTHS
- DATE_SUB
- PREVIOUS_DAY
- TO_TERA_DATA
- MINUTES_SUB
- WEEKS_ADD
- HOURS_DIFF
- UNIX_TIMESTAMP
- DAY
- DATE_SLICE
- DATE
- CURTIME
- SECONDS_SUB
- MONTH
- WEEK
- TO_DATE
- TIMEDIFF
- MONTHS_DIFF
- STR_TO_JODATIME
- WEEK_ISO
- MICROSECONDS_SUB
- TIME_SLICE
- MAKEDATE
- DATE_TRUNC
- JODATIME
- DAYOFWEEK
- YEARS_SUB
- TIMESTAMP_ADD
- HOURS_SUB
- STR2DATE
- TIMESTAMP
- FROM_DAYS
- WEEK_OF_YEAR
- YEAR
- TIMESTAMP_DIFF
- TO_TERA_TIMESTAMP
- DAYOFMONTH
- DAYOFYEAR
- DATE_FORMAT
- MONTHS_SUB
- NEXT_DAY
- MINUTES_DIFF
- DATA_ADD
- MINUTES_ADD
- CURDATE
- DAY_OF_WEEK_ISO
- CURRENt_TIMESTAMP
- STR_TO_DATE
- LAST_DAY
- WEEKS_SUB
- TO_DAYS
- DATEDIFF
- NOW
- TO_ISO8601
- TIME_TO_SEC
- QUARTER
- SECONDS_DIFF
- UTC_TIMESTAMP
- DATA_DIFF
- SECONDS_ADD
- ADDDATE
- WEEKSDIFF
- CONVERT_TZ
- MICROSECONDS_ADD
- SECOND
- YEARS_DIFF
- YEARS_ADD
- HOURS_ADD
- DAYS_SUB
- DAYS_DIFF
- Cryptographic Functions
- Percentile Functions
- Bit Functions
- JSON Functions
- Hash Functions
- Scalar Functions
- Table Functions
Create an IAM integration
Suppose you want your CelerData cloud account to have access to your AWS cloud resources (for example, connecting to your data lake built on top of S3 or loading data in bulk from your S3 bucket). In that case, you must establish a trust relationship between your CelerData cloud account and your AWS account.
You can achieve this by using an access key pair, which consists of two parts: an access key ID ("access key" for short) and a secret access key ("secret key" for short). However, using an access key pair is generally not recommended as a best practice by AWS. Since the CelerData services are also built on AWS cloud resources, you can consider a more secure approach: using a cross-account IAM role.
This tutorial walks you through all the steps necessary to set up a trust relationship between your CelerData cloud account and your AWS account by using a cross-account IAM role.
Follow these steps:
Sign in to the CelerData Cloud Serverless console.
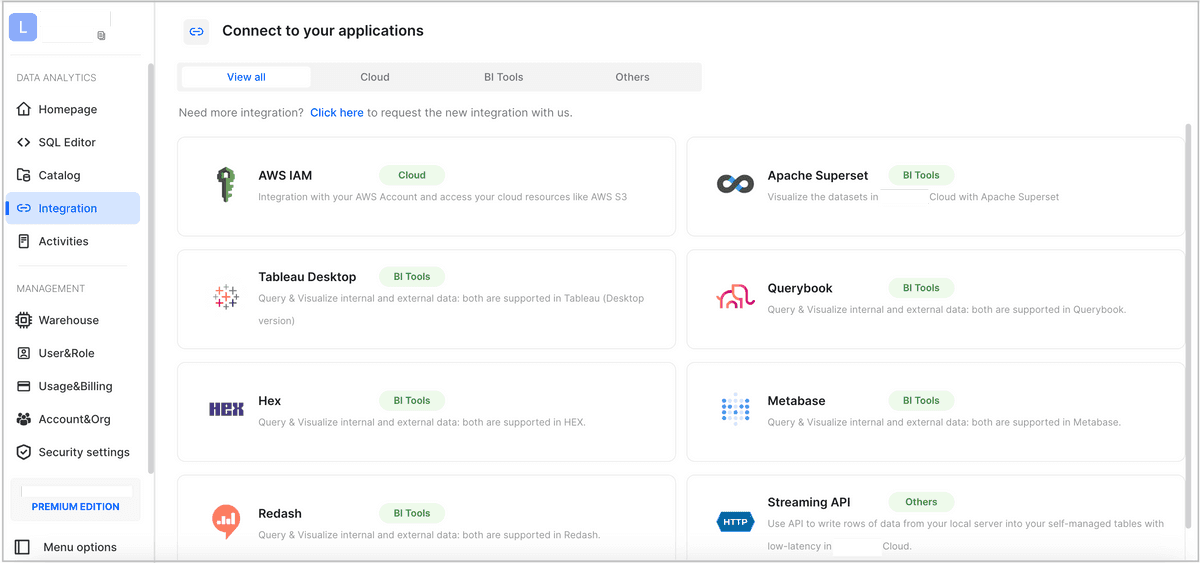
In the left-side navigation pane, choose Integration. Then on the Connect to your applications page click AWS IAM.

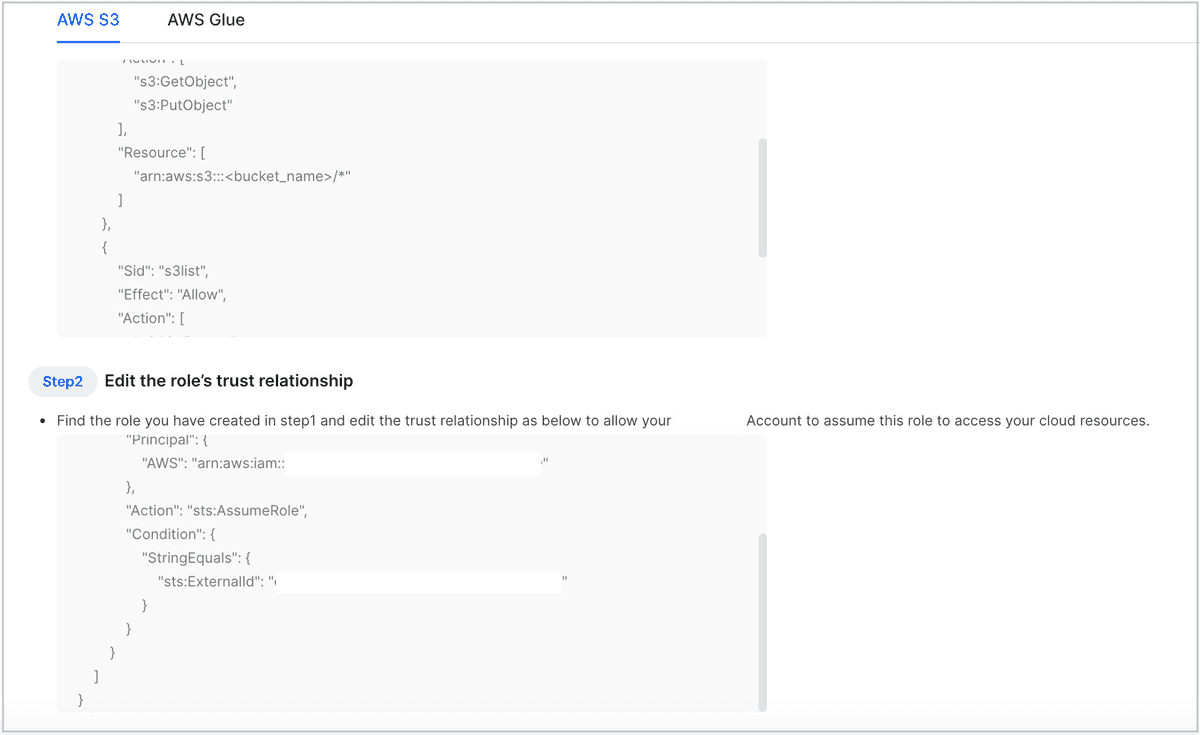
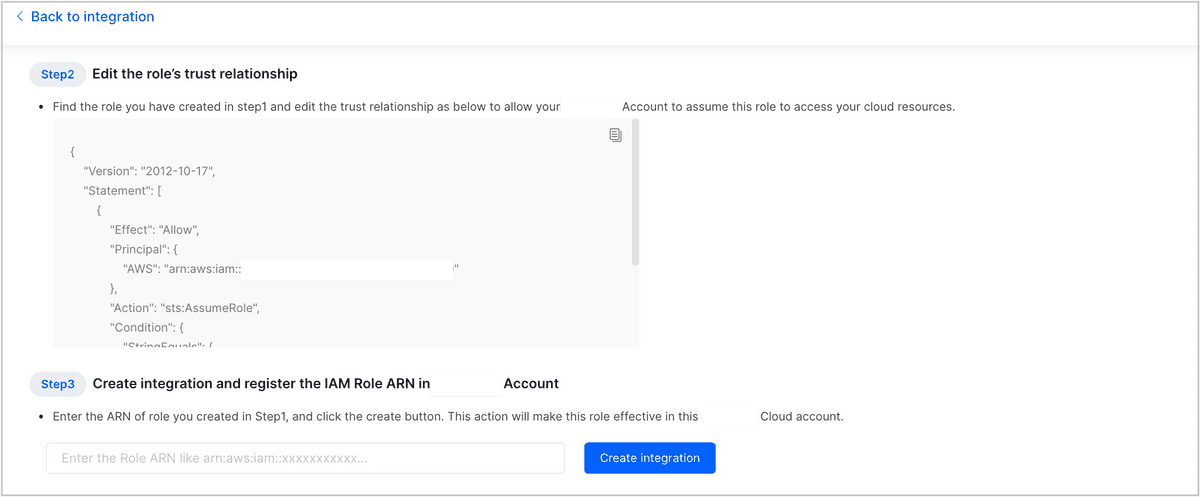
On the Create new IAM integration tab of the AWS IAM page, view the IAM policies in the Step 1 section and the trust policy in the Step 2 section. You will need these when you create IAM policies and configure your IAM role in the next steps.

Sign in to the AWS IAM console as a user with administrator privileges.
In the left-side navigation pane, choose Access management > Policies. Then, create the IAM policies you will need for your operations.
For the JSON policy documents you need to paste to the Policy editor section, see the IAM policies provided in the CelerData Cloud Serverless console or AWS IAM policies.
NOTICE
When you copy and paste the JSON policy document that grants access to AWS S3, remember to replace
<bucket_name>with the S3 bucket you want to access.For the detailed steps to create IAM policies, see Creating IAM policies.
In the left-side navigation pane, choose Access management > Roles. Then, create an IAM role, and attach the IAM policies you created to the IAM role.
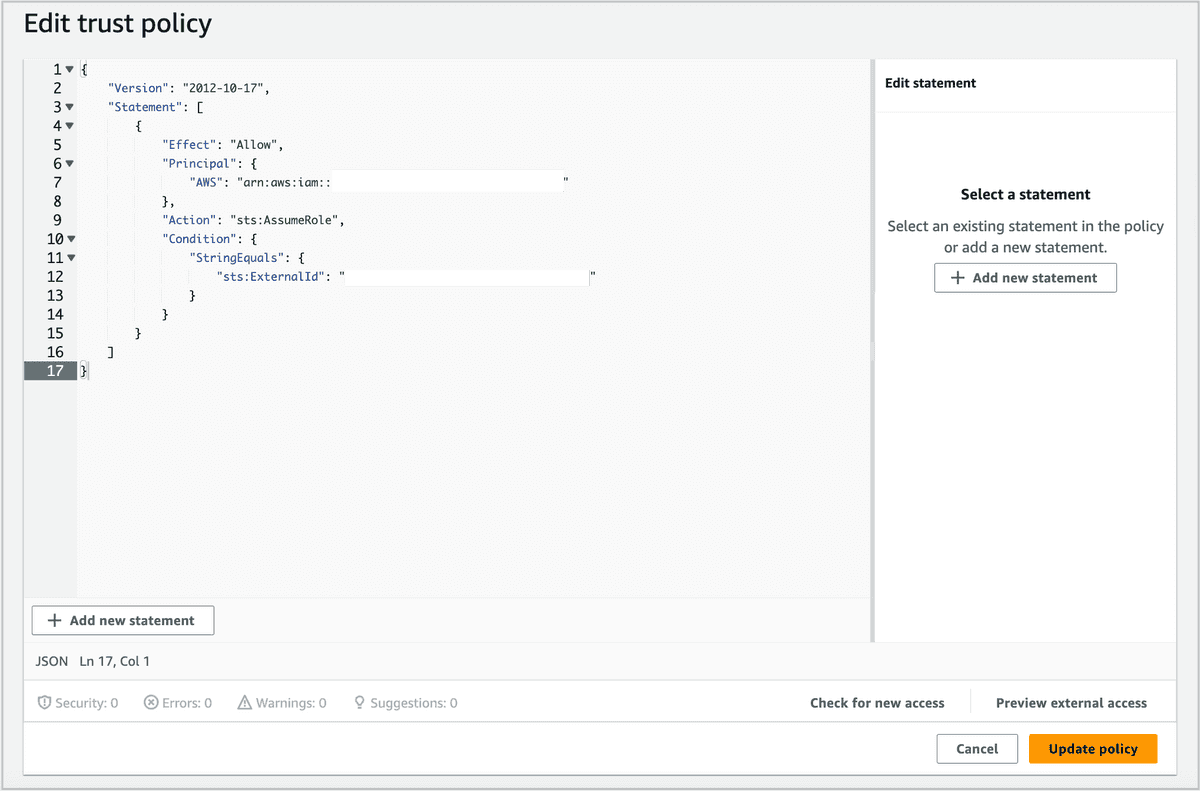
On the IAM role's details page, click the Trust relationships tab, and then click Edit trust policy in the upper-right corner of the tab.
On the Edit trust policy page, paste the trust policy which you can obtain from the Step 2 section on the Create new IAM integration tab of the AWS IAM page in the CelerData Cloud Serverless console. (Remember to set the AWS and sts:ExternalId elements in the trust policy to the Service role ARN and AWS External ID, respectively, which you can obtain from the Homepage of the CelerData Cloud Serverless console.) Then, click Update policy.

Obtain the ARN of the IAM role you created and save it to a location that you can access later.
Return to the CelerData Cloud Serverless console. On the Create new IAM integration tab of the AWS IAM page, paste the IAM role ARN to the field in the Step 3 section. Then, click Create integration.

When the system displays a success message, the integration is successfully created. You can view the created integration on the View all IAM integrations tab of the page.
Then you can use the IAM role ARN and the external ID to access your AWS cloud resources. For example, you can query external data stored on your AWS Cloud by using external catalogs or batch load data from your AWS S3 bucket.