- Release Notes
- Introduction to CelerData Cloud Serverless
- Quick Start
- Sign up for CelerData Cloud Serverless
- A quick tour of the console
- Connect to CelerData Cloud Serverless
- Create an IAM integration
- Create and assign a warehouse
- Create an external catalog
- Load data from cloud storage
- Load data from Apache Kafka/Confluent Cloud
- Try your first query
- Invite new users
- Design data access control policy
- Warehouses
- Catalog, database, table, view, and MV
- Overview of database objects
- Catalog
- Table types
- Asynchronous materialized views
- Data Loading
- Data access control
- Networking and private connectivity
- Usage and Billing
- Organization and Account
- Integration
- Query Acceleration
- Reference
- AWS IAM policies
- Information Schema
- Overview
- be_bvars
- be_cloud_native_compactions
- be_compactions
- character_sets
- collations
- column_privileges
- columns
- engines
- events
- global_variables
- key_column_usage
- load_tracking_logs
- loads
- materialized_views
- partitions
- pipe_files
- pipes
- referential_constraints
- routines
- schema_privileges
- schemata
- session_variables
- statistics
- table_constraints
- table_privileges
- tables
- tables_config
- task_runs
- tasks
- triggers
- user_privileges
- views
- Data Types
- System Metadatabase
- Keywords
- SQL Statements
- Account Management
- Data Definition
- CREATE TABLE
- ALTER TABLE
- DROP CATALOG
- CREATE TABLE LIKE
- REFRESH EXTERNAL TABLE
- RESTORE
- SET CATALOG
- DROP TABLE
- RECOVER
- USE
- CREATE MATERIALIZED VIEW
- DROP DATABASE
- ALTER MATERIALIZED VIEW
- DROP REPOSITORY
- CANCEL RESTORE
- DROP INDEX
- DROP MATERIALIZED VIEW
- CREATE DATABASE
- CREATE TABLE AS SELECT
- BACKUP
- CANCEL BACKUP
- CREATE REPOSITORY
- CREATE INDEX
- Data Manipulation
- INSERT
- SHOW CREATE DATABASE
- SHOW BACKUP
- SHOW ALTER MATERIALIZED VIEW
- SHOW CATALOGS
- SHOW CREATE MATERIALIZED VIEW
- SELECT
- SHOW ALTER
- SHOW MATERIALIZED VIEW
- RESUME ROUTINE LOAD
- ALTER ROUTINE LOAD
- SHOW TABLES
- STREAM LOAD
- SHOW PARTITIONS
- CANCEL REFRESH MATERIALIZED VIEW
- SHOW CREATE CATALOG
- SHOW ROUTINE LOAD TASK
- SHOW RESTORE
- CREATE ROUTINE LOAD
- STOP ROUTINE LOAD
- SHOW DATABASES
- BROKER LOAD
- SHOW ROUTINE LOAD
- PAUSE ROUTINE LOAD
- SHOW SNAPSHOT
- SHOW CREATE TABLE
- CANCEL LOAD
- REFRESH MATERIALIZED VIEW
- SHOW REPOSITORIES
- SHOW LOAD
- Administration
- DESCRIBE
- SQL Functions
- Function List
- String Functions
- CONCAT
- HEX
- LOWER
- SPLIT
- LPAD
- SUBSTRING
- PARSE_URL
- INSTR
- REPEAT
- LCASE
- REPLACE
- HEX_DECODE_BINARY
- RPAD
- SPLIT_PART
- STRCMP
- SPACE
- CHARACTER_LENGTH
- URL_ENCODE
- APPEND_TAILING_CHAR_IF_ABSENT
- LTRIM
- HEX_DECODE_STRING
- URL_DECODE
- LEFT
- STARTS_WITH
- CONCAT
- GROUP_CONCAT
- STR_TO_MAP
- STRLEFT
- STRRIGHT
- MONEY_FORMAT
- RIGHT
- SUBSTRING_INDEX
- UCASE
- TRIM
- FIND_IN_SET
- RTRIM
- ASCII
- UPPER
- REVERSE
- LENGTH
- UNHEX
- ENDS_WITH
- CHAR_LENGTH
- NULL_OR_EMPTY
- LOCATE
- CHAR
- Predicate Functions
- Map Functions
- Binary Functions
- Geospatial Functions
- Lambda Expression
- Utility Functions
- Bitmap Functions
- BITMAP_SUBSET_LIMIT
- TO_BITMAP
- BITMAP_AGG
- BITMAP_FROM_STRING
- BITMAP_OR
- BITMAP_REMOVE
- BITMAP_AND
- BITMAP_TO_BASE64
- BITMAP_MIN
- BITMAP_CONTAINS
- SUB_BITMAP
- BITMAP_UNION
- BITMAP_COUNT
- BITMAP_UNION_INT
- BITMAP_XOR
- BITMAP_UNION_COUNT
- BITMAP_HAS_ANY
- BITMAP_INTERSECT
- BITMAP_AND_NOT
- BITMAP_TO_STRING
- BITMAP_HASH
- INTERSECT_COUNT
- BITMAP_EMPTY
- BITMAP_MAX
- BASE64_TO_ARRAY
- BITMAP_TO_ARRAY
- Struct Functions
- Aggregate Functions
- RETENTION
- MI
- MULTI_DISTINCT_SUM
- WINDOW_FUNNEL
- STDDEV_SAMP
- GROUPING_ID
- HLL_HASH
- AVG
- HLL_UNION_AGG
- COUNT
- BITMAP
- HLL_EMPTY
- SUM
- MAX_BY
- PERCENTILE_CONT
- COVAR_POP
- PERCENTILE_APPROX
- HLL_RAW_AGG
- STDDEV
- CORR
- COVAR_SAMP
- MIN_BY
- MAX
- VAR_SAMP
- STD
- HLL_UNION
- APPROX_COUNT_DISTINCT
- MULTI_DISTINCT_COUNT
- VARIANCE
- ANY_VALUE
- COUNT_IF
- GROUPING
- PERCENTILE_DISC
- Array Functions
- ARRAY_CUM_SUM
- ARRAY_MAX
- ARRAY_LENGTH
- ARRAY_REMOVE
- UNNEST
- ARRAY_SLICE
- ALL_MATCH
- ARRAY_CONCAT
- ARRAY_SORT
- ARRAY_POSITION
- ARRAY_DIFFERENCE
- ARRAY_CONTAINS
- ARRAY_JOIN
- ARRAY_INTERSECT
- CARDINALITY
- ARRAY_CONTAINS_ALL
- ARRAYS_OVERLAP
- ARRAY_MIN
- ARRAY_MAP
- ELEMENT_AT
- ARRAY_APPEND
- ARRAY_SORTBY
- ARRAY_TO_BITMAP
- ARRAY_GENERATE
- ARRAY_AVG
- ARRAY_FILTER
- ANY_MATCH
- REVERSE
- ARRAY_AGG
- ARRAY_DISTINCT
- ARRAY_SUM
- Condition Functions
- Math Functions
- Date and Time Functions
- DAYNAME
- MINUTE
- FROM_UNIXTIME
- HOUR
- MONTHNAME
- MONTHS_ADD
- ADD_MONTHS
- DATE_SUB
- PREVIOUS_DAY
- TO_TERA_DATA
- MINUTES_SUB
- WEEKS_ADD
- HOURS_DIFF
- UNIX_TIMESTAMP
- DAY
- DATE_SLICE
- DATE
- CURTIME
- SECONDS_SUB
- MONTH
- WEEK
- TO_DATE
- TIMEDIFF
- MONTHS_DIFF
- STR_TO_JODATIME
- WEEK_ISO
- MICROSECONDS_SUB
- TIME_SLICE
- MAKEDATE
- DATE_TRUNC
- JODATIME
- DAYOFWEEK
- YEARS_SUB
- TIMESTAMP_ADD
- HOURS_SUB
- STR2DATE
- TIMESTAMP
- FROM_DAYS
- WEEK_OF_YEAR
- YEAR
- TIMESTAMP_DIFF
- TO_TERA_TIMESTAMP
- DAYOFMONTH
- DAYOFYEAR
- DATE_FORMAT
- MONTHS_SUB
- NEXT_DAY
- MINUTES_DIFF
- DATA_ADD
- MINUTES_ADD
- CURDATE
- DAY_OF_WEEK_ISO
- CURRENt_TIMESTAMP
- STR_TO_DATE
- LAST_DAY
- WEEKS_SUB
- TO_DAYS
- DATEDIFF
- NOW
- TO_ISO8601
- TIME_TO_SEC
- QUARTER
- SECONDS_DIFF
- UTC_TIMESTAMP
- DATA_DIFF
- SECONDS_ADD
- ADDDATE
- WEEKSDIFF
- CONVERT_TZ
- MICROSECONDS_ADD
- SECOND
- YEARS_DIFF
- YEARS_ADD
- HOURS_ADD
- DAYS_SUB
- DAYS_DIFF
- Cryptographic Functions
- Percentile Functions
- Bit Functions
- JSON Functions
- Hash Functions
- Scalar Functions
- Table Functions
Load data from a local file system
CelerData Cloud Serverless allows you to load data from a local file system by using Stream Load.
NOTE
This feature is included in the Premium software edition. Please see the Software editions documentation for details on the differences between Standard and Premium editions if you are subscribed to the Standard edition.
Stream Load is an HTTPS-based synchronous loading method. After you submit a load job, CelerData synchronously runs the job, and returns the result of the job after the job finishes. You can determine whether the job is successful based on the job result.
Stream Load is suitable for loading of data less than 10 GB from a local file system.
Supported formats
Supported file formats are CSV and JSON.
For CSV data, take note of the following points:
- You can use a UTF-8 string, such as a comma (,), tab, or pipe (|), whose length does not exceed 50 bytes as a text delimiter.
- Null values are denoted by using
\N. For example, a data file consists of three columns, and a record from that data file holds data in the first and third columns but no data in the second column. In this situation, you need to use\Nin the second column to denote a null value. This means the record must be compiled asa,\N,binstead ofa,,b, becausea,,bdenotes that the second column of the record holds an empty string.
Limits
- To use this feature, you must contact CelerData support team.
- Stream Load does not support loading the data of a CSV file that contains a JSON-formatted column.
Before you begin
Make source data ready
Make sure that the source data in your local file system is ready, and obtain the path in which the source data is stored.
In this topic, two sample data files are used as examples:
A CSV file named
example1.csv. The file consists of three columns, which represent the user ID, user name, and user score in sequence.1,Lily,23 2,Rose,23 3,Alice,24 4,Julia,25A JSON file named
example2.json. The file consists of two columns, which represent city ID and city name in sequence.{"name": "Beijing", "code": 2}
Check privileges
You can load data into tables within CelerData only as a user who has the INSERT privilege on the tables. If you do not have the INSERT privilege, follow the instructions provided in GRANT to grant the INSERT privilege to the user that you use to connect to CelerData.
Select the destination table and warehouse
Sign in to the CelerData Cloud Serverless console.
Choose SQL Editor in the left-side navigation bar. On the Data Explorer tab, select a catalog and then a database.
In this topic, assume that you select a database named
mydatabase. You can create this database by using the CREATE DATABASE statement:CREATE DATABASE mydatabase;Select a table.
If you do not have a table in the database you have selected, you can create one by using the CREATE TABLE statement.
In this topic, create two tables like below:
A Primary Key table named
table1. The table consists of three columns:id,name, andscore, of whichidis the primary key.CREATE TABLE `table1` ( `id` int(11) NOT NULL COMMENT "user ID", `name` varchar(65533) NULL COMMENT "user name", `score` int(11) NOT NULL COMMENT "user score" ) ENGINE=OLAP PRIMARY KEY(`id`) DISTRIBUTED BY HASH(`id`);A Primary Key table named
table2. The table consists of two columns:idandcity, of whichidis the primary key.CREATE TABLE `table2` ( `id` int(11) NOT NULL COMMENT "city ID", `city` varchar(65533) NULL COMMENT "city name" ) ENGINE=OLAP PRIMARY KEY(`id`) DISTRIBUTED BY HASH(`id`);
NOTE
CelerData can automatically set the number of buckets (
BUCKETS) when you create a table or add a partition. You do not need to set the number of buckets by hand.In CelerData, some literals are used as reserved keywords by the SQL language. Do not directly use these keywords in SQL statements. If you want to use such a keyword in an SQL statement, enclose it in a pair of backticks (`). See Keywords.
Determine the warehouse to which you want to load data. The warehouse you select must be running. You will need to provide the warehouse name when you create a Stream Load job.
For the examples in this topic, select
default_warehouseas the destination warehouse.
Check network connectivity
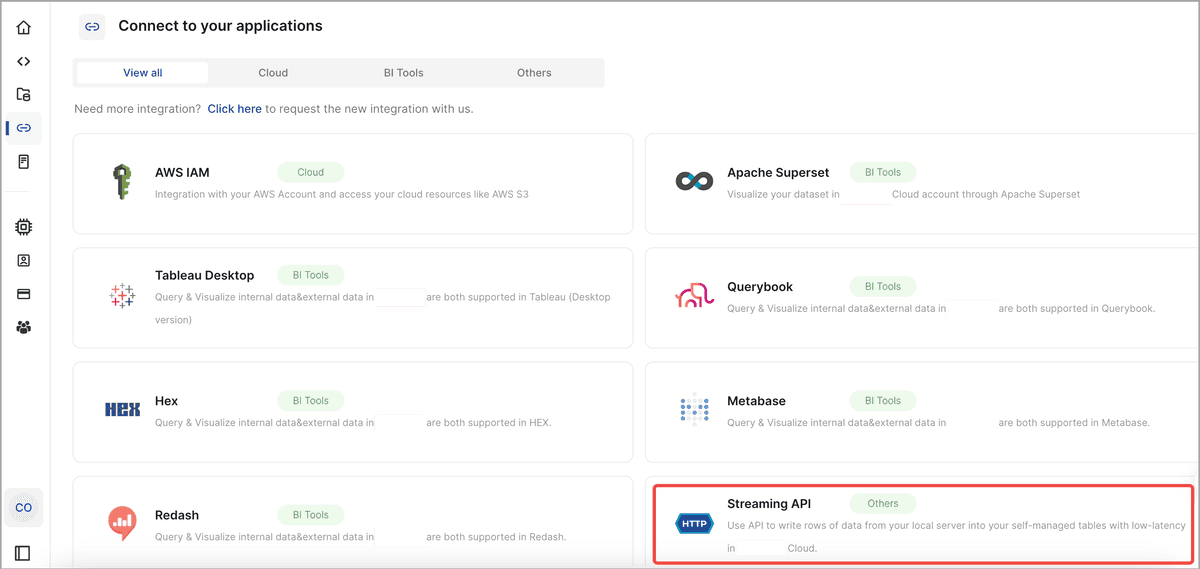
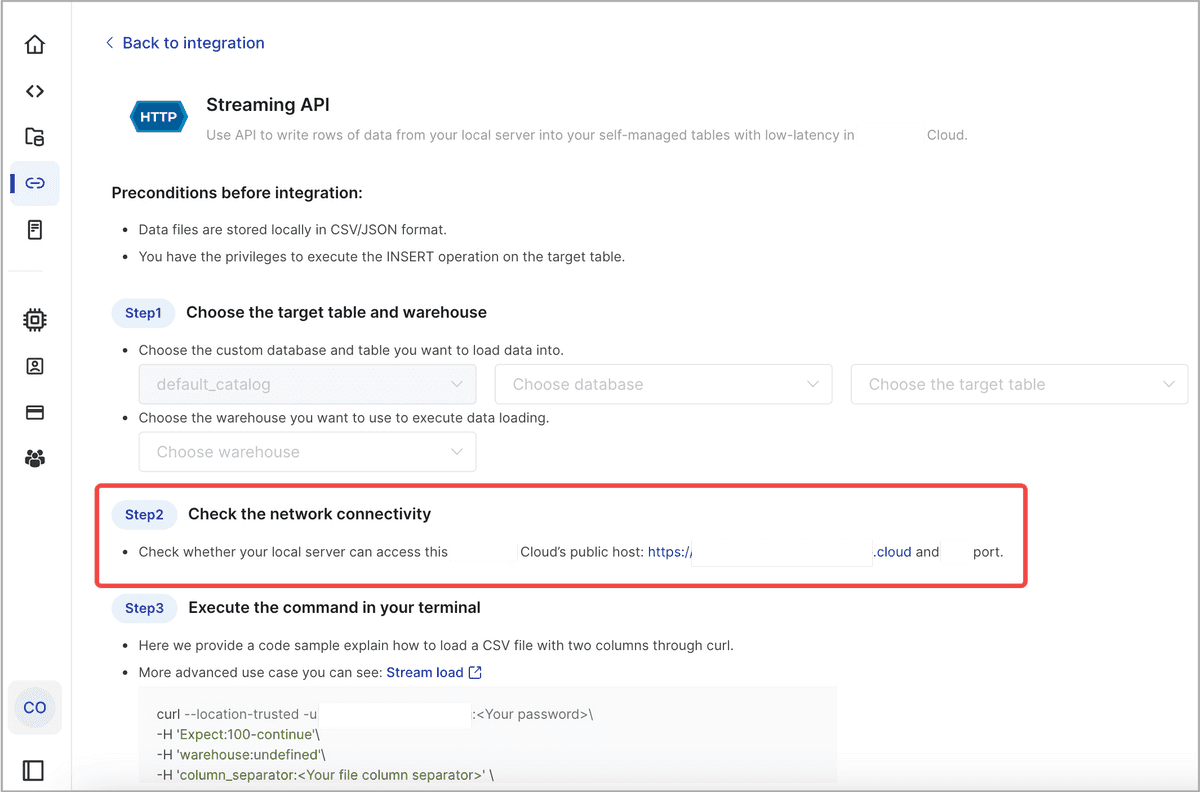
Choose Integration in the left-side navigation bar of the CelerData Cloud Serverless console. Then, find and click Streaming API.

On the Streaming API page, navigate to Step 2, where you can see the address and port of the public host for your CelerData cloud.

Make sure that your local server can access the host address and port. You will need to provide the host address (host_address) and port (host_port) in the HTTPS line of the load command when you create a Stream Load job.
Start a Stream Load
This section uses curl to explain how to run a Stream Load job in your local terminal to load CSV or JSON data.
The basic syntax is as follows:
curl --location-trusted -u <account_id>.<username>:<password> \
    -H "Expect:100-continue" \
    -H "warehouse:<warehouse_name>" \
    # The parameter column_separator is used only for CSV data loading.
    -H "column_separator:<column_separator>" \
    # The parameter jsonpaths is used only for JSON data loading.
    -H "jsonpaths: [ \"<json_path1>\"[, \"<json_path2>\", ...] ]" \
    -H "columns:<column1_name>[, <column2_name>, ... ]" \
    -H "format: CSV | JSON" \
    -T <file_path> -XPUT \
    https://<host_address>:<host_port>/api/<database_name>/<table_name>/_stream_load
The load command mainly includes the following parts:
HTTPS request header
Expect: Specify its value as100-continue, as in"Expect:100-continue".<account_id>.<username>:<password>: Specify the ID, username, and password of the account that you use to connect to CelerData.warehouse: Specify the destination warehouse. If you do not specify this parameter, the default warehouse nameddefault_warehouseis used for the data loading. Make sure the destination warehouse is running. If the destination warehouse is not running, the data loading will fail.column_separator: Specify the characters that are used in the CSV data file to separate fields. The default value is\t, which indicates tab. If the CSV data file uses tabs to separate the fields in it, you do not need to specify this parameter.jsonpaths: Specify the names of the keys that you want to load from the JSON data file. You need to specify this parameter only when you load JSON data by using the matched mode. The value of this parameter is in JSON format. See Configure column mapping for JSON data loading.columns: Specify the column mapping between the data file and the destination table.format: Specify the format of the data file.file_path: Specify the save path of the data file. You can optionally include the extension of the file name, and then you do not need to specify theformatparameter.HTTPS line: This includes the method, which is
-XPUT, and the URL that contains the path to the destination table in CelerData.The parameters in the URL are as follows:
Parameter Required Description host_address Yes The address of the public host for your CelerData cloud. For information about how to obtain the host address, see Check network connectivity. host_port Yes The port of the public host for your CelerData cloud. For information about how to obtain the host port, see Check network connectivity. database_name Yes The name of the database to which the destination table belongs. table_name Yes The name of the destination table.
For detailed syntax and parameter descriptions, see STREAM LOAD.
Load CSV data
To load the data of the CSV data file example1.csv into table1, run the following command:
curl --location-trusted -u <account_id>.<username>:<password> \
    -H "Expect:100-continue" \
    -H "warehouse:default_warehouse" \
    -H "column_separator:," \
    -H "columns: id, name, score" \
    -T example1.csv -XPUT \
    https://<host_address>:<host_port>/api/mydatabase/table1/_stream_load
example1.csv consists of three columns, which are separated by commas (,) and can be mapped in sequence onto the id, name, and score columns of table1. Therefore, you need to use the column_separator parameter to specify the comma (,) as the column separator. You also need to use the columns parameter to temporarily name the three columns of example1.csv as id, name, and score, which are mapped in sequence onto the three columns of table1.
For more information about column mapping, see Configure column mapping for CSV data loading.
Load JSON data
To load the data of the JSON data file example2.json into table2, run the following command:
curl -v --location-trusted -u <account_id>.<username>:<password> \
    -H "strict_mode: true" \
    -H "Expect:100-continue" \
    -H "warehouse:default_warehouse" \
    -H "format: json" \
    -H "jsonpaths: [\"$.name\", \"$.code\"]" \
    -H "columns: city,tmp_id, id = tmp_id * 100" \
    -T example2.json -XPUT \
    https://<host_address>:<host_port>/api/mydatabase/table2/_stream_load
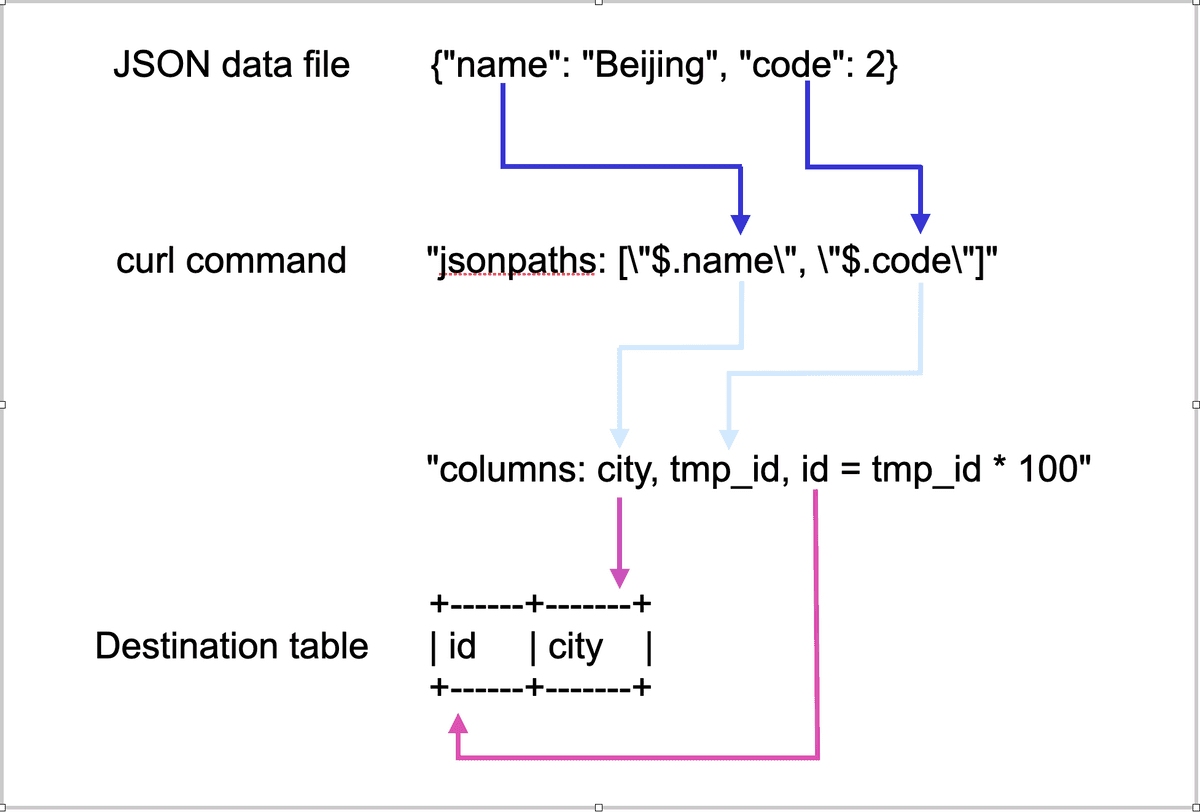
example2.json consists of two keys, name and code, which are mapped onto the id and city columns of table2, as shown in the following figure.

The mappings shown in the preceding figure are described as follows:
- CelerData extracts the
nameandcodekeys ofexample2.jsonand maps them onto thenameandcodefields declared in thejsonpathsparameter. - CelerData extracts the
nameandcodefields declared in thejsonpathsparameter and maps them in sequence onto thecityandtmp_idfields declared in thecolumnsparameter. - CelerData extracts the
cityandtmp_idfields declared in thecolumnsparameter and maps them by name onto thecityandidcolumns oftable2.
NOTE
In the preceding example, the value of
codeinexample2.jsonis multiplied by 100 before it is loaded into theidcolumn oftable2.
For more information about column mapping, see Configure column mapping for JSON data loading.
Check Stream Load progress
After a Stream Load job is complete, CelerData returns the result of the job in JSON format. For more information, see the "Return value" section in STREAM LOAD.
Stream Load does not allow you to query the result of a load job by using the SHOW LOAD statement.
Cancel a Stream Load job
Stream Load does not allow you to cancel a load job. If a load job times out or encounters errors, CelerData automatically cancels the job.