- Release Notes
- Introduction to CelerData Cloud Serverless
- Quick Start
- Sign up for CelerData Cloud Serverless
- A quick tour of the console
- Connect to CelerData Cloud Serverless
- Create an IAM integration
- Create and assign a warehouse
- Create an external catalog
- Load data from cloud storage
- Load data from Apache Kafka/Confluent Cloud
- Try your first query
- Invite new users
- Design data access control policy
- Warehouses
- Catalog, database, table, view, and MV
- Overview of database objects
- Catalog
- Table types
- Asynchronous materialized views
- Data Loading
- Data access control
- Networking and private connectivity
- Usage and Billing
- Organization and Account
- Integration
- Query Acceleration
- Reference
- AWS IAM policies
- Information Schema
- Overview
- be_bvars
- be_cloud_native_compactions
- be_compactions
- character_sets
- collations
- column_privileges
- columns
- engines
- events
- global_variables
- key_column_usage
- load_tracking_logs
- loads
- materialized_views
- partitions
- pipe_files
- pipes
- referential_constraints
- routines
- schema_privileges
- schemata
- session_variables
- statistics
- table_constraints
- table_privileges
- tables
- tables_config
- task_runs
- tasks
- triggers
- user_privileges
- views
- Data Types
- System Metadatabase
- Keywords
- SQL Statements
- Account Management
- Data Definition
- CREATE TABLE
- ALTER TABLE
- DROP CATALOG
- CREATE TABLE LIKE
- REFRESH EXTERNAL TABLE
- RESTORE
- SET CATALOG
- DROP TABLE
- RECOVER
- USE
- CREATE MATERIALIZED VIEW
- DROP DATABASE
- ALTER MATERIALIZED VIEW
- DROP REPOSITORY
- CANCEL RESTORE
- DROP INDEX
- DROP MATERIALIZED VIEW
- CREATE DATABASE
- CREATE TABLE AS SELECT
- BACKUP
- CANCEL BACKUP
- CREATE REPOSITORY
- CREATE INDEX
- Data Manipulation
- INSERT
- SHOW CREATE DATABASE
- SHOW BACKUP
- SHOW ALTER MATERIALIZED VIEW
- SHOW CATALOGS
- SHOW CREATE MATERIALIZED VIEW
- SELECT
- SHOW ALTER
- SHOW MATERIALIZED VIEW
- RESUME ROUTINE LOAD
- ALTER ROUTINE LOAD
- SHOW TABLES
- STREAM LOAD
- SHOW PARTITIONS
- CANCEL REFRESH MATERIALIZED VIEW
- SHOW CREATE CATALOG
- SHOW ROUTINE LOAD TASK
- SHOW RESTORE
- CREATE ROUTINE LOAD
- STOP ROUTINE LOAD
- SHOW DATABASES
- BROKER LOAD
- SHOW ROUTINE LOAD
- PAUSE ROUTINE LOAD
- SHOW SNAPSHOT
- SHOW CREATE TABLE
- CANCEL LOAD
- REFRESH MATERIALIZED VIEW
- SHOW REPOSITORIES
- SHOW LOAD
- Administration
- DESCRIBE
- SQL Functions
- Function List
- String Functions
- CONCAT
- HEX
- LOWER
- SPLIT
- LPAD
- SUBSTRING
- PARSE_URL
- INSTR
- REPEAT
- LCASE
- REPLACE
- HEX_DECODE_BINARY
- RPAD
- SPLIT_PART
- STRCMP
- SPACE
- CHARACTER_LENGTH
- URL_ENCODE
- APPEND_TAILING_CHAR_IF_ABSENT
- LTRIM
- HEX_DECODE_STRING
- URL_DECODE
- LEFT
- STARTS_WITH
- CONCAT
- GROUP_CONCAT
- STR_TO_MAP
- STRLEFT
- STRRIGHT
- MONEY_FORMAT
- RIGHT
- SUBSTRING_INDEX
- UCASE
- TRIM
- FIND_IN_SET
- RTRIM
- ASCII
- UPPER
- REVERSE
- LENGTH
- UNHEX
- ENDS_WITH
- CHAR_LENGTH
- NULL_OR_EMPTY
- LOCATE
- CHAR
- Predicate Functions
- Map Functions
- Binary Functions
- Geospatial Functions
- Lambda Expression
- Utility Functions
- Bitmap Functions
- BITMAP_SUBSET_LIMIT
- TO_BITMAP
- BITMAP_AGG
- BITMAP_FROM_STRING
- BITMAP_OR
- BITMAP_REMOVE
- BITMAP_AND
- BITMAP_TO_BASE64
- BITMAP_MIN
- BITMAP_CONTAINS
- SUB_BITMAP
- BITMAP_UNION
- BITMAP_COUNT
- BITMAP_UNION_INT
- BITMAP_XOR
- BITMAP_UNION_COUNT
- BITMAP_HAS_ANY
- BITMAP_INTERSECT
- BITMAP_AND_NOT
- BITMAP_TO_STRING
- BITMAP_HASH
- INTERSECT_COUNT
- BITMAP_EMPTY
- BITMAP_MAX
- BASE64_TO_ARRAY
- BITMAP_TO_ARRAY
- Struct Functions
- Aggregate Functions
- RETENTION
- MI
- MULTI_DISTINCT_SUM
- WINDOW_FUNNEL
- STDDEV_SAMP
- GROUPING_ID
- HLL_HASH
- AVG
- HLL_UNION_AGG
- COUNT
- BITMAP
- HLL_EMPTY
- SUM
- MAX_BY
- PERCENTILE_CONT
- COVAR_POP
- PERCENTILE_APPROX
- HLL_RAW_AGG
- STDDEV
- CORR
- COVAR_SAMP
- MIN_BY
- MAX
- VAR_SAMP
- STD
- HLL_UNION
- APPROX_COUNT_DISTINCT
- MULTI_DISTINCT_COUNT
- VARIANCE
- ANY_VALUE
- COUNT_IF
- GROUPING
- PERCENTILE_DISC
- Array Functions
- ARRAY_CUM_SUM
- ARRAY_MAX
- ARRAY_LENGTH
- ARRAY_REMOVE
- UNNEST
- ARRAY_SLICE
- ALL_MATCH
- ARRAY_CONCAT
- ARRAY_SORT
- ARRAY_POSITION
- ARRAY_DIFFERENCE
- ARRAY_CONTAINS
- ARRAY_JOIN
- ARRAY_INTERSECT
- CARDINALITY
- ARRAY_CONTAINS_ALL
- ARRAYS_OVERLAP
- ARRAY_MIN
- ARRAY_MAP
- ELEMENT_AT
- ARRAY_APPEND
- ARRAY_SORTBY
- ARRAY_TO_BITMAP
- ARRAY_GENERATE
- ARRAY_AVG
- ARRAY_FILTER
- ANY_MATCH
- REVERSE
- ARRAY_AGG
- ARRAY_DISTINCT
- ARRAY_SUM
- Condition Functions
- Math Functions
- Date and Time Functions
- DAYNAME
- MINUTE
- FROM_UNIXTIME
- HOUR
- MONTHNAME
- MONTHS_ADD
- ADD_MONTHS
- DATE_SUB
- PREVIOUS_DAY
- TO_TERA_DATA
- MINUTES_SUB
- WEEKS_ADD
- HOURS_DIFF
- UNIX_TIMESTAMP
- DAY
- DATE_SLICE
- DATE
- CURTIME
- SECONDS_SUB
- MONTH
- WEEK
- TO_DATE
- TIMEDIFF
- MONTHS_DIFF
- STR_TO_JODATIME
- WEEK_ISO
- MICROSECONDS_SUB
- TIME_SLICE
- MAKEDATE
- DATE_TRUNC
- JODATIME
- DAYOFWEEK
- YEARS_SUB
- TIMESTAMP_ADD
- HOURS_SUB
- STR2DATE
- TIMESTAMP
- FROM_DAYS
- WEEK_OF_YEAR
- YEAR
- TIMESTAMP_DIFF
- TO_TERA_TIMESTAMP
- DAYOFMONTH
- DAYOFYEAR
- DATE_FORMAT
- MONTHS_SUB
- NEXT_DAY
- MINUTES_DIFF
- DATA_ADD
- MINUTES_ADD
- CURDATE
- DAY_OF_WEEK_ISO
- CURRENt_TIMESTAMP
- STR_TO_DATE
- LAST_DAY
- WEEKS_SUB
- TO_DAYS
- DATEDIFF
- NOW
- TO_ISO8601
- TIME_TO_SEC
- QUARTER
- SECONDS_DIFF
- UTC_TIMESTAMP
- DATA_DIFF
- SECONDS_ADD
- ADDDATE
- WEEKSDIFF
- CONVERT_TZ
- MICROSECONDS_ADD
- SECOND
- YEARS_DIFF
- YEARS_ADD
- HOURS_ADD
- DAYS_SUB
- DAYS_DIFF
- Cryptographic Functions
- Percentile Functions
- Bit Functions
- JSON Functions
- Hash Functions
- Scalar Functions
- Table Functions
Authenticate to AWS resources
CelerData Cloud Serverless supports using two authentication methods to integrate with AWS resources: assumed role-based authentication and IAM user-based authentication. This topic describes how to configure AWS credentials by using these authentication methods.
Authentication methods
Assumed role-based authentication (Recommended)
Your CelerData cloud account can securely integrate with your AWS account by assuming an AWS IAM role. This requires you to create an IAM role and configure a trust relationship for it, so as to allow your CelerData cloud account to assume this role. This way, you can access your data securely and reliably without the need to create a long-term plaintext key pair that consists of an access key ID (commonly referred to as "access key") and a secret access key (commonly referred to as "secret key").
IAM user-based authentication
You need to create an AWS IAM user and embed the access key and secret key of the user into SQL commands. This way, your CelerData cloud account can use the user's identity to access the cloud resources within your AWS account.
Preparations
First, you need to create an IAM policy based on the type of cloud resource you want to access and the specific operation scenario within CelerData. A policy in AWS IAM declares a set of permissions on a specific AWS resource. After creating a policy, you need to attach it to an IAM role or user. As such, the IAM role or user is assigned the permissions declared in the policy to access the specified AWS resource.
NOTICE
To make these preparations, you must have permission to sign in to the AWS IAM console and edit IAM users and roles.
For the IAM policy you will need to access a specific AWS resource, see the following sections:
Preparation for assumed role-based authentication
Create a cross-account IAM role and configure a trust relationship for it
Sign in to the AWS IAM console.
In the left-side navigation pane, choose Access management > Roles.
On the Roles page, click Create role.
The Create role wizard appears, helping you create an IAM role with three steps.
In the Select trusted entity step, select Custom trust policy for Trusted entity type.
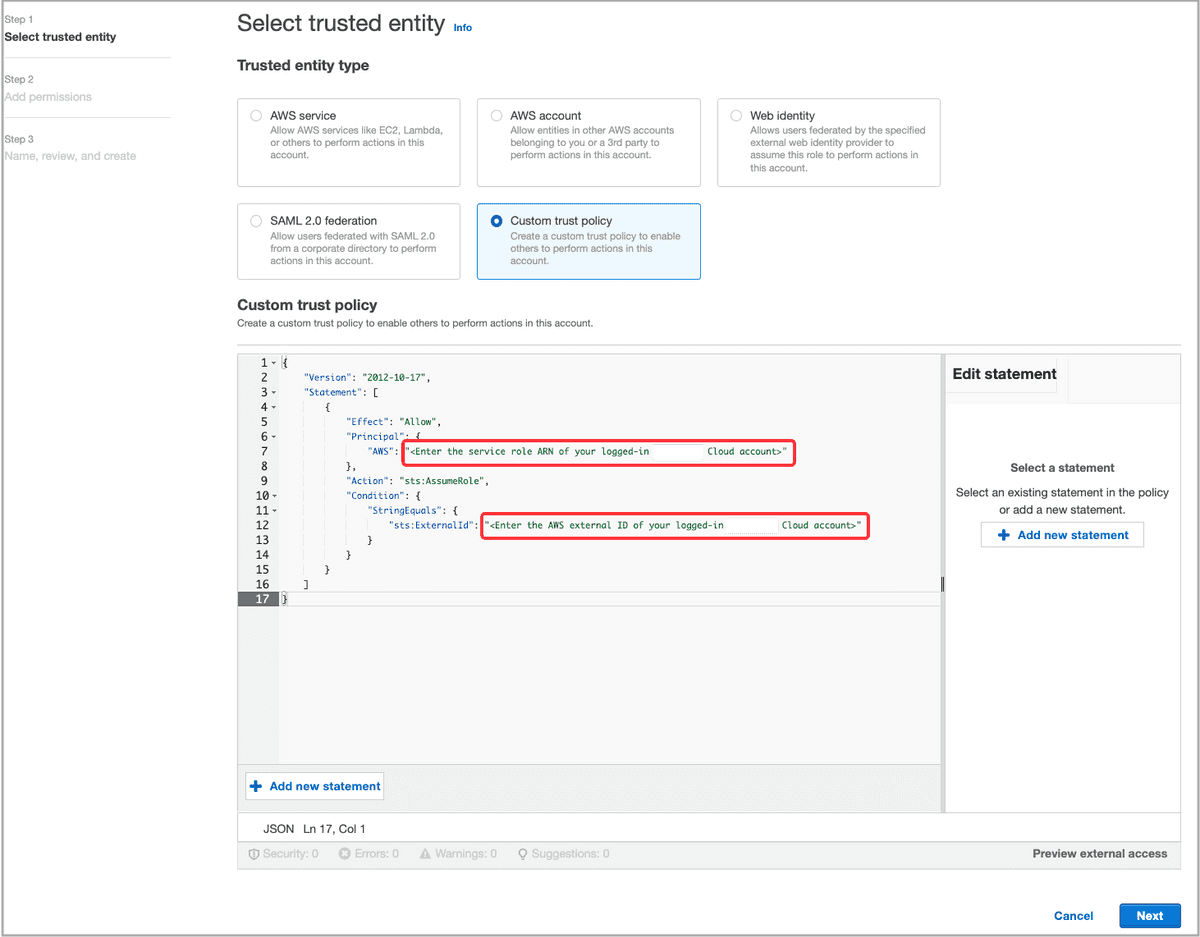
In the Custom trust policy edit box, configure a trust relationship. Then, click Next.
Follow these steps to configure a trust relationship in the Custom trust policy edit box:
a. Delete the existing JSON policy document, then copy the following JSON policy template and paste it to the edit box:
{
    "Version": "2012-10-17",
    "Statement": [
        {
            "Effect": "Allow",
            "Principal": {
                "AWS": "<Enter the service role ARN of your logged-in CelerData cloud account>"
            },
            "Action": "sts:AssumeRole",
            "Condition": {
                "StringEquals": {
                    "sts:ExternalId": "<Enter the AWS external ID of your logged-in CelerData cloud account>"
                }
            }
        }
    ]
}
b. Configure the Principal and ExternalId elements in the JSON policy document as follows:
Principal: Enter the service role ARN of your logged-in CelerData cloud account, for example,
arn:aws:iam::081976408565:role/caikfzy-vdk13478.ExternalId: Enter the AWS external ID of your logged-in CelerData cloud account, for example,
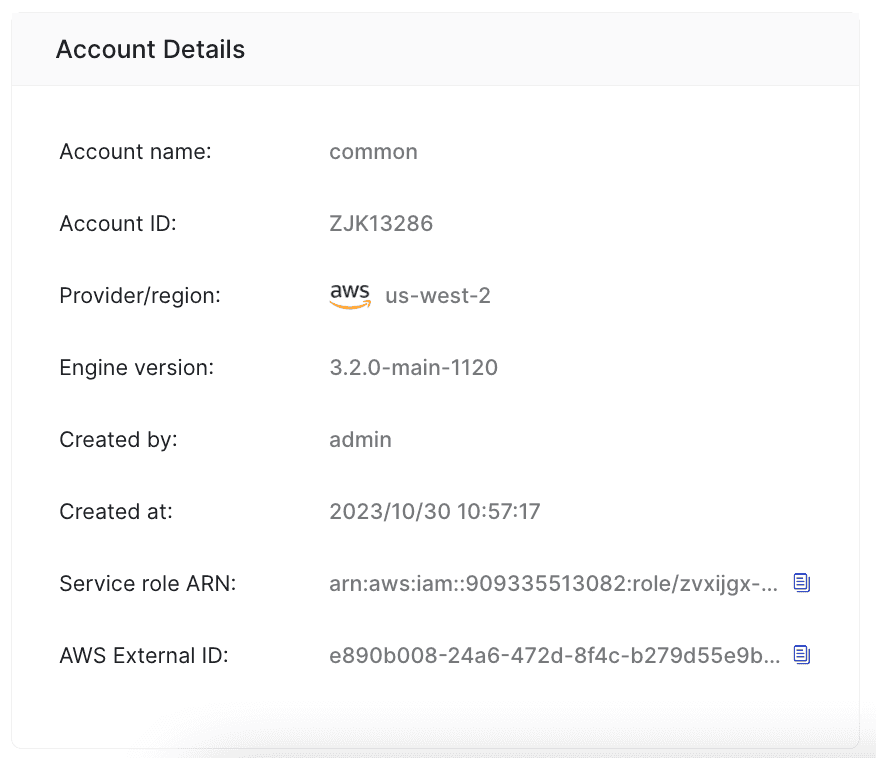
fa6f62b0-d9f4-43ae-ac49-238bcca1a31a.By configuring the trust relationship, you enable your logged-in CelerData cloud account to assume the IAM role you are creating.
You can obtain the service role ARN and AWS external ID of your logged-in CelerData cloud account from the CelerData Cloud Serverless homepage, as shown in the following figure.
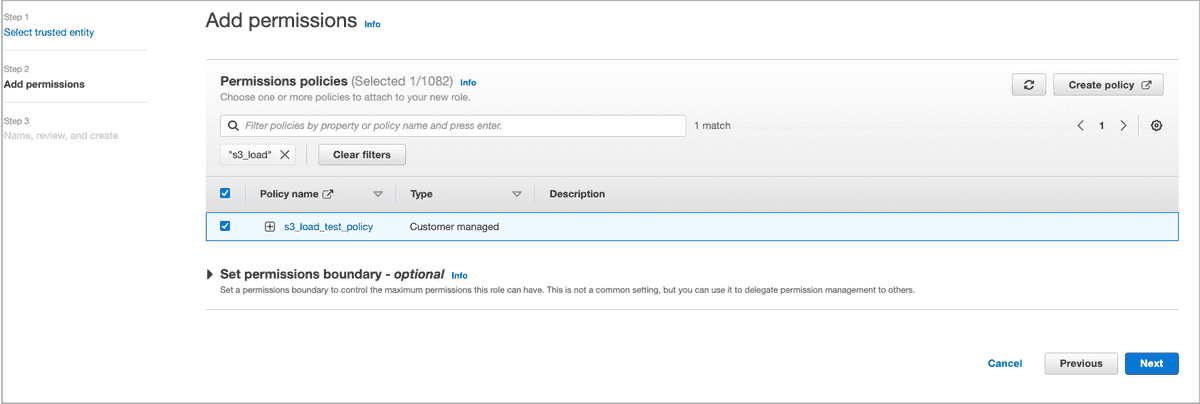
In the Add permissions step, find the IAM policy you want to attach to the IAM role and select the check box preceding it.
In the Name, review, and create step, enter a role name, for example, s3_load_test_role, optionally enter a role description or add tags, and then click Create role.
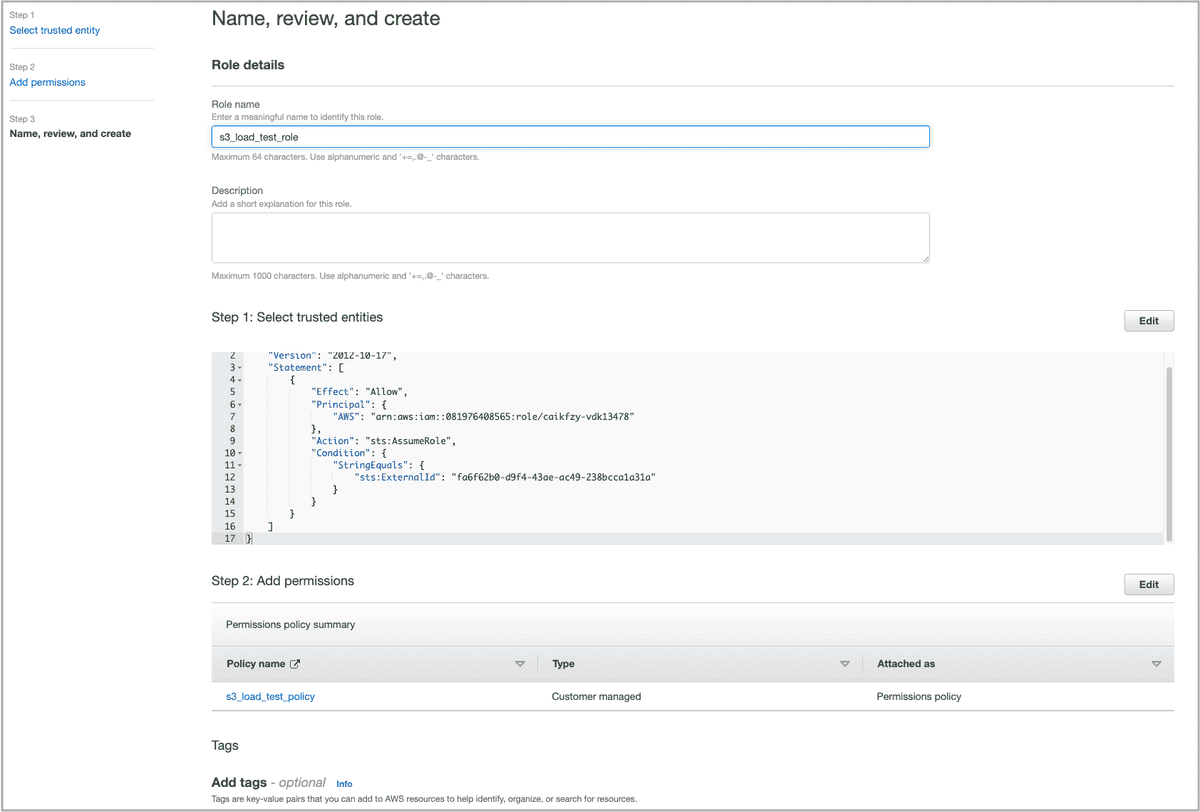
You are then directed to the Roles page, where you can view the IAM role you just created.
On the Roles page, find the IAM role you just created and click its name.
On the role's details page, copy the role's ARN (for example,
arn:aws:iam::081976408565:role/s3_load_test_role) and save the ARN to a location that you can access later. You will need to provide this ARN when you are registering the IAM role you just created with your CelerData cloud account.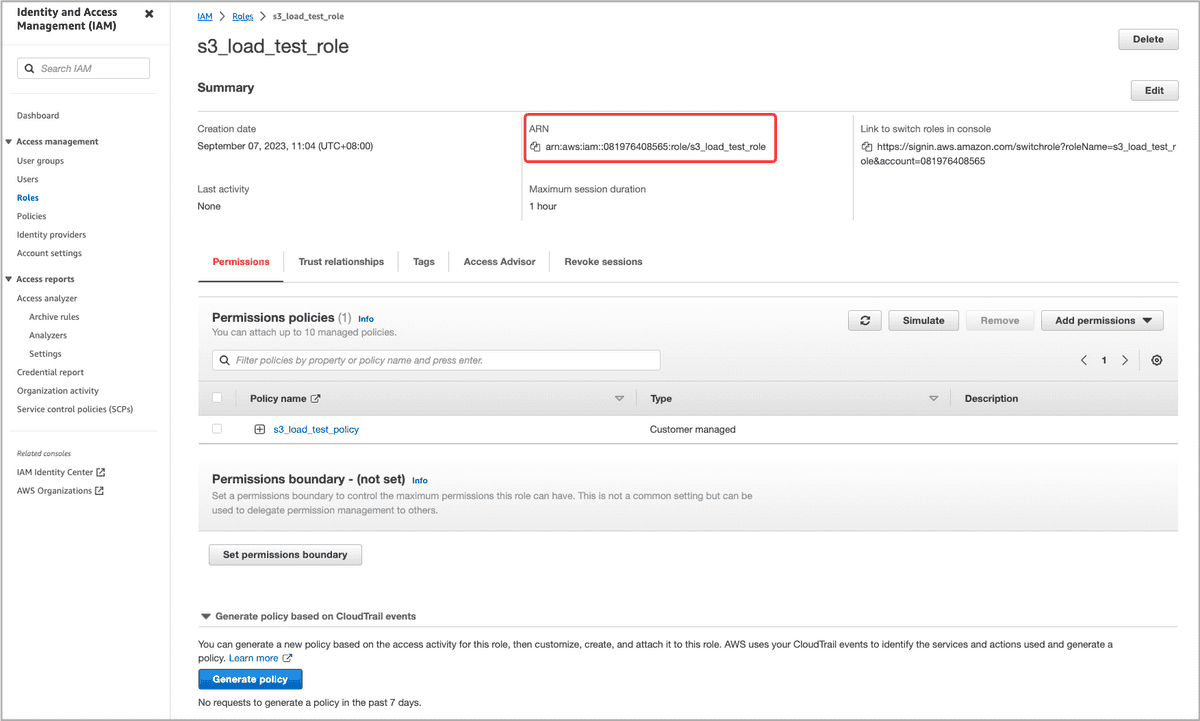
Register the IAM role with your CelerData cloud account
By registering an IAM role in your CelerData cloud account, you allow your CelerData cloud account to assume the role, and thus your CelerData cloud account is granted all resource access permissions included in the IAM policy attached to the role. Only an IAM role registered in your CelerData cloud account can be used as a valid security credential for accessing the specified AWS resource.
To register your IAM role with your CelerData cloud account, follow these steps:
Sign in to the CelerData Cloud Serverless console.
In the left-side navigation tree, choose Integration.
On the View all or Cloud tab of the page that appears, choose AWS IAM.
NOTE
On the View all tab, you can view all integrations in your CelerData account. You can manage them as an account administrator.
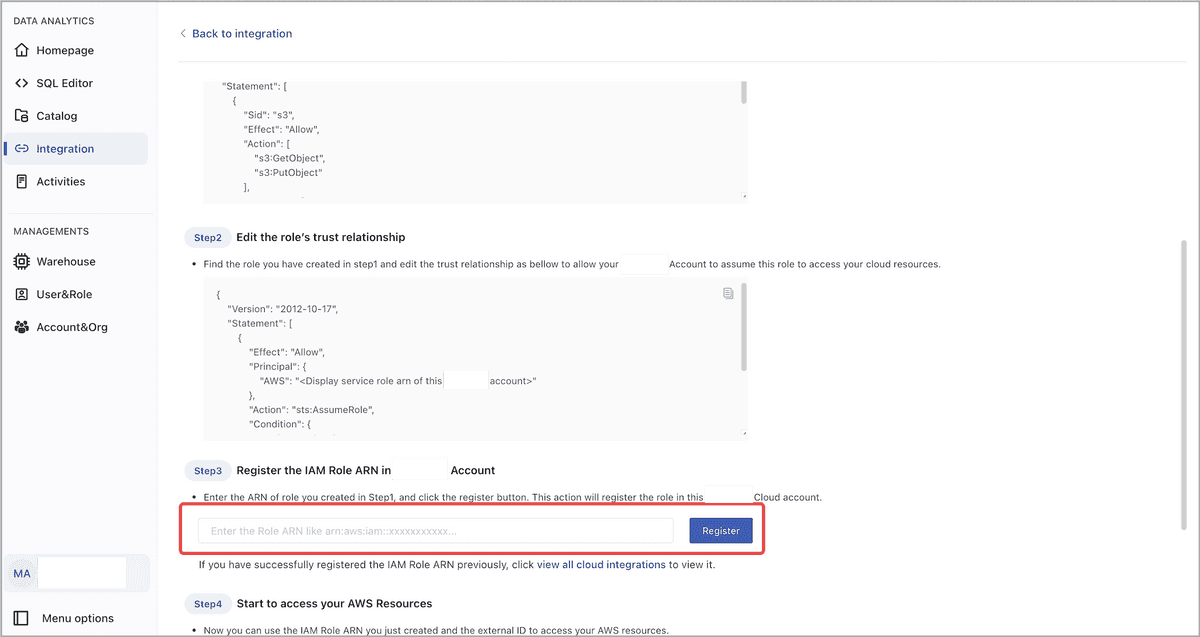
On the page that appears, scroll down to the Step 3 Register the IAM Role ARN in CelerData Account section, enter the IAM role's ARN you have saved earlier, and then click Register.
Preparation for IAM user-based authentication
Sign in to the AWS IAM console.
In the left-side navigation pane, choose Access management > Users.
On the Users page, click Create user.
The Create user wizard appears, helping you create an IAM user with three steps.
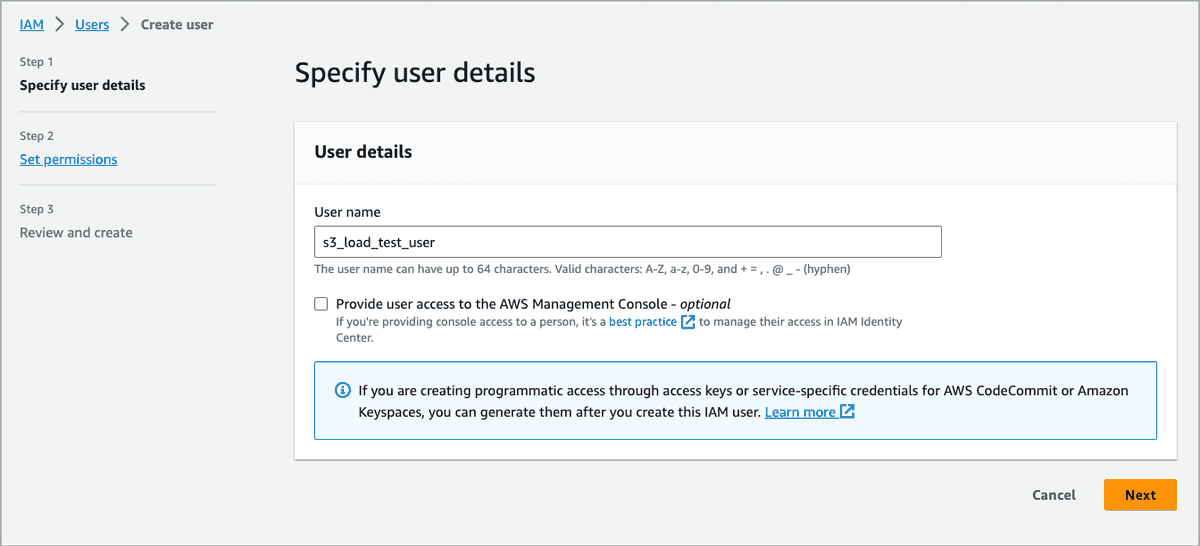
In the Specify user details step, enter a user name, for example, s3_load_test_user, and click Next.
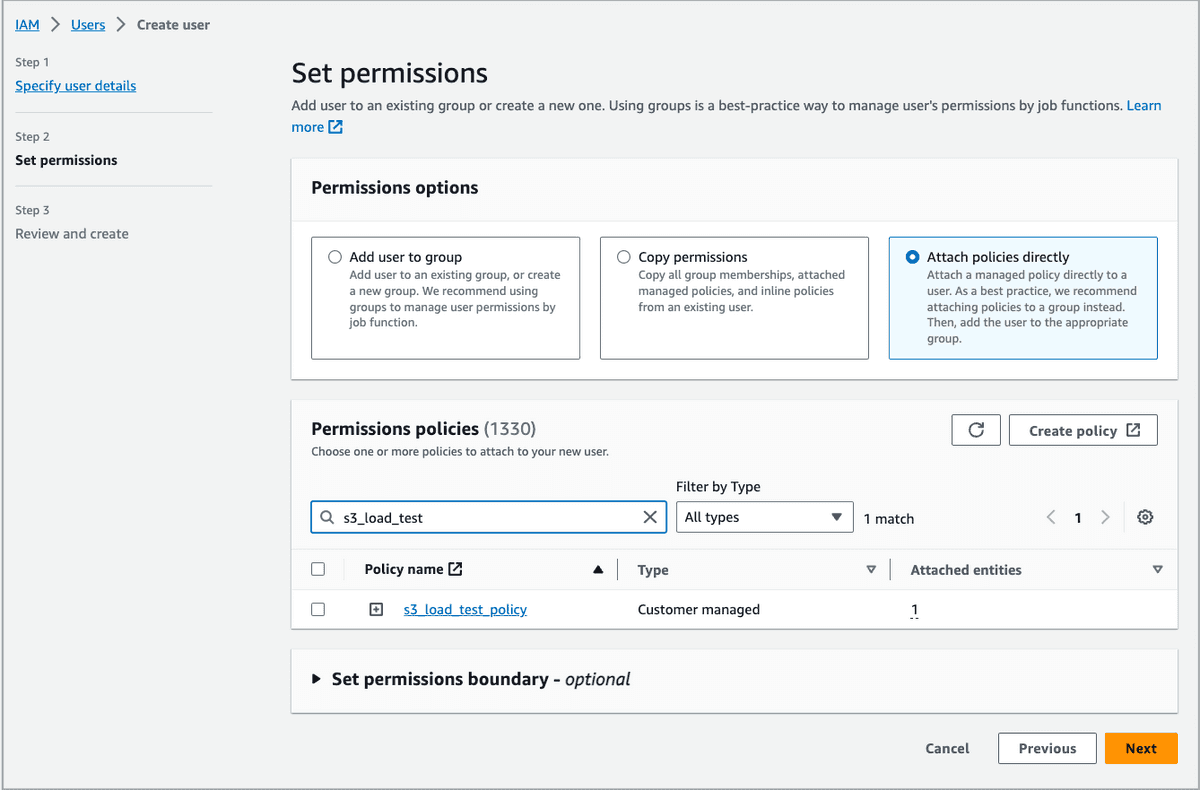
In the Set permissions step, select Attach policies directly. Find the IAM policy you want to attach to the IAM role and select the check box preceding it. Then, click Next.
In the Review and create step, directly click Create user.
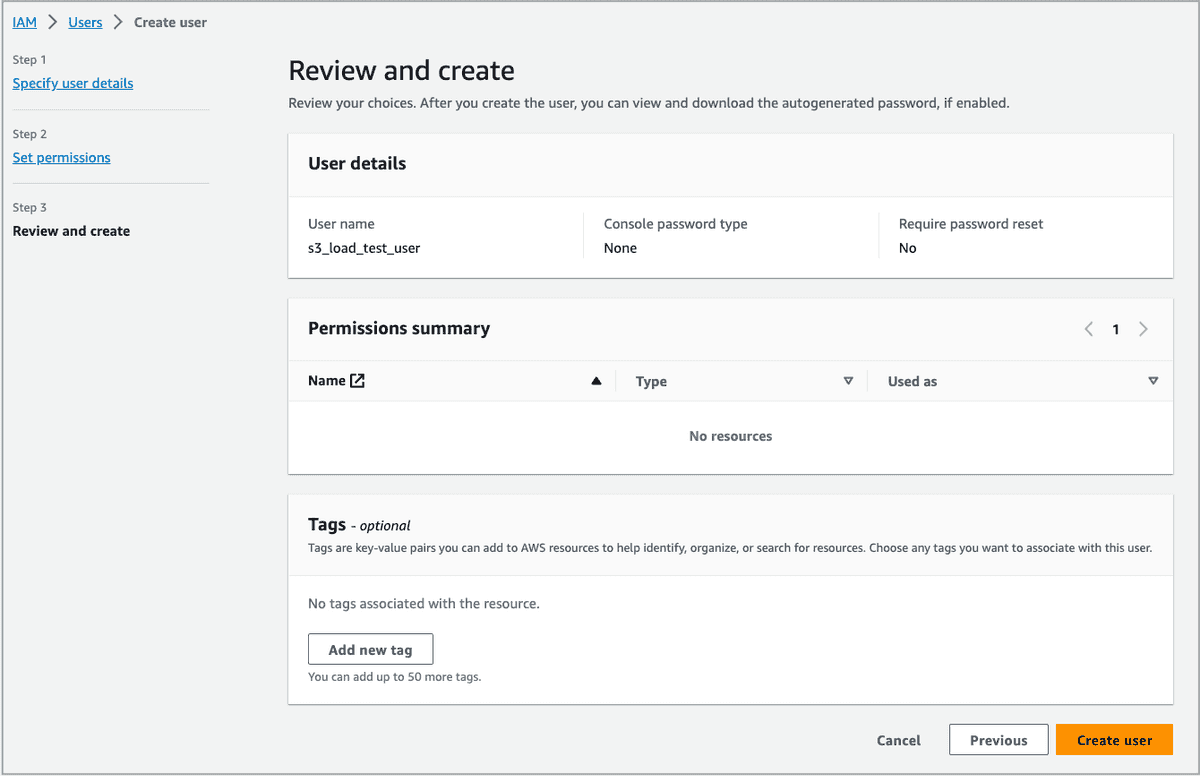
You are then directed to the Users page, where you can view the IAM user you just created.
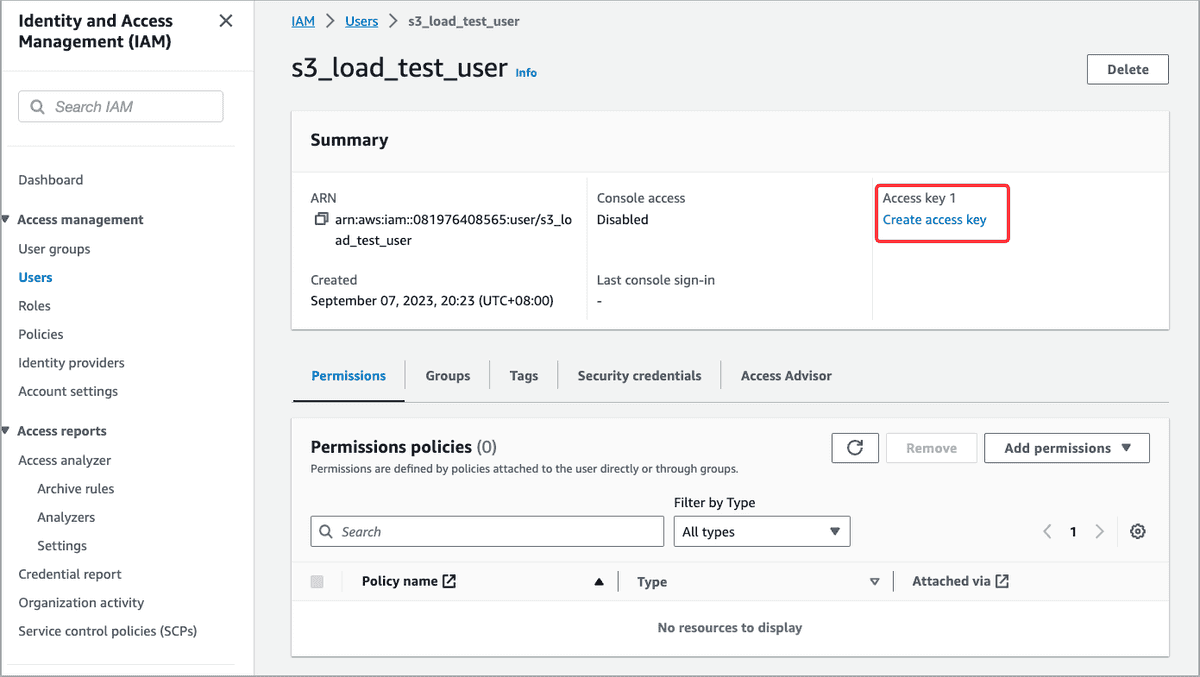
On the Users page, find the IAM user you just created and click its name.
On the user's details page, click Create access key to create an access key pair.
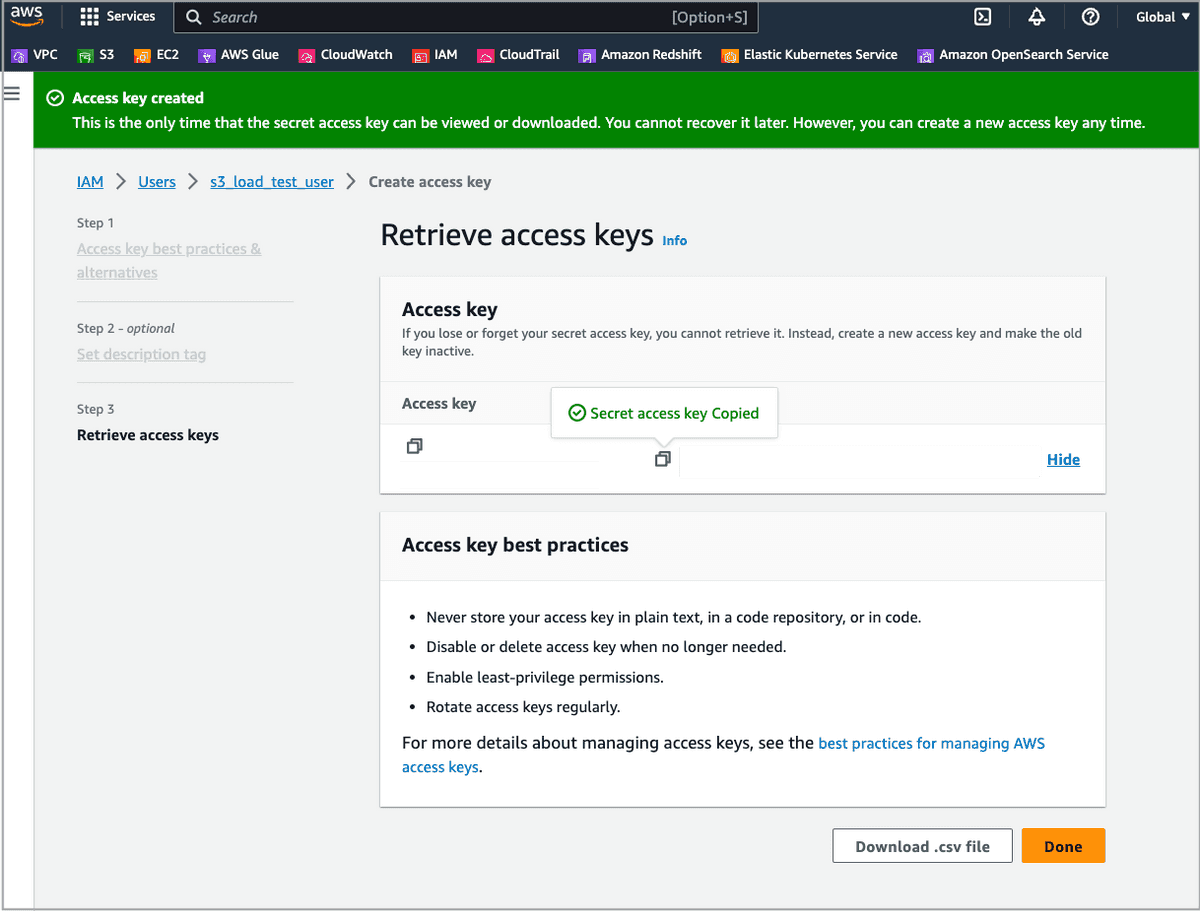
After the access key pair is generated, copy the access key and secret key and save them to a location that you can access later. You will need to embed the access key and secret key into SQL commands, thereby enabling access to cloud resources through the SQL commands.
Configure AWS credentials in SQL commands
Authentication parameters for accessing AWS S3
IAM user-based authentication
Configure the following parameters in your SQL commands:
| Parameter | Description |
|---|---|
| aws.s3.use_instance_profile | Specifies whether to enable assumed role-based authentication. Valid values: true and false. Default value: false. To use IAM user-based authentication, set this parameter to false. |
| aws.s3.region | The region in which your AWS S3 bucket resides. Example: us-west-1. |
| aws.s3.access_key | The access key of the IAM user you just created. |
| aws.s3.secret_key | The secret key of the IAM user you just created. |
Assumed role-based authentication
Configure the following parameters in your SQL commands:
| Parameter | Description |
|---|---|
| aws.s3.use_aws_sdk_default_behavior | For authentication based on a cross-account IAM role, set this parameter to true. |
| aws.s3.external_id | Enter the AWS external ID of your logged-in CelerData cloud account, for example, fa6f62b0-d9f4-43ae-ac49-238bcca1a31a. You can obtain the AWS external ID of your logged-in CelerData cloud account from the CelerData Cloud Serverless homepage. |
| aws.s3.iam_role_arn | The ARN of the IAM role you just created. |
Authentication parameters for accessing AWS Glue
IAM user-based authentication
Configure the following parameters in your SQL commands:
| Parameter | Description |
|---|---|
| aws.glue.use_instance_profile | Specifies whether to enable assumed role-based authentication. Valid values: true and false. Default value: false. To use IAM user-based authentication, set this parameter to false. |
| aws.glue.region | The region in which your AWS Glue Data Catalog resides. Example: us-west-1. |
| aws.glue.access_key | The access key of the IAM user you created. |
| aws.glue.secret_key | The secret key of the IAM user you created. |
Assumed role-based authentication
Configure the following parameters in your SQL commands:
| Parameter | Description |
|---|---|
| aws.glue.use_aws_sdk_default_behavior | For authentication based on a cross-account IAM role, set this parameter to true. |
| aws.glue.external_id | Enter the AWS external ID of your logged-in CelerData cloud account, for example, fa6f62b0-d9f4-43ae-ac49-238bcca1a31a. You can obtain the AWS external ID of your logged-in CelerData cloud account from the CelerData Cloud Serverless homepage. |
| aws.glue.iam_role_arn | The ARN of the IAM role you just created. |
Integration examples
Ingestion
CelerData Cloud Serverless supports bulk loads from AWS S3. See Batch load data from AWS Cloud Storage.
This example assumes that you use assumed role-based authentication and that your source CSV data files have the same schema as your destination table and use commas (,) as their column separators.
Execute the following statement to load all your CSV files stored in the input folder of your AWS S3 bucket bucket_s3 into table1 which belongs to database s3_load_test_database:
LOAD LABEL s3_load_test_database.s3_load_job_1001
(
    DATA INFILE("s3://bucket_s3/input/*")
    INTO TABLE table1
    COLUMNS TERMINATED BY ","
    (id, name, score)
)
WITH BROKER
(
    "aws.s3.use_aws_sdk_default_behavior" = "true",
    "aws.s3.region" = "us-west-2",
    "aws.s3.external_id" = "fa6f62b0-d9f4-43ae-ac49-238bcca1a31a",
    "aws.s3.iam_role_arn" = "arn:aws:iam::805976108162:role/s3_load_test_role"
);
External catalog
CelerData Cloud Serverless supports the following types of catalogs:
This example assumes that you use IAM user-based authentication to create a Hive catalog which uses AWS Glue as metastore to query data from your Hive cluster.
Execute the following statement to create a Hive catalog named hive_catalog_glue:
CREATE EXTERNAL CATALOG hive_catalog_glue
PROPERTIES
(
    "type" = "hive",
    "hive.metastore.type" = "glue",
    "aws.glue.use_instance_profile" = "false",
    "aws.glue.access_key" = "******",
    "aws.glue.secret_key" = "******",
    "aws.glue.region" = "us-west-2",
    "aws.s3.use_instance_profile" = "false",
    "aws.s3.access_key" = "******",
    "aws.s3.secret_key" = "******",
    "aws.s3.region" = "us-west-2"
);