- Release Notes
- Introduction to CelerData Cloud Serverless
- Quick Start
- Sign up for CelerData Cloud Serverless
- A quick tour of the console
- Connect to CelerData Cloud Serverless
- Create an IAM integration
- Create and assign a warehouse
- Create an external catalog
- Load data from cloud storage
- Load data from Apache Kafka/Confluent Cloud
- Try your first query
- Invite new users
- Design data access control policy
- Warehouses
- Catalog, database, table, view, and MV
- Overview of database objects
- Catalog
- Table types
- Asynchronous materialized views
- Data Loading
- Data access control
- Networking and private connectivity
- Usage and Billing
- Organization and Account
- Integration
- Query Acceleration
- Reference
- AWS IAM policies
- Information Schema
- Overview
- be_bvars
- be_cloud_native_compactions
- be_compactions
- character_sets
- collations
- column_privileges
- columns
- engines
- events
- global_variables
- key_column_usage
- load_tracking_logs
- loads
- materialized_views
- partitions
- pipe_files
- pipes
- referential_constraints
- routines
- schema_privileges
- schemata
- session_variables
- statistics
- table_constraints
- table_privileges
- tables
- tables_config
- task_runs
- tasks
- triggers
- user_privileges
- views
- Data Types
- System Metadatabase
- Keywords
- SQL Statements
- Account Management
- Data Definition
- CREATE TABLE
- ALTER TABLE
- DROP CATALOG
- CREATE TABLE LIKE
- REFRESH EXTERNAL TABLE
- RESTORE
- SET CATALOG
- DROP TABLE
- RECOVER
- USE
- CREATE MATERIALIZED VIEW
- DROP DATABASE
- ALTER MATERIALIZED VIEW
- DROP REPOSITORY
- CANCEL RESTORE
- DROP INDEX
- DROP MATERIALIZED VIEW
- CREATE DATABASE
- CREATE TABLE AS SELECT
- BACKUP
- CANCEL BACKUP
- CREATE REPOSITORY
- CREATE INDEX
- Data Manipulation
- INSERT
- SHOW CREATE DATABASE
- SHOW BACKUP
- SHOW ALTER MATERIALIZED VIEW
- SHOW CATALOGS
- SHOW CREATE MATERIALIZED VIEW
- SELECT
- SHOW ALTER
- SHOW MATERIALIZED VIEW
- RESUME ROUTINE LOAD
- ALTER ROUTINE LOAD
- SHOW TABLES
- STREAM LOAD
- SHOW PARTITIONS
- CANCEL REFRESH MATERIALIZED VIEW
- SHOW CREATE CATALOG
- SHOW ROUTINE LOAD TASK
- SHOW RESTORE
- CREATE ROUTINE LOAD
- STOP ROUTINE LOAD
- SHOW DATABASES
- BROKER LOAD
- SHOW ROUTINE LOAD
- PAUSE ROUTINE LOAD
- SHOW SNAPSHOT
- SHOW CREATE TABLE
- CANCEL LOAD
- REFRESH MATERIALIZED VIEW
- SHOW REPOSITORIES
- SHOW LOAD
- Administration
- DESCRIBE
- SQL Functions
- Function List
- String Functions
- CONCAT
- HEX
- LOWER
- SPLIT
- LPAD
- SUBSTRING
- PARSE_URL
- INSTR
- REPEAT
- LCASE
- REPLACE
- HEX_DECODE_BINARY
- RPAD
- SPLIT_PART
- STRCMP
- SPACE
- CHARACTER_LENGTH
- URL_ENCODE
- APPEND_TAILING_CHAR_IF_ABSENT
- LTRIM
- HEX_DECODE_STRING
- URL_DECODE
- LEFT
- STARTS_WITH
- CONCAT
- GROUP_CONCAT
- STR_TO_MAP
- STRLEFT
- STRRIGHT
- MONEY_FORMAT
- RIGHT
- SUBSTRING_INDEX
- UCASE
- TRIM
- FIND_IN_SET
- RTRIM
- ASCII
- UPPER
- REVERSE
- LENGTH
- UNHEX
- ENDS_WITH
- CHAR_LENGTH
- NULL_OR_EMPTY
- LOCATE
- CHAR
- Predicate Functions
- Map Functions
- Binary Functions
- Geospatial Functions
- Lambda Expression
- Utility Functions
- Bitmap Functions
- BITMAP_SUBSET_LIMIT
- TO_BITMAP
- BITMAP_AGG
- BITMAP_FROM_STRING
- BITMAP_OR
- BITMAP_REMOVE
- BITMAP_AND
- BITMAP_TO_BASE64
- BITMAP_MIN
- BITMAP_CONTAINS
- SUB_BITMAP
- BITMAP_UNION
- BITMAP_COUNT
- BITMAP_UNION_INT
- BITMAP_XOR
- BITMAP_UNION_COUNT
- BITMAP_HAS_ANY
- BITMAP_INTERSECT
- BITMAP_AND_NOT
- BITMAP_TO_STRING
- BITMAP_HASH
- INTERSECT_COUNT
- BITMAP_EMPTY
- BITMAP_MAX
- BASE64_TO_ARRAY
- BITMAP_TO_ARRAY
- Struct Functions
- Aggregate Functions
- RETENTION
- MI
- MULTI_DISTINCT_SUM
- WINDOW_FUNNEL
- STDDEV_SAMP
- GROUPING_ID
- HLL_HASH
- AVG
- HLL_UNION_AGG
- COUNT
- BITMAP
- HLL_EMPTY
- SUM
- MAX_BY
- PERCENTILE_CONT
- COVAR_POP
- PERCENTILE_APPROX
- HLL_RAW_AGG
- STDDEV
- CORR
- COVAR_SAMP
- MIN_BY
- MAX
- VAR_SAMP
- STD
- HLL_UNION
- APPROX_COUNT_DISTINCT
- MULTI_DISTINCT_COUNT
- VARIANCE
- ANY_VALUE
- COUNT_IF
- GROUPING
- PERCENTILE_DISC
- Array Functions
- ARRAY_CUM_SUM
- ARRAY_MAX
- ARRAY_LENGTH
- ARRAY_REMOVE
- UNNEST
- ARRAY_SLICE
- ALL_MATCH
- ARRAY_CONCAT
- ARRAY_SORT
- ARRAY_POSITION
- ARRAY_DIFFERENCE
- ARRAY_CONTAINS
- ARRAY_JOIN
- ARRAY_INTERSECT
- CARDINALITY
- ARRAY_CONTAINS_ALL
- ARRAYS_OVERLAP
- ARRAY_MIN
- ARRAY_MAP
- ELEMENT_AT
- ARRAY_APPEND
- ARRAY_SORTBY
- ARRAY_TO_BITMAP
- ARRAY_GENERATE
- ARRAY_AVG
- ARRAY_FILTER
- ANY_MATCH
- REVERSE
- ARRAY_AGG
- ARRAY_DISTINCT
- ARRAY_SUM
- Condition Functions
- Math Functions
- Date and Time Functions
- DAYNAME
- MINUTE
- FROM_UNIXTIME
- HOUR
- MONTHNAME
- MONTHS_ADD
- ADD_MONTHS
- DATE_SUB
- PREVIOUS_DAY
- TO_TERA_DATA
- MINUTES_SUB
- WEEKS_ADD
- HOURS_DIFF
- UNIX_TIMESTAMP
- DAY
- DATE_SLICE
- DATE
- CURTIME
- SECONDS_SUB
- MONTH
- WEEK
- TO_DATE
- TIMEDIFF
- MONTHS_DIFF
- STR_TO_JODATIME
- WEEK_ISO
- MICROSECONDS_SUB
- TIME_SLICE
- MAKEDATE
- DATE_TRUNC
- JODATIME
- DAYOFWEEK
- YEARS_SUB
- TIMESTAMP_ADD
- HOURS_SUB
- STR2DATE
- TIMESTAMP
- FROM_DAYS
- WEEK_OF_YEAR
- YEAR
- TIMESTAMP_DIFF
- TO_TERA_TIMESTAMP
- DAYOFMONTH
- DAYOFYEAR
- DATE_FORMAT
- MONTHS_SUB
- NEXT_DAY
- MINUTES_DIFF
- DATA_ADD
- MINUTES_ADD
- CURDATE
- DAY_OF_WEEK_ISO
- CURRENt_TIMESTAMP
- STR_TO_DATE
- LAST_DAY
- WEEKS_SUB
- TO_DAYS
- DATEDIFF
- NOW
- TO_ISO8601
- TIME_TO_SEC
- QUARTER
- SECONDS_DIFF
- UTC_TIMESTAMP
- DATA_DIFF
- SECONDS_ADD
- ADDDATE
- WEEKSDIFF
- CONVERT_TZ
- MICROSECONDS_ADD
- SECOND
- YEARS_DIFF
- YEARS_ADD
- HOURS_ADD
- DAYS_SUB
- DAYS_DIFF
- Cryptographic Functions
- Percentile Functions
- Bit Functions
- JSON Functions
- Hash Functions
- Scalar Functions
- Table Functions
Create and assign a warehouse to a user
A warehouse in CelerData Cloud Serverless is an independent group of compute nodes that can provide with you the required compute resources (CPU, memory, and temporary storage) for SQL execution. Each warehouse can be suspended, resumed, and scaled on demand.
This topic describes how to create a warehouse and assign it to a user.
Prerequisites
You must have and activate the cluster_admin role to perform this operation.
Process
Follow these steps to create a warehouse and assign it to a user:
Sign in to the CelerData Cloud Serverless console.
In the left-side navigation pane, choose Warehouse.
On the page that appears, click Add warehouse.
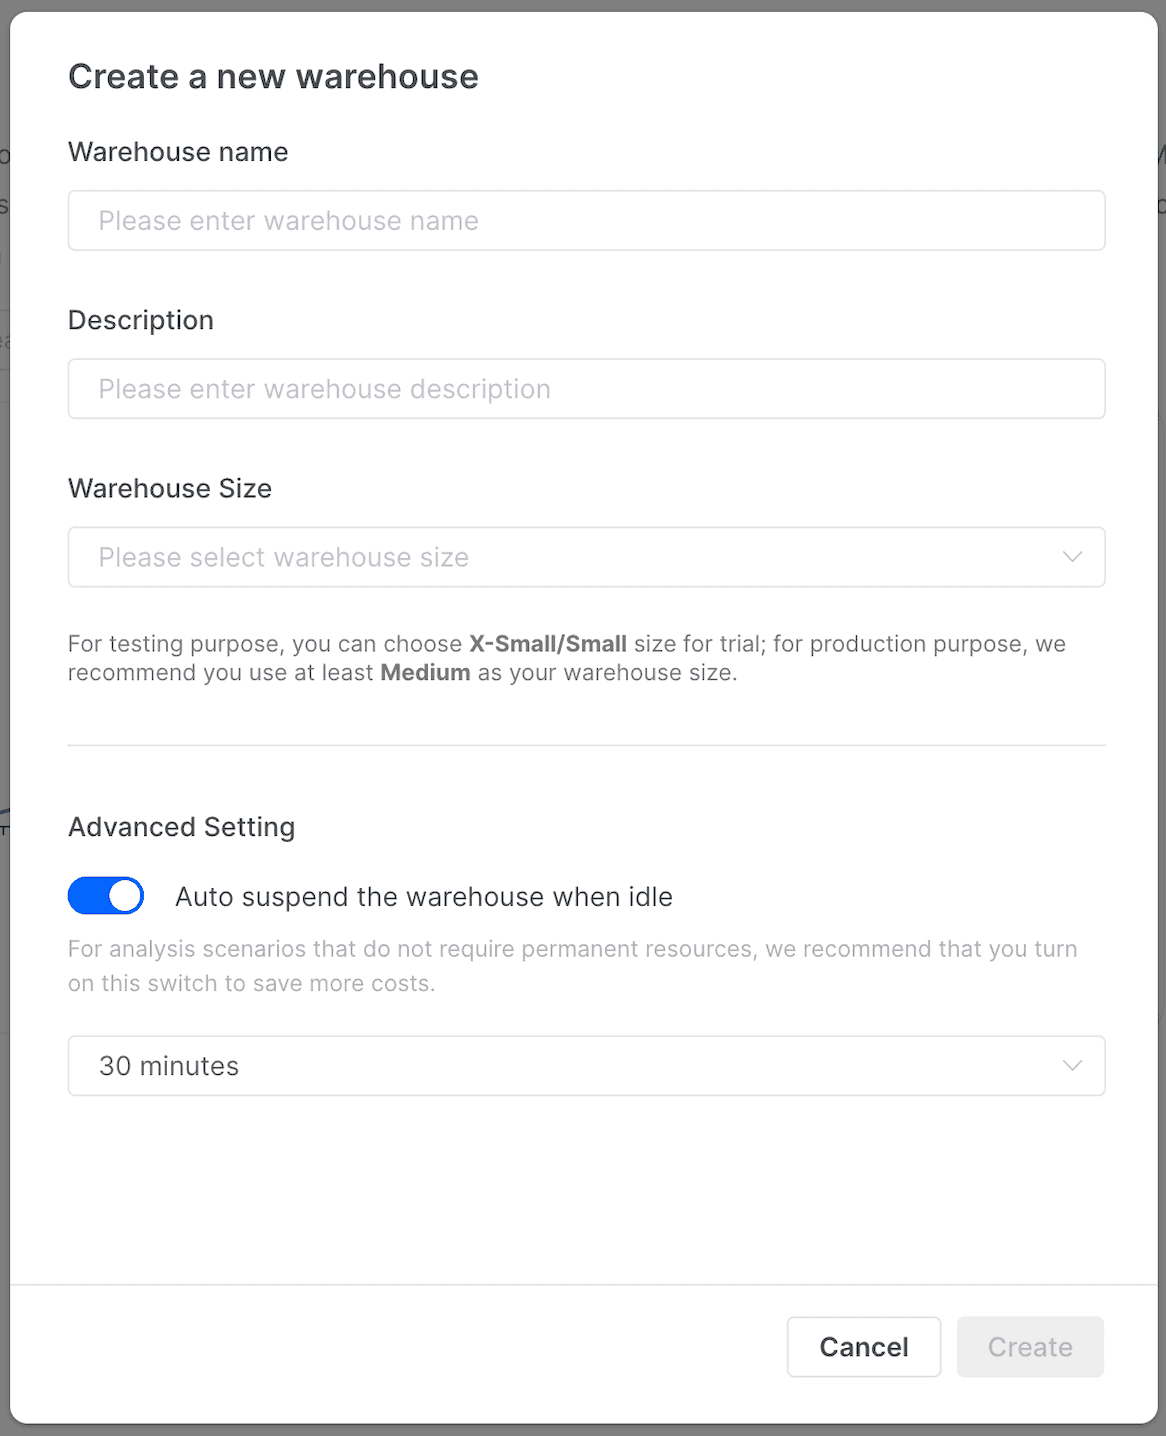
In the dialog box that appears, configure the following parameters and click Create:
- Warehouse name: Enter a name for the warehouse.
- Description: Optionally enter a description for the warehouse.
- Warehouse size: Select a size for the warehouse. Each warehouse size represents a specific amount of compute resources.
- Advanced Setting: Configure the Auto Suspend feature for the warehouse.
Creating a warehouse takes a few minutes.

After the warehouse is successfully created, choose SQL Editor in the left-side navigation pane.
From the drop-down list in the upper-right corner of the editor, select a warehouse in the Running state. If the warehouse is suspended, click Quick resume next to the warehouse to resume the warehouse.
TIPS
- Only warehouses in the Running state can be used to execute SQL statements, and only users with an activated cluster_admin role can resume a suspended warehouse.
- You can find the new warehouse you have just created in the drop-down list.
- You can execute
SHOW WAREHOUSES;in the editor to list the warehouses in your account and their status.
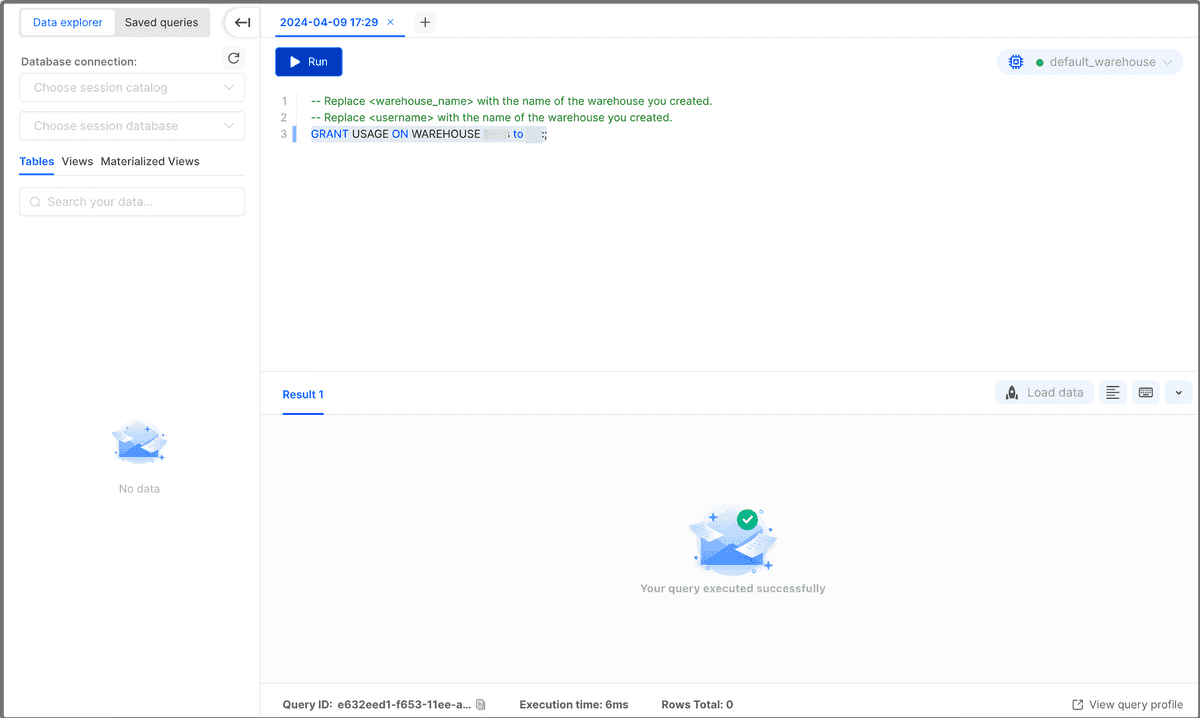
Copy the following statement and paste it to the editor, configure the variables as noted in the comments, and click Run:
-- Replace <warehouse_name> with the name of the warehouse you created.
-- Replace <username> with the user to whom you want to grant the warehouse USAGE privilege.
GRANT USAGE ON WAREHOUSE <warehouse_name> TO <username>;
This statement grants the USAGE privilege of the warehouse to the specified user.
