Quick Deployment on GCP
This topic describes how to perform a quick deployment on Google Cloud. If you want to create a cluster for a production environment, you need to configure and run a manual deployment instead.
Quick deployment launches a Terraform template to help you create the required credentials and provision and configure the necessary GCP resources.
Quick Deployments are not suitable for production use, and are recommended for non-production use only.
Quick Deployments do not support all of the possible configuration options that can be used with manual deployments. Use the manual deployment method if you need to:
- reuse existing data credentials
- reuse deployment credentials
- create new data or deployment credentials
- manually configure network access
Prerequisites
Before proceeding to initiate a quick deployment, you must:
- Create a Google Cloud Project and enable necessary APIs, copy the Project ID from the Project info section of your project dashboard, and save it to a location that you can access later.
- Create a Cloud Storage bucket and a Service Account for Quick Deployment.
Start the deployment wizard
Follow these steps to start the deployment wizard:
- Sign in to the CelerData Cloud BYOC console.
- On the Clusters page, click Create cluster.
- In the dialog box that is displayed, choose Classic cluster or Elastic cluster, choose GCP as your cloud provider, and then click Next.
Configure and run a quick deployment
After you start the deployment wizard, you only need to finish STEP1 of the deployment wizard, and provide necessary information. CelerData will finish the remaining steps.
Configure cluster resources
In STEP1: Configure the cluster resources, configure the cluster based on your business requirements, and optionally click Add label to add one or more labels to the cluster. Then, click Quick deployment to continue. The labels you add here will be attached to the GCP cloud resources associated with the cluster.
- CelerData provides a Free Developer Tier. To use it, you must select instance types that provide 4 CPU cores and 16-GB RAM.
- 4 CPU cores and 16-GB RAM are also the minimum configuration package for CelerData nodes.
Configure the following configuration items.
| Parameter | Required | Description |
|---|---|---|
| Cluster name | Yes | Enter the name of the cluster. The name cannot be changed after the cluster is created. We recommend that you enter an informative name that can help you identify the cluster with ease at a later time. |
| GCP region | Yes | Select the GCP region that hosts the cluster. For information about the regions supported by CelerData, see Supported cloud platforms and regions. |
| Coordinator HA mode | No | Enable or disable the coordinator HA mode. The coordinator HA mode is disabled by default.
|
| Coordinator node size | Yes | Select an instance type for the coordinator nodes in the cluster. For information about the instance types supported by CelerData, see Supported instance types. |
| Compute node size | Yes | Select an instance type for the compute nodes of the default warehouse in the cluster. For information about the instance types supported by CelerData, see Supported instance types. |
| Compute storage size | Yes | Specify the storage size for the compute nodes of the default warehouse. |
| Compute node count | Yes | Specify the number of compute nodes for the default warehouse in the cluster. You can determine the number of compute nodes based on the amount of data to process. The default value is 1. |
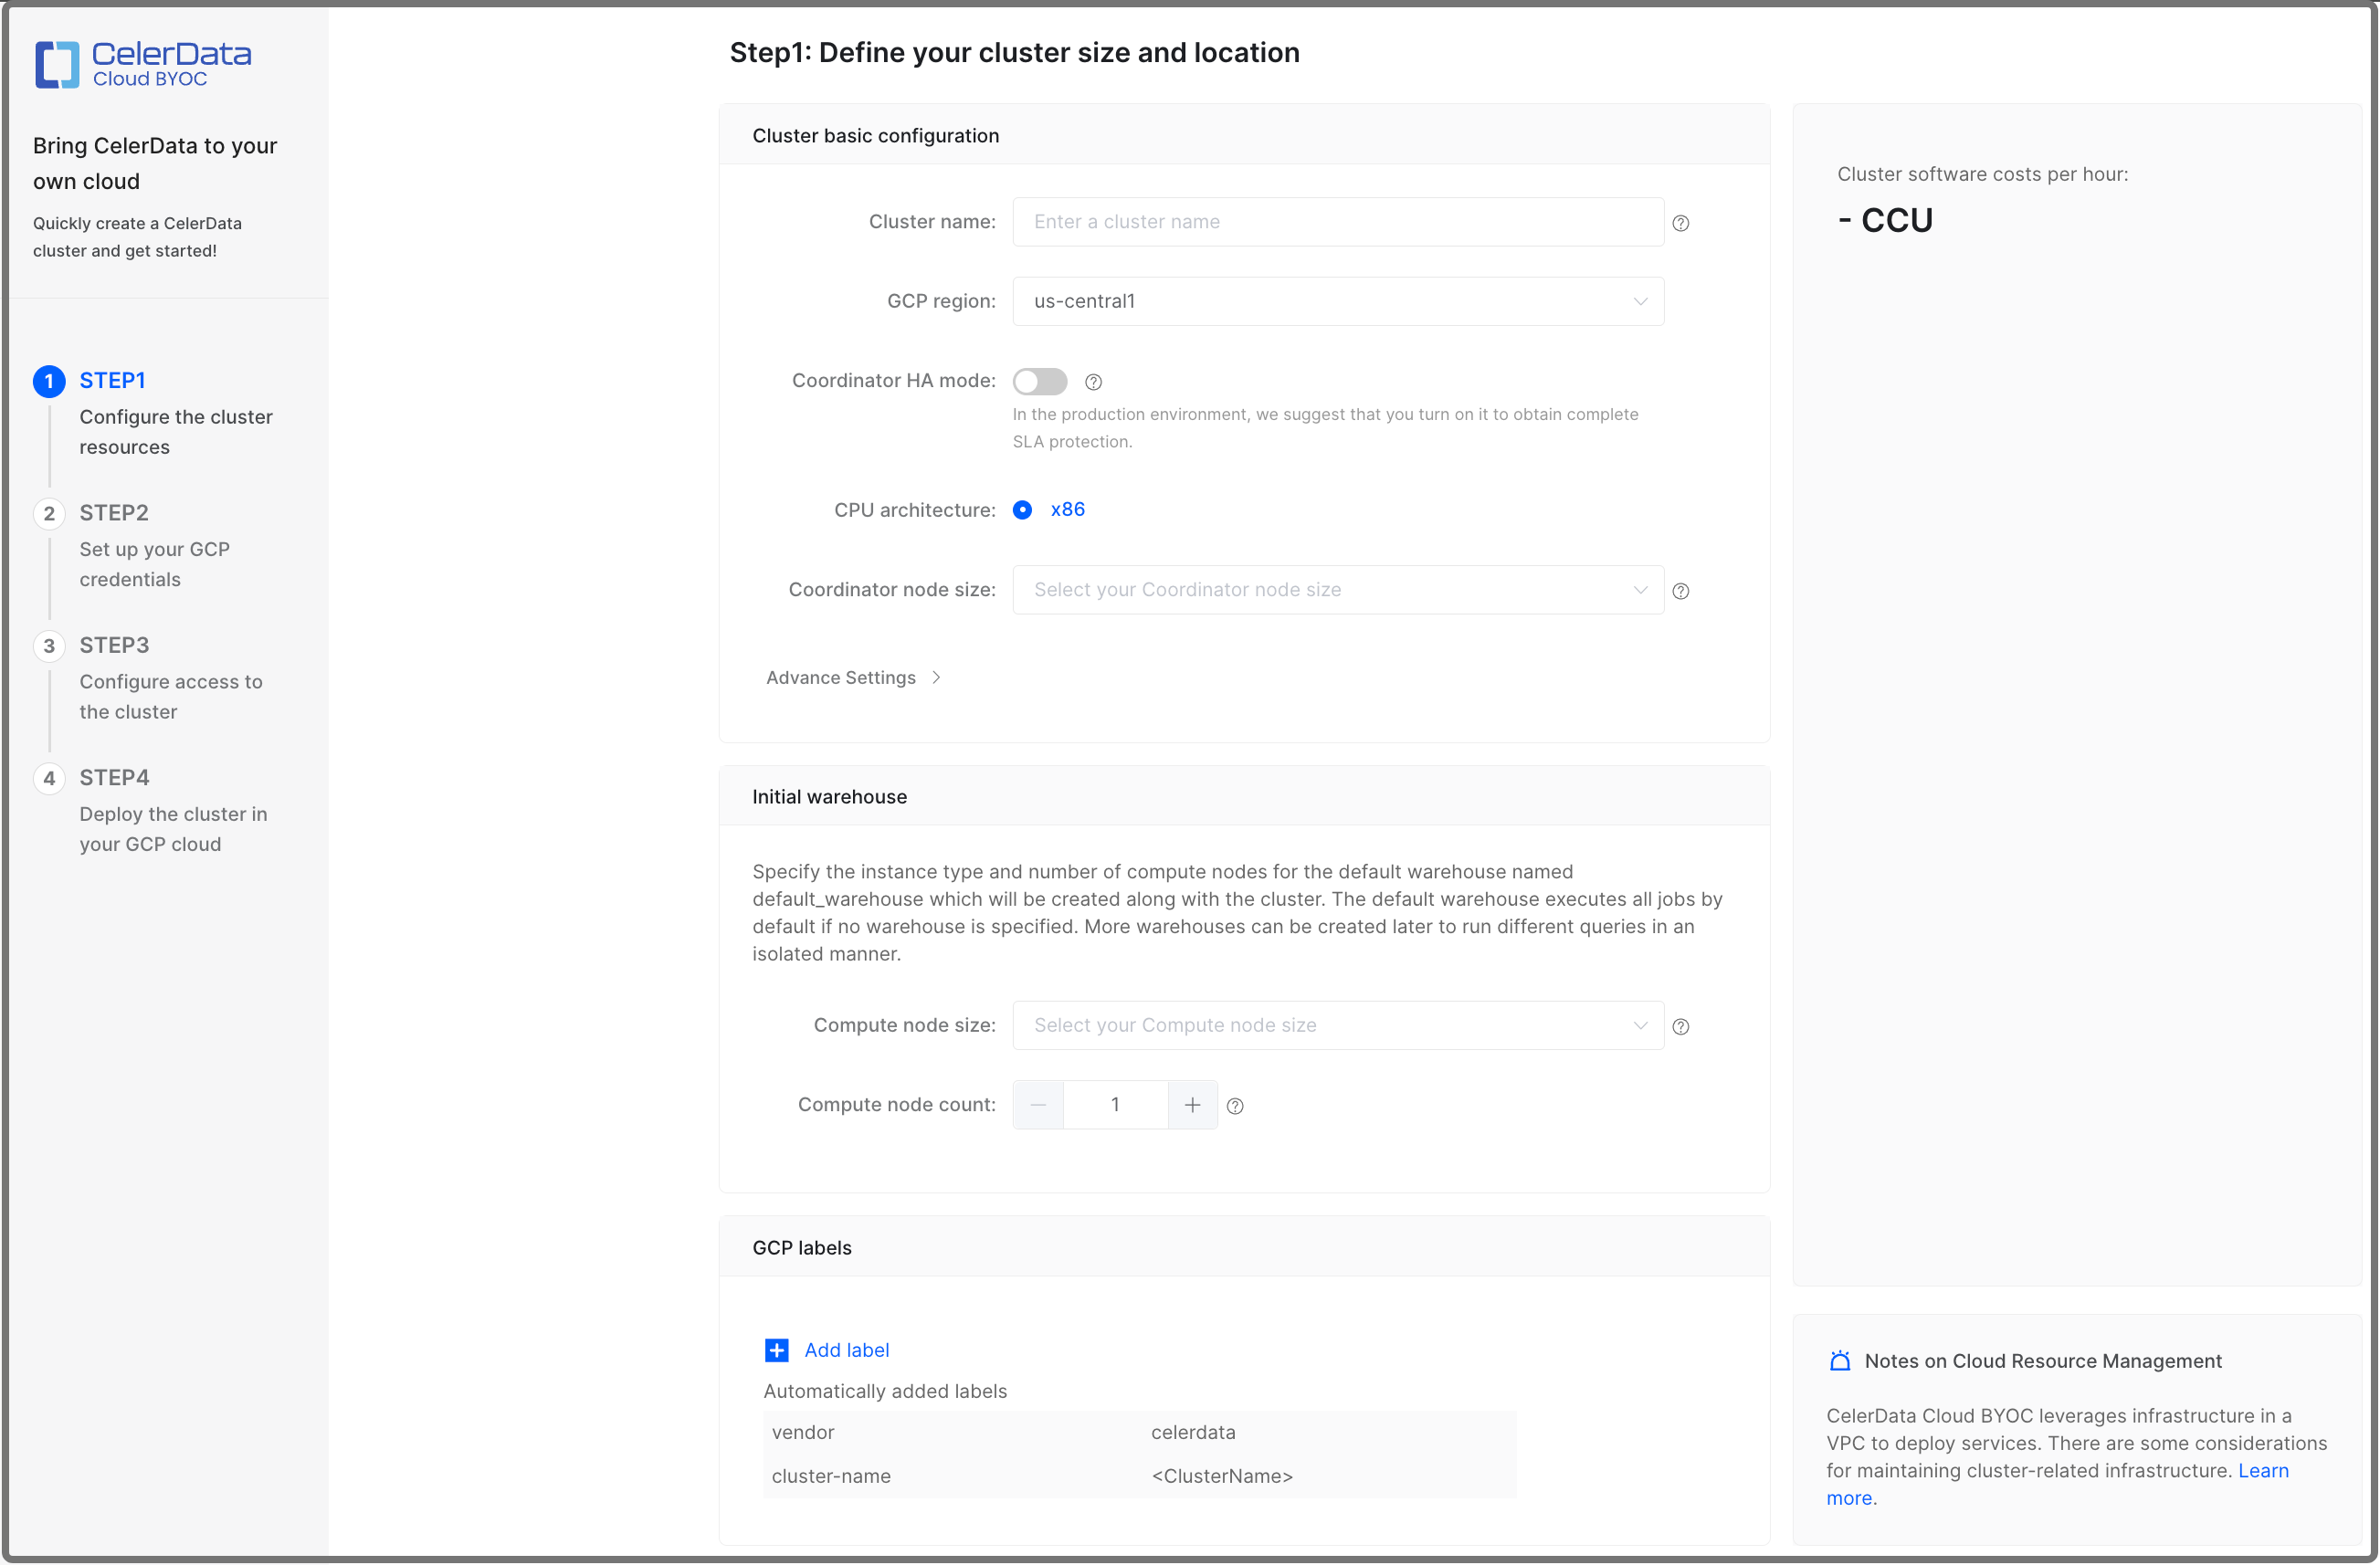
In Advance Settings, you can:
-
Enable Termination Protection.
You can enable Termination Protection to prevent the cluster from being deleted accidentally, thus eliminating the risk of data loss. Once Termination Protection is enabled for a cluster, any attempt to delete the cluster will fail and an error will be returned. To delete the cluster, you will need to manually disable Termination Protection first.
After the cluster is created, you can enable or disable this feature in the Other section on the Cluster parameters tab of the cluster details page.
-
Define a Coordinator Node storage autoscaling policy.
Storage autoscaling is enabled by default. CelerData will automatically scale up the storage size based on the policy when it detects that you are running out of the preset storage space.
noteKeeping storage autoscaling enabled is strongly recommended if your cluster has an unpredictable workload, which can exhaust the storage quickly and thereby cause critical cluster failures.
To define a storage autoscaling policy, follow these steps:
-
Set the storage usage threshold (in percentage) that triggers an autoscaling operation. You can set this threshold between 80% to 90%. When the storage usage of a node reached this threshold and lasted for over five minutes, CelerData will scale up its storage by the step size you defined in the following procedure.
-
Set the step size of each autoscaling operation. You can choose to set the step size in fixed size (GB) or percentage, for example, 50 GB or 15% (of the original storage size).
-
Set the maximum storage size of each node. CelerData will stop scaling up the storage when its size reaches this threshold.
note- A minimum of four hours is mandatory as the interval between two scaling operations (including manual scaling and autoscaling).
- The maximum size of each storage is 64 TB.
- Compute Nodes in Elastic clusters do not support storage autoscaling.
-
Launch resources in Google Cloud
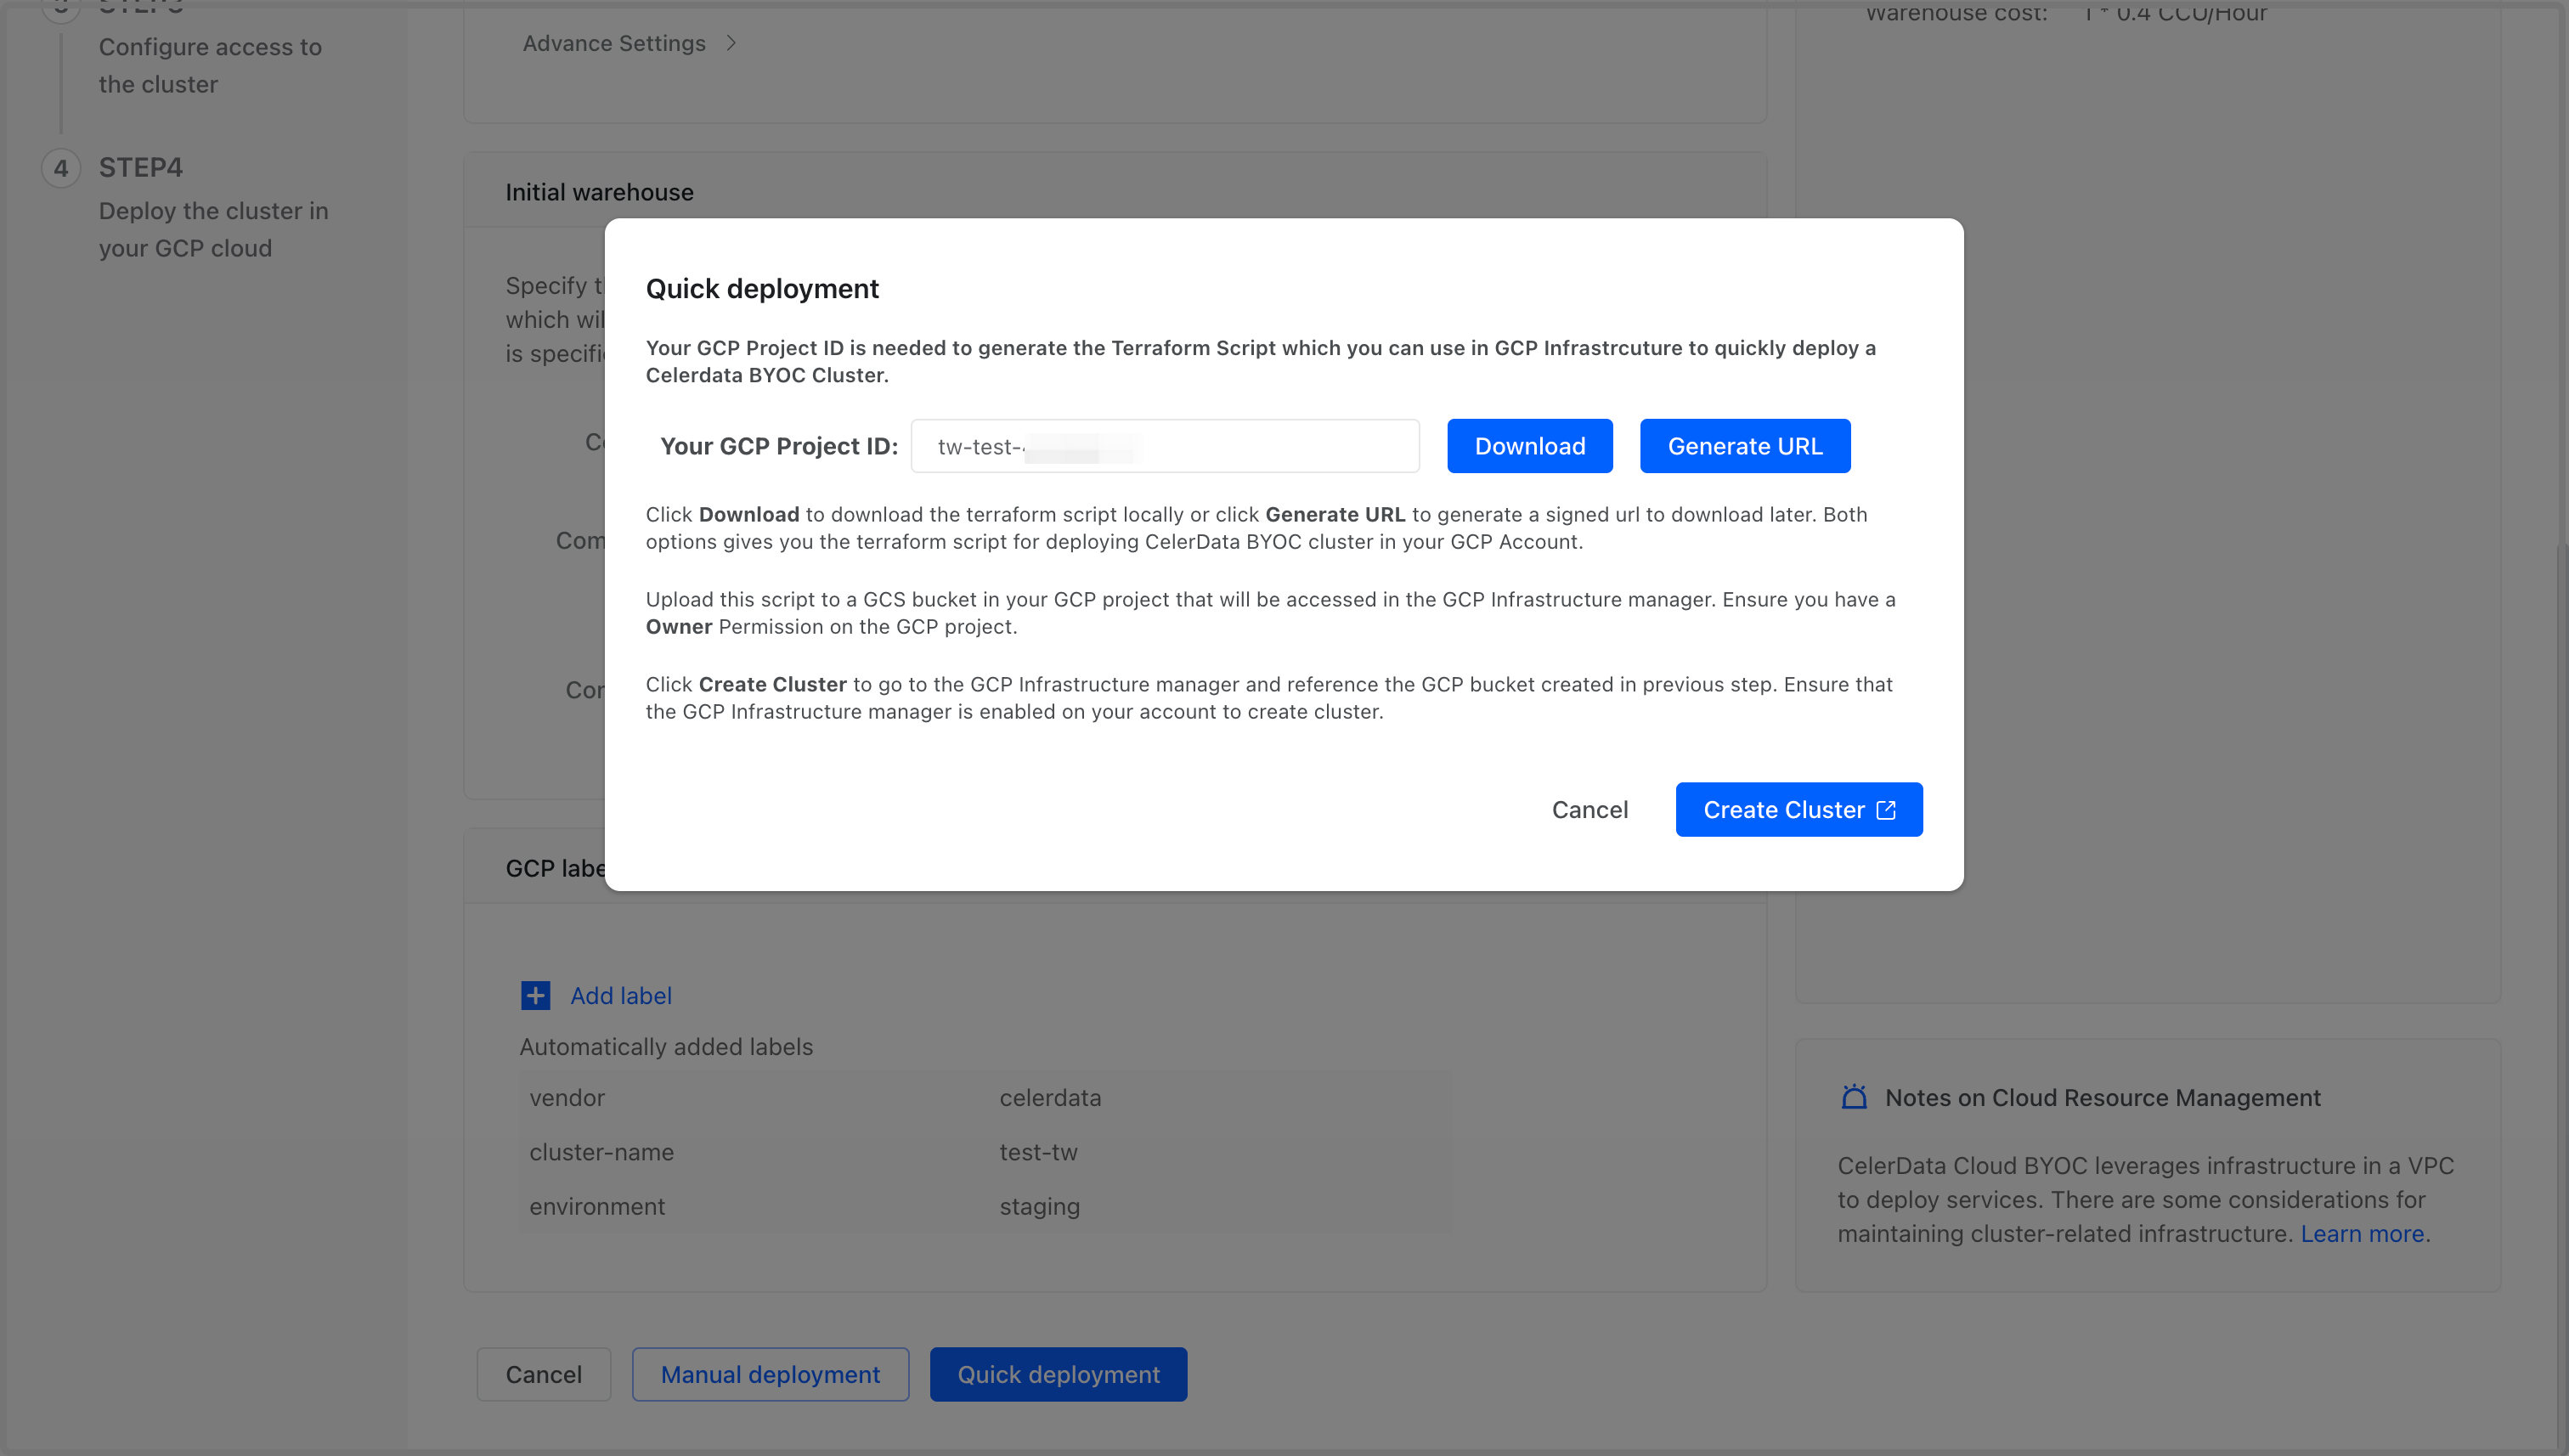
On the Quick deployment dialog box, follow these steps:
-
Paste your Google Cloud Project ID you copied earlier to the Your GCP Project ID field.
-
Click Download to download the script package file directly, or click Generate URL to generate a signed URL for downloading the file later. The scripts in the package are templates for Google Could Infrastructure Manager to launch and manage necessary resources for your cluster.
-
Sign in to your project in the Google Cloud console, and upload the package file to the Cloud Storage bucket you created for quick deployment. Note that you do not need to decompress the package. For detailed instructions on uploading files to a Cloud Storage bucket, see Google Cloud Official Document - Upload an object to a bucket.
-
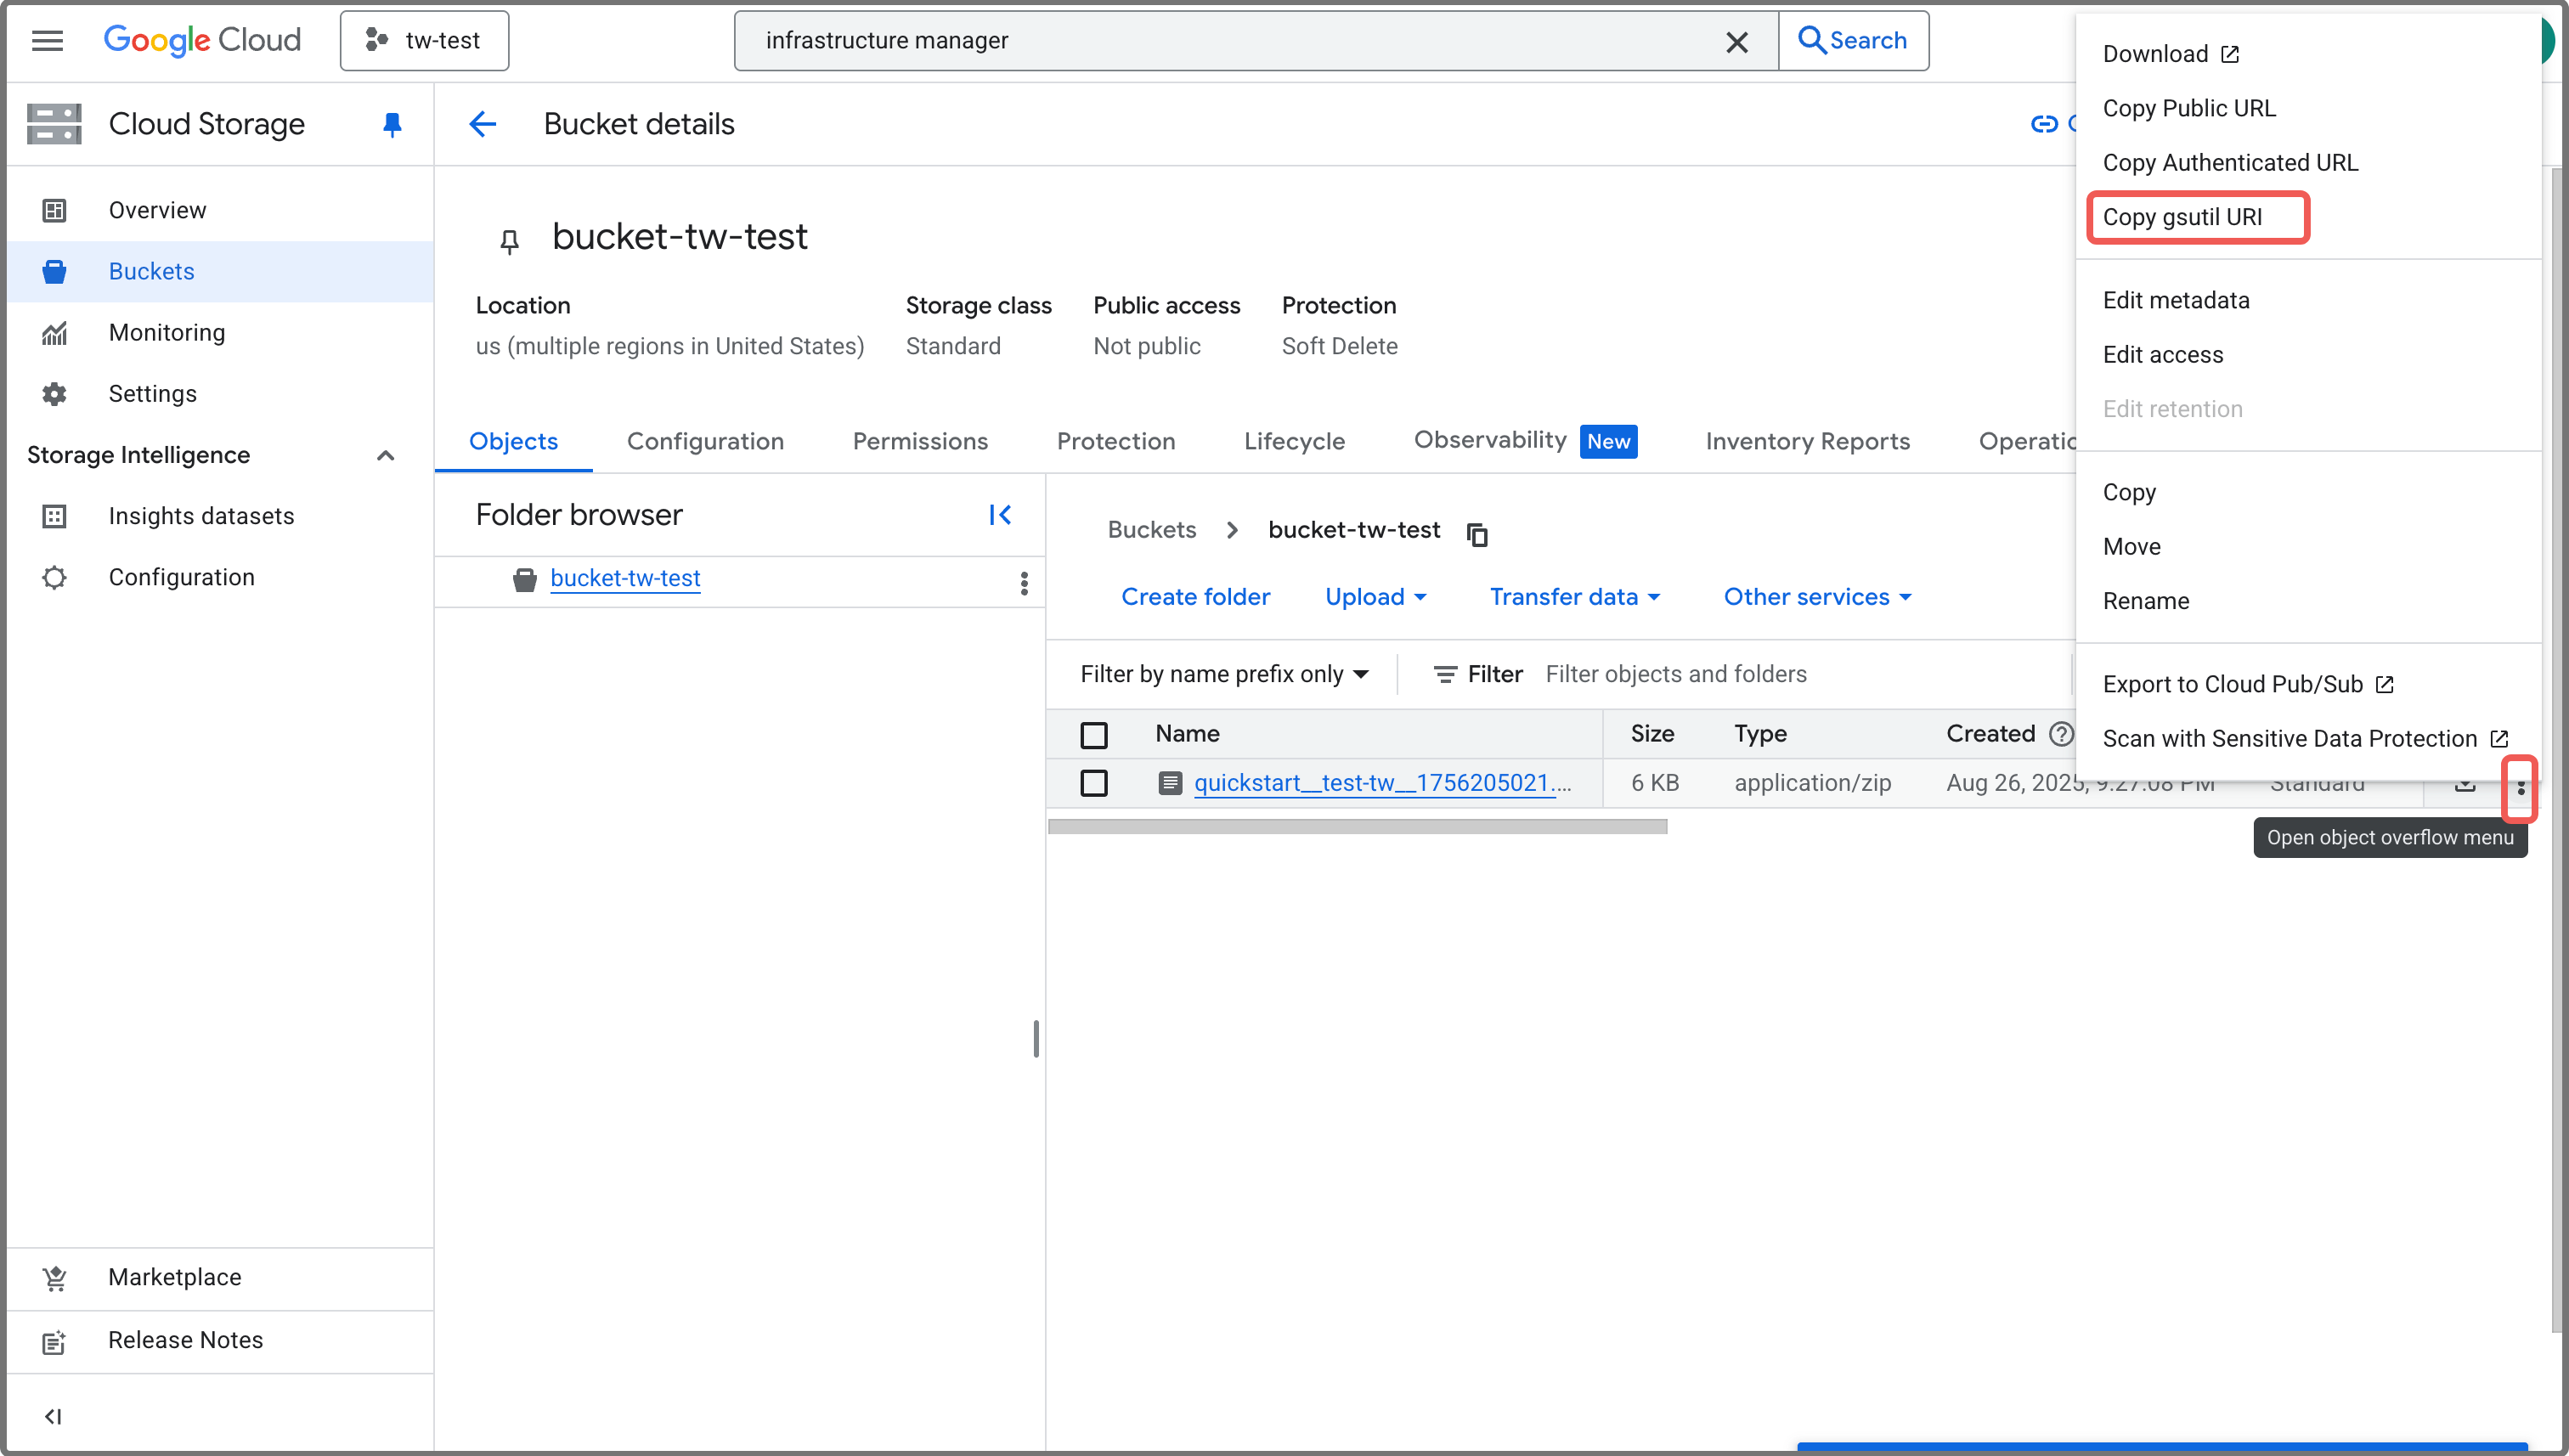
After the package file is successfully uploaded, copy the gsutil URI of the package file you have uploaded, and save it to a location that you can access later.
notegsutil URI is in the format of
gs://<BUCKET_NAME>/<FOLDER_NAME>/<FILE_NAME>.If you do not know the gsutil URI of the uploaded package, follow these steps to obtain the URI from Google Cloud console:
- Sign in to your project in the Google Cloud console.
- Expand the left-side navigation menu, and choose Cloud Storage > Buckets.
- Click the bucket to which you uploaded the package file.
- On the Bucket details page, find the record of the package file.
- Click the More actions (⋮) button on the right of the record, and select Copy gsutil URI to copy the URI.
-
Click Create Cluster.
You will then be redirected to the Infrastructure Manager page of the Google Cloud console.
Do not close the CelerData Cloud BYOC console after you have been redirected. You will need to return to the console later to finish the deployment.
On the Infrastructure Manager page, follow these steps:
-
Click Create new deployment to navigate to the Create new Terraform deployment page.
-
In the Deployment details step, configure as follows:
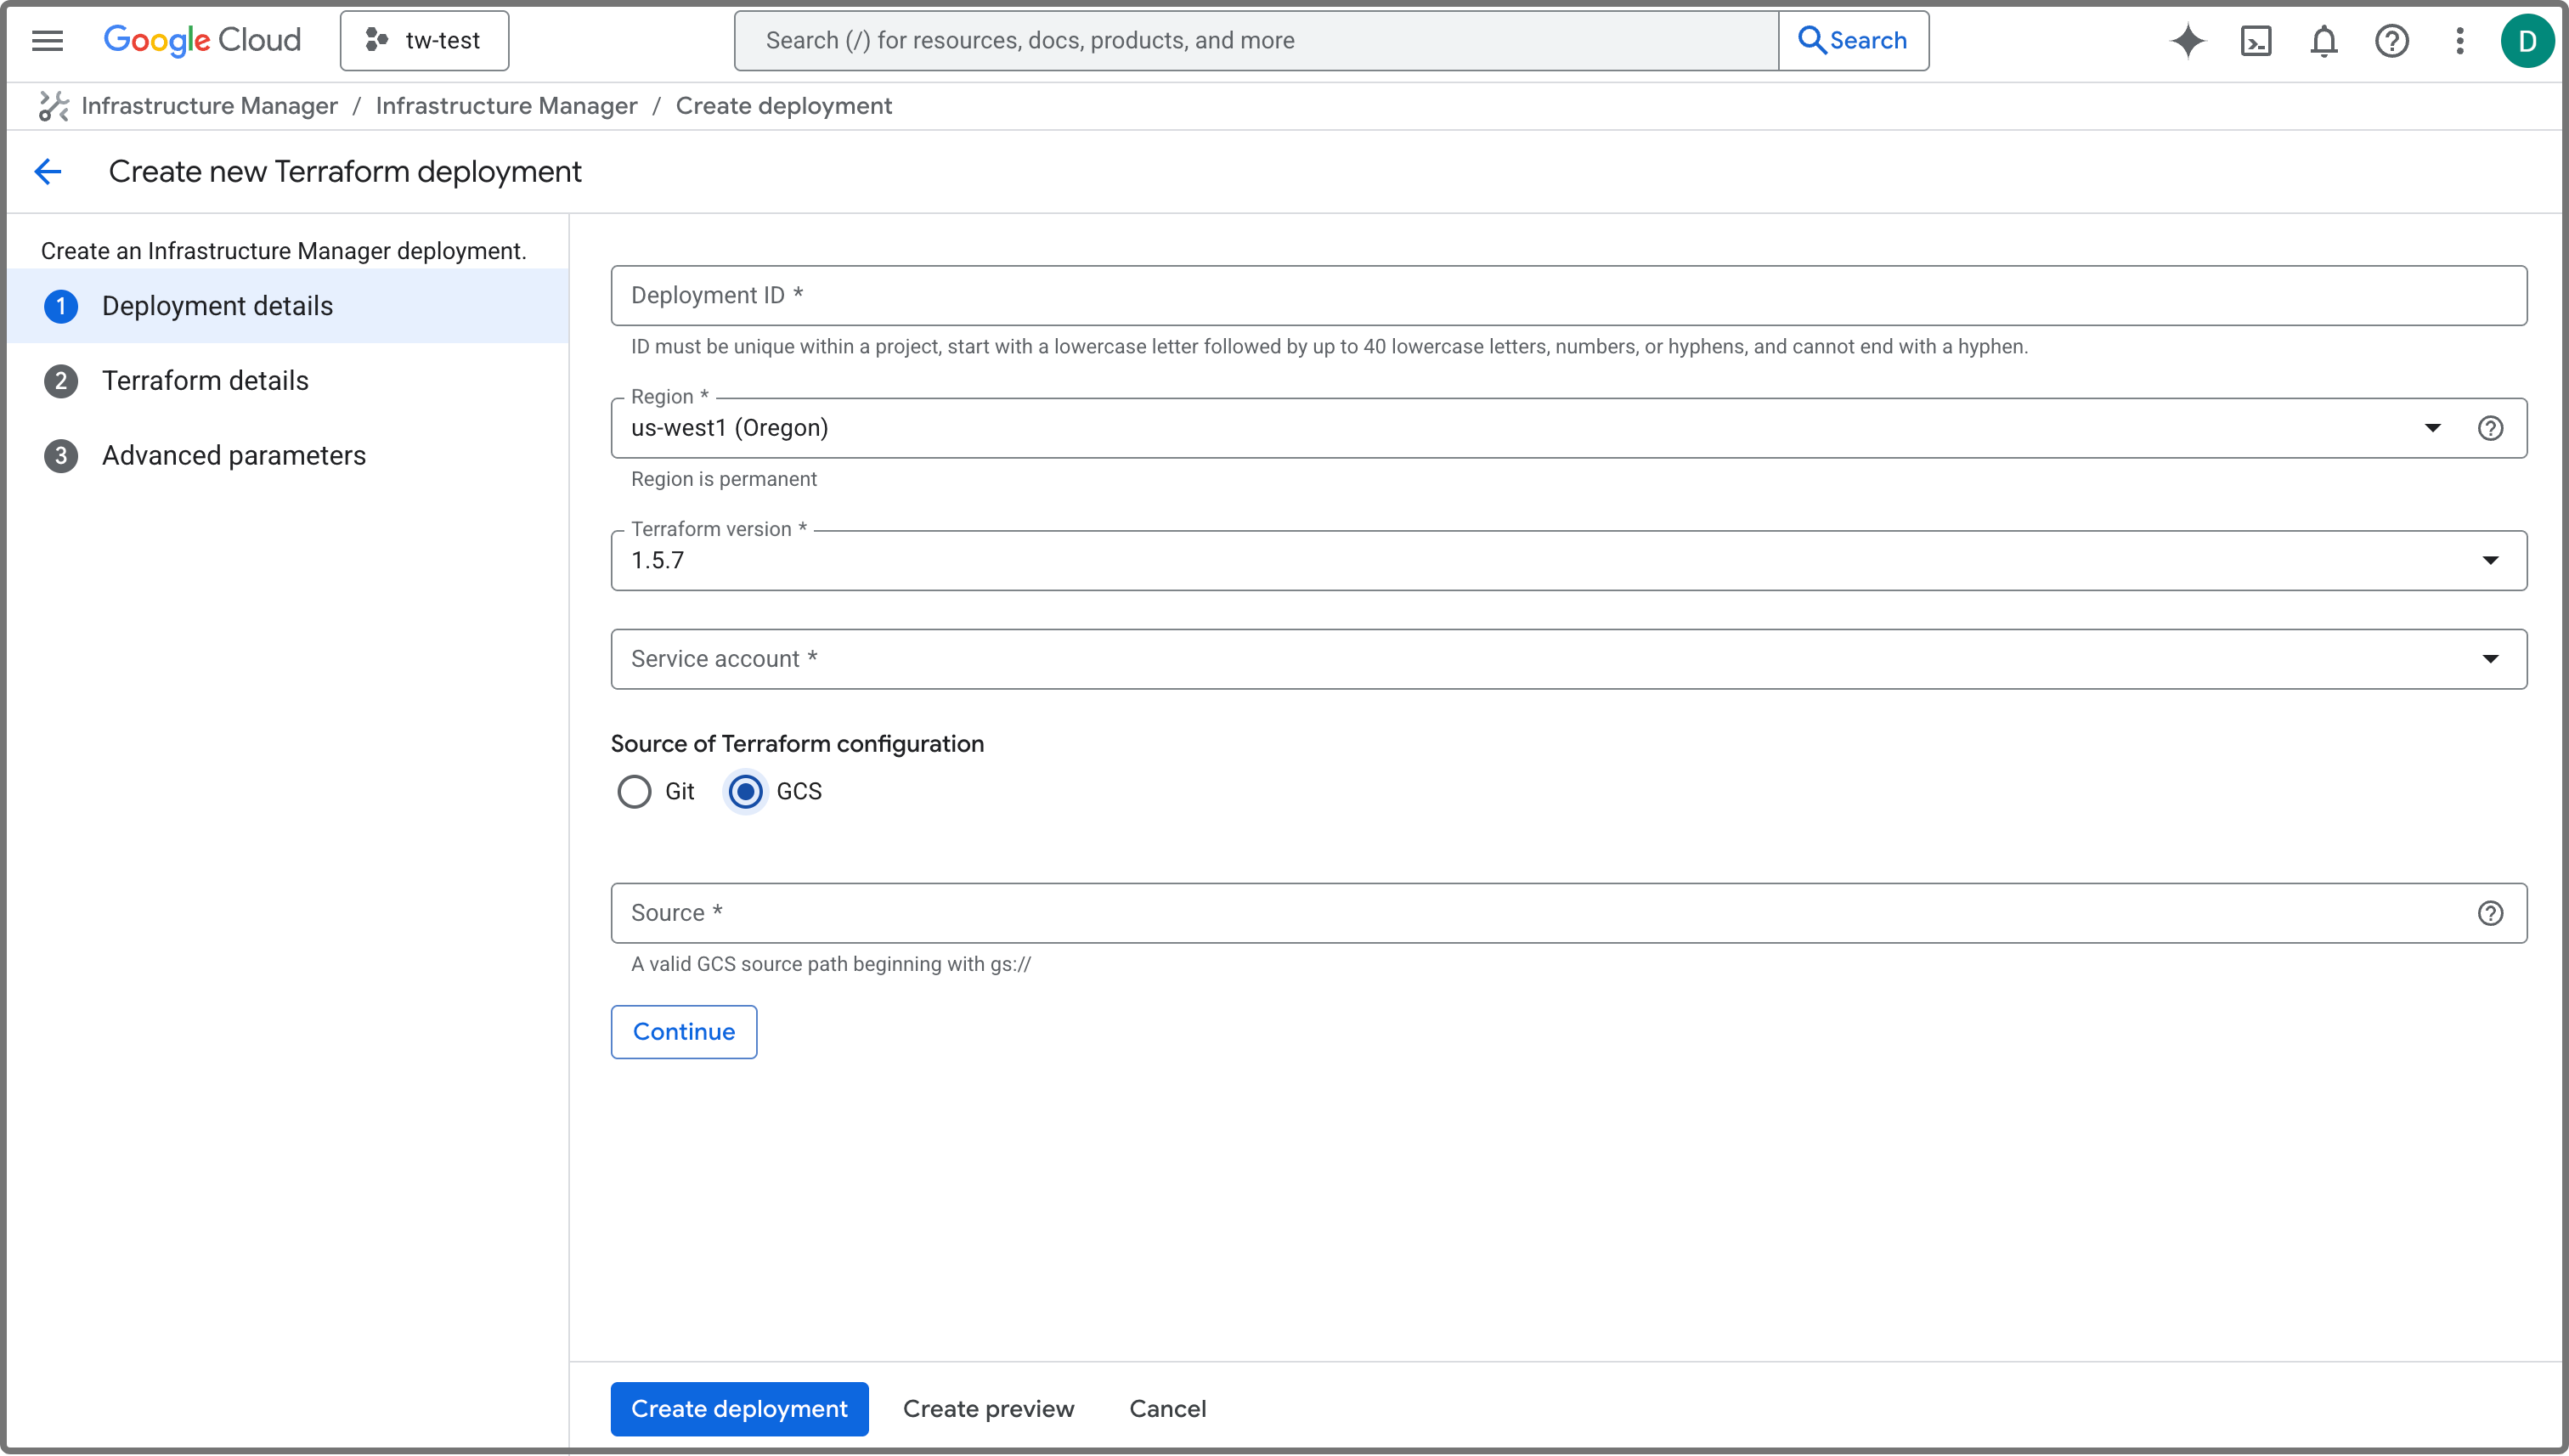
a. Specify an ID for the deployment in the Deployment ID field. The ID must be unique within your Google Cloud project.
b. Select a region for the deployment from the Region drop-down list. It is recommended to set it to the region in which you want to deploy your cluster.
c. Select the service account you created for the quick deployment from the Service account drop-down list.
d. Choose GCS as Source of Terraform configuration.
e. Paste the package file gsutil URI you copied earlier to the Source field.
-
Click Create deployment.
You will then be redirected to the detail page of the deployment you just created. Creating the deployment takes a few minutes. When the deployment is successfully created, the State of the deployment changes from Creating to Active. You can then proceed to the next step.
Deploy the cluster
Follow these steps to finish the deployment:
-
Return to the CelerData Cloud BYOC console.
-
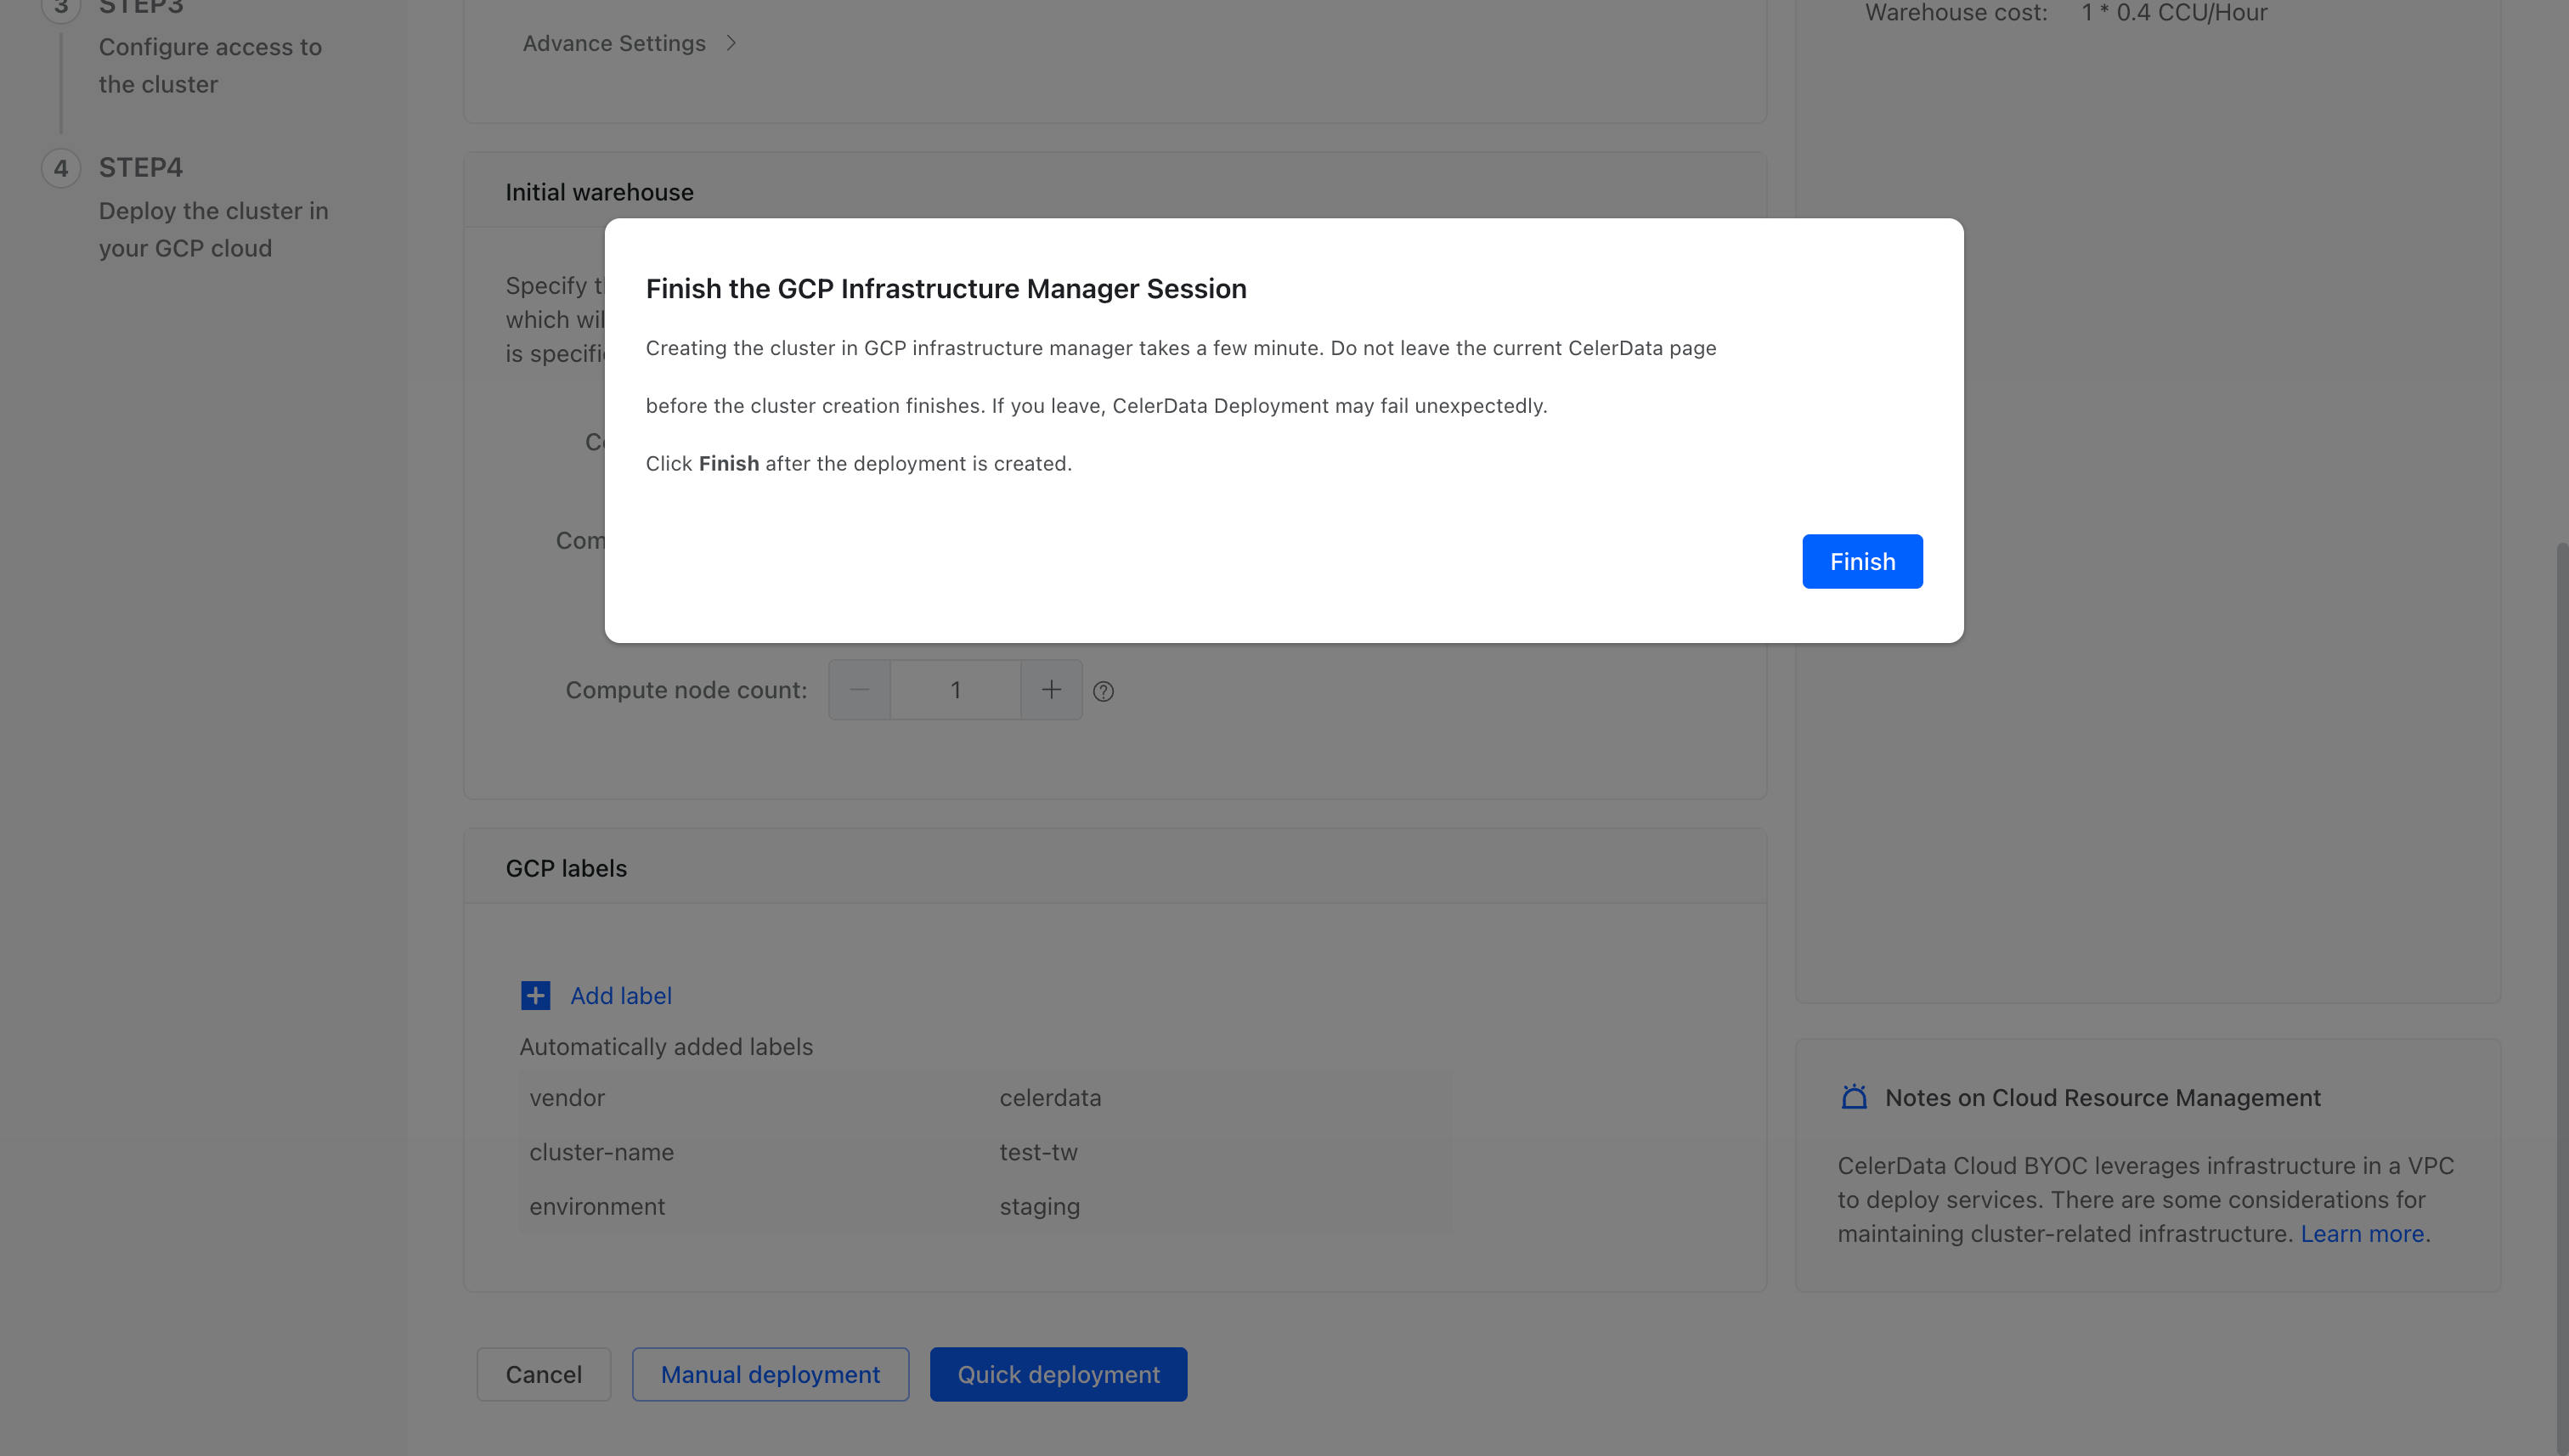
On the message appeared, click Finish. You will then be redirected to the Cluster page of the console.
-
Click the cluster you just created.
After you complete the preceding steps, CelerData automatically deploys the cluster. This takes a few minutes.
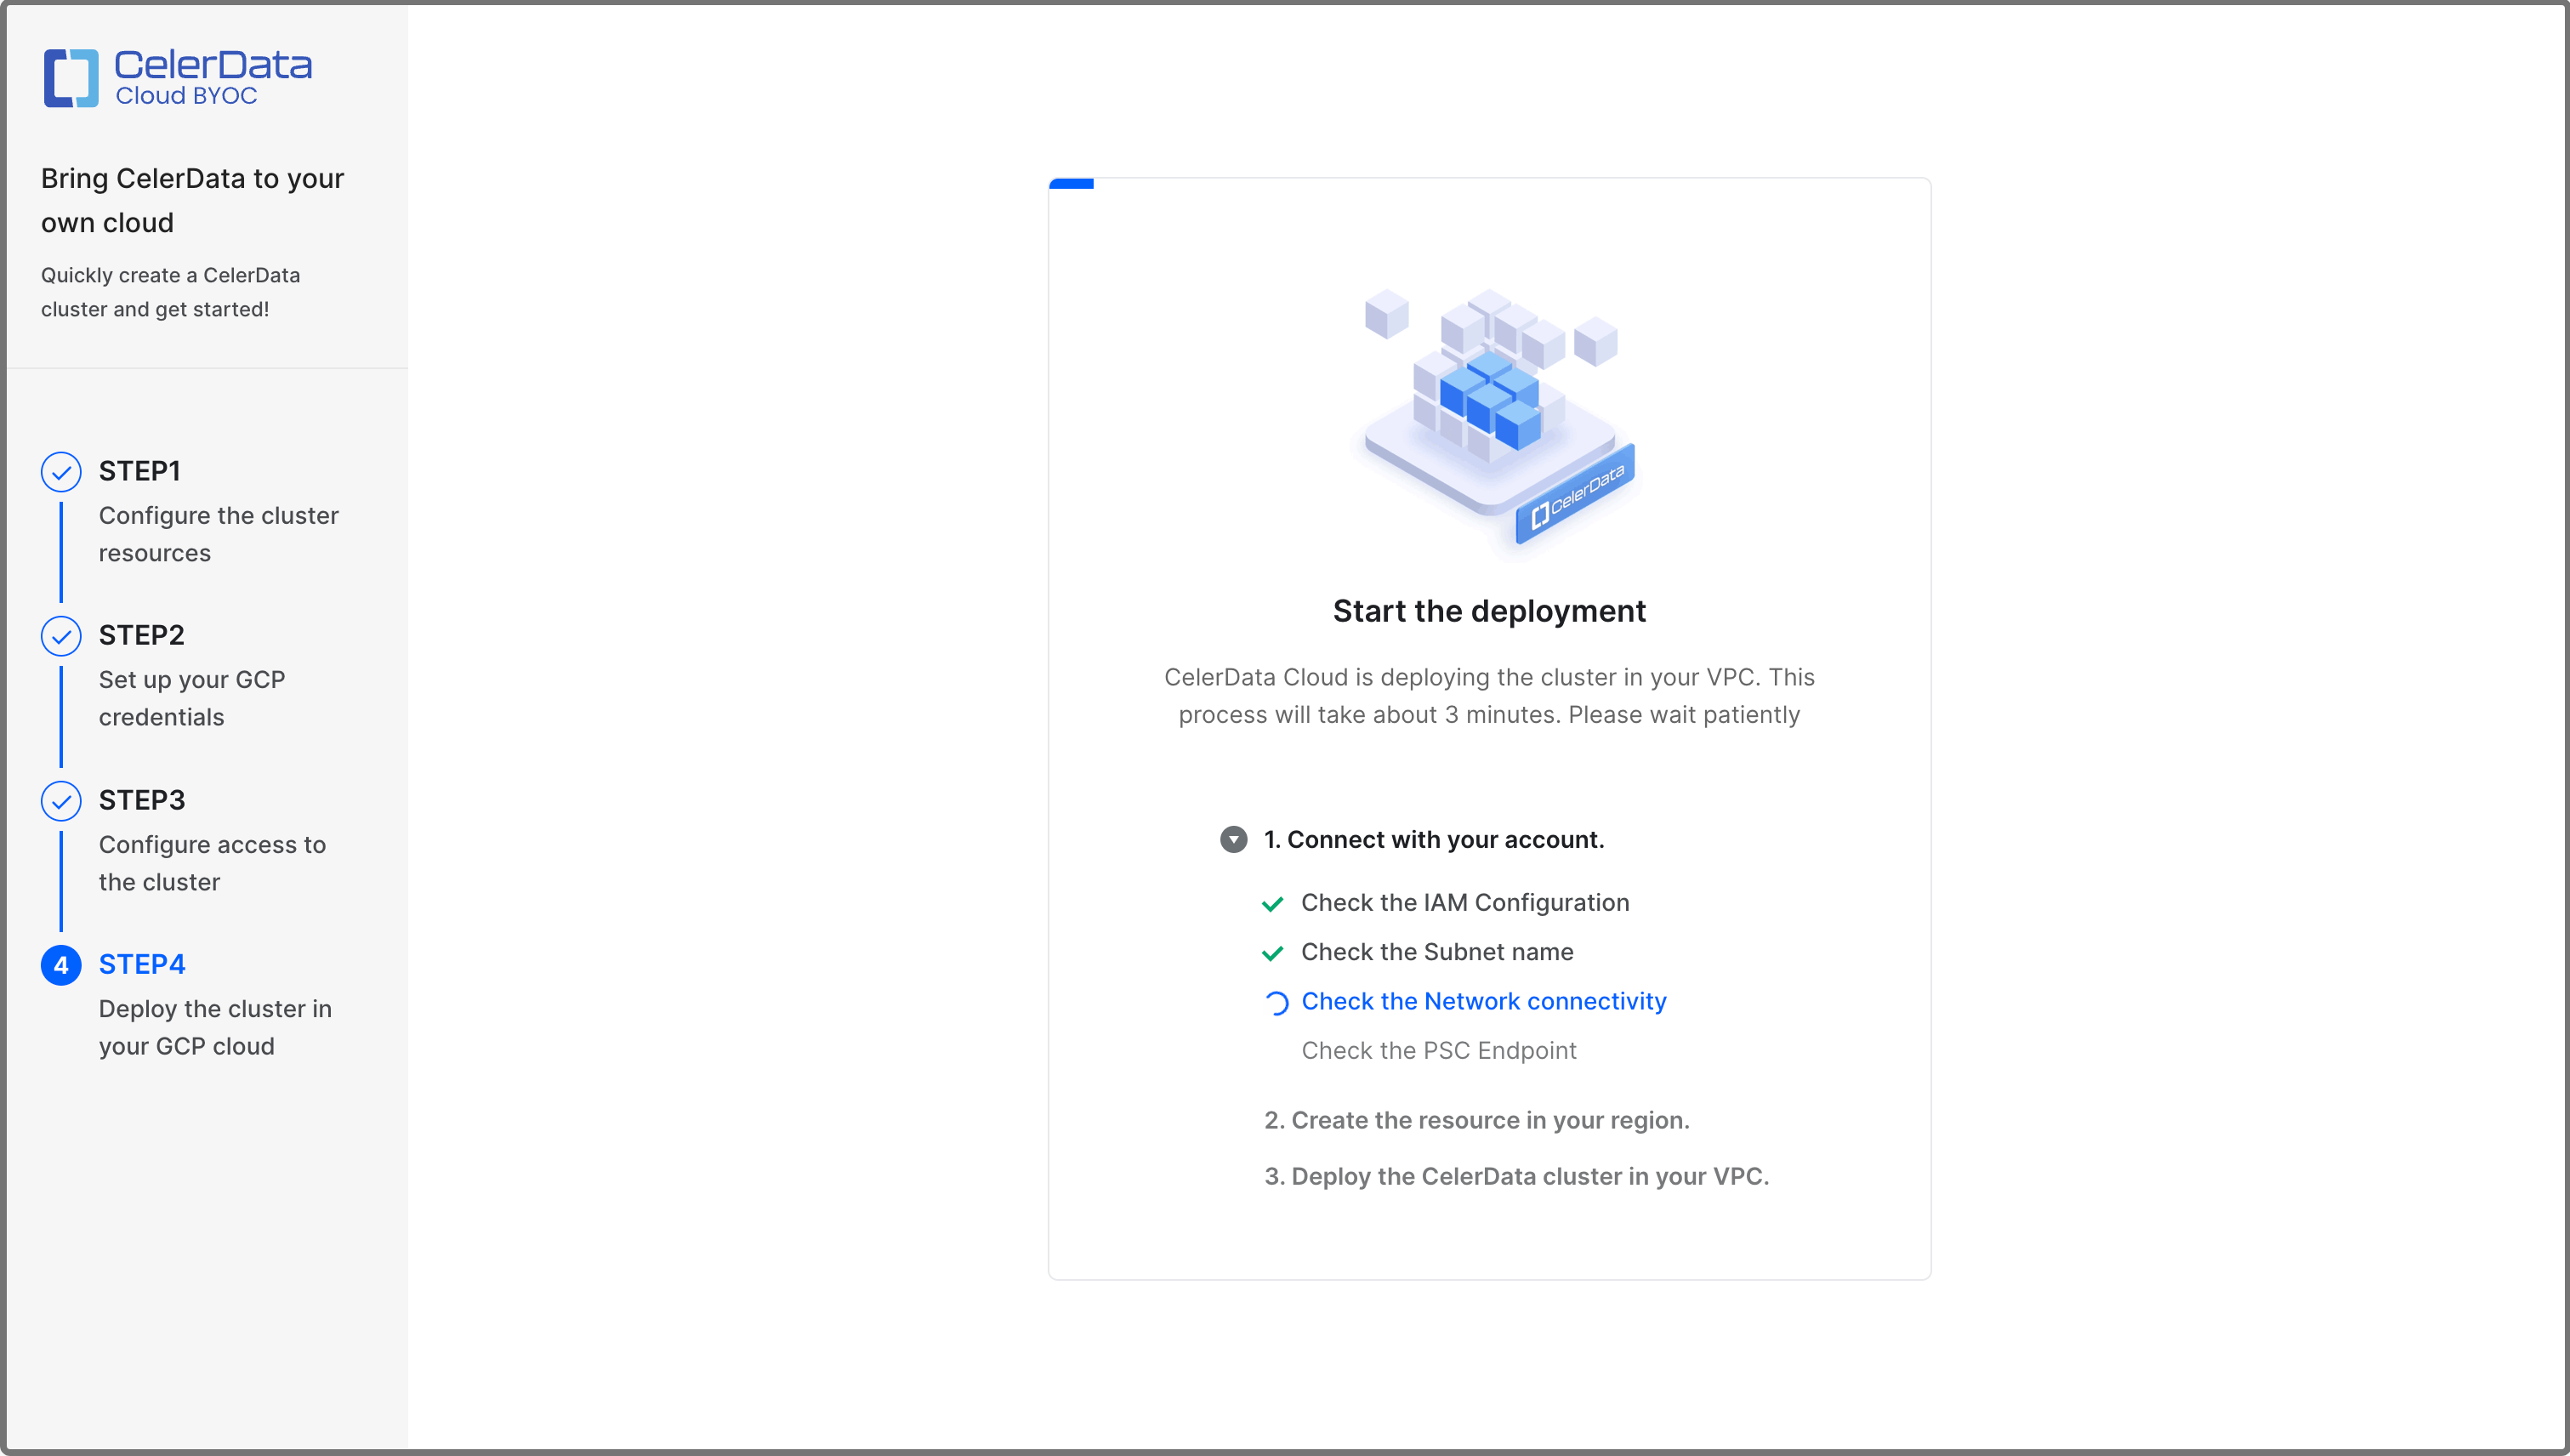
When the deployment is complete, a message shown in the following figure appears.
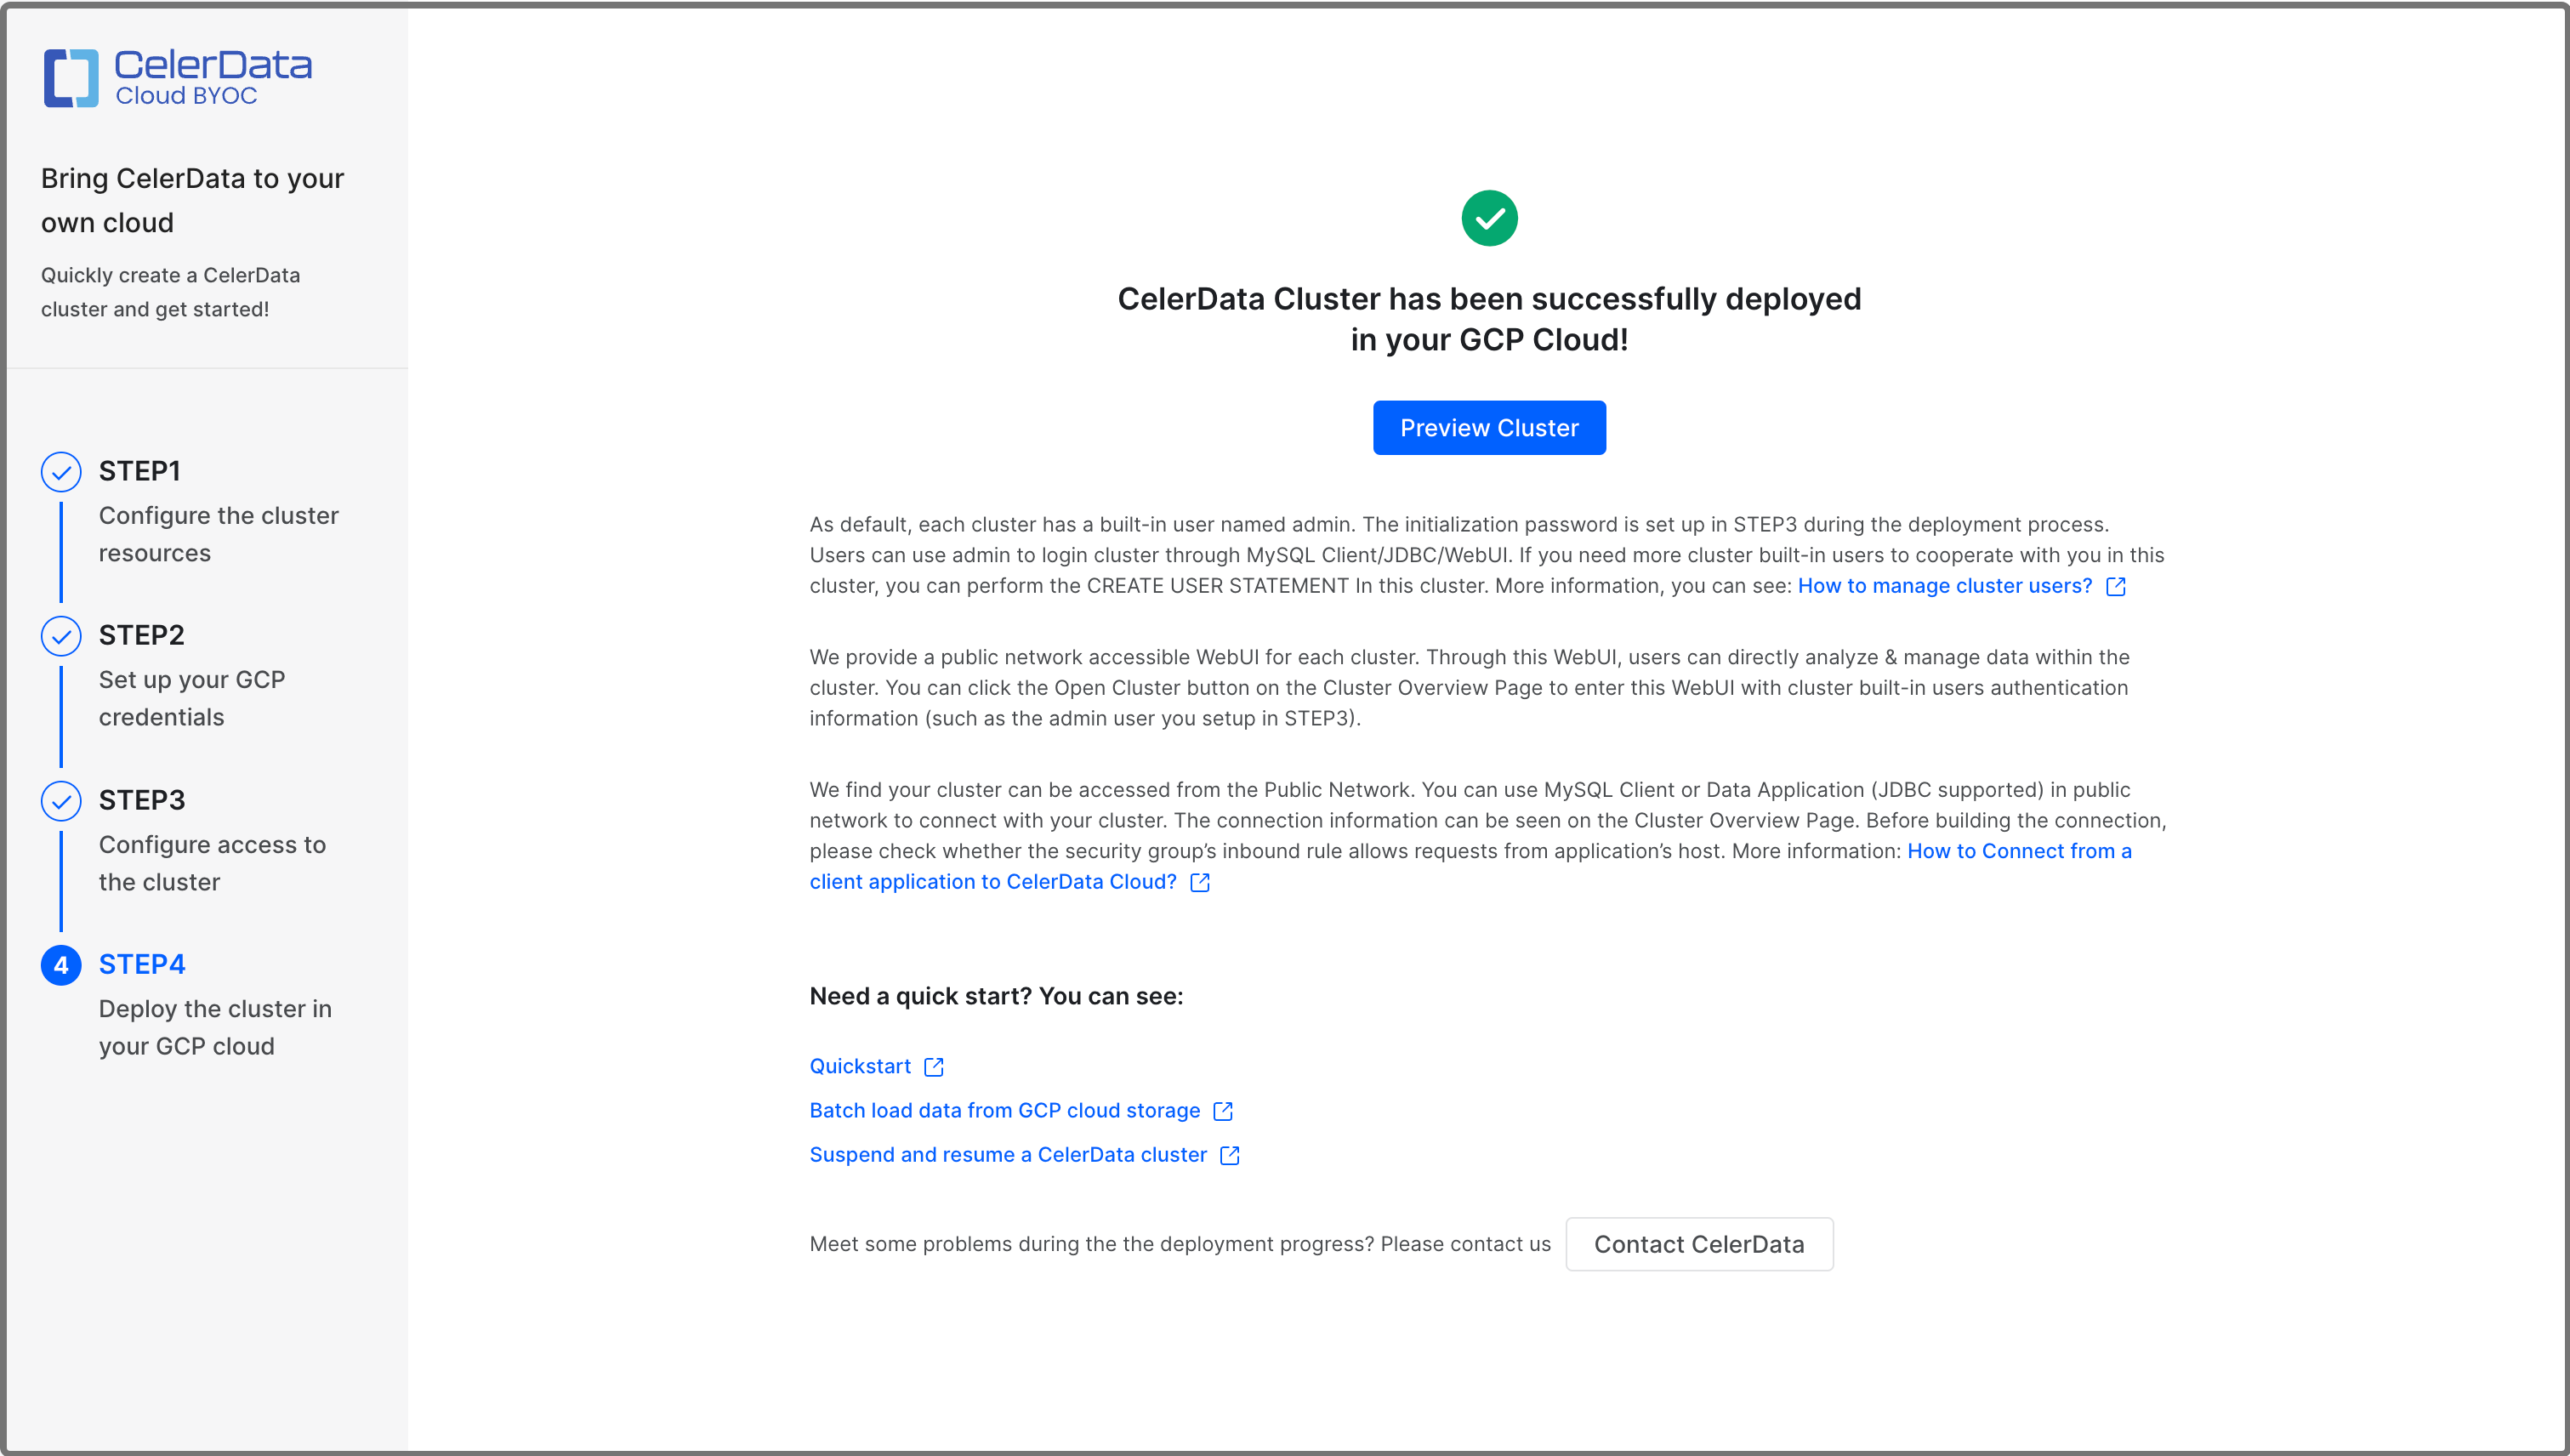
You can click Preview Cluster in the message to view the cluster. You can also return to the Clusters page to view the cluster, which is in the Running state, upon successful deployment.
Obtain cluster credential and deployment details
Follow these steps to collect the cluster credential information and deployment details you will need for future use:
-
Return to the detail page of the deployment you created for your cluster. Click the Output tab.
-
On the Output tab, you can view the following information:
celerdata_cluster_preview_address: The link to the cluster detail page in the CelerData Cloud BYOC console.celerdata_cluster_storage_bucket: The URI of the bucket used to store the cluster query profiles.celerdata_cluster_vm_service_account: The name of the instance service account created to grant the cluster permission to access the storage bucket.celerdata_cluster_network_tag: The target tag for the firewall rules used to enable connectivity between cluster nodes and between CelerData's VPC and cluster's VPC over TLS.celerdata_cluster_network: The URI of the VPC Network under which the cluster is deployed.celerdata_cluster_subnetwork: The URI of the subnet under which the cluster is deployed.celerdata_cluster_initial_admin_password: The initial password for the admin account in the cluster.
Set the default storage volume - Elastic clusters only
Skip this step if you have deployed a Classic cluster.
By default, all databases and tables are created in the default storage volume.
During the Private Preview of CelerData BYOC on GCP, the default storage volume must be created manually after creating your cluster and before creating databases or tables.
The XML API for interoperability is used to interact with GCS storage as if it were S3. Generally the only changes between an S3 configuration and a GCS configuration are:
- Using the endpoint
https://storage.googleapis.com - Using an HMAC key and secret for authentication
There are links at the bottom of this page if you are not familiar with the interoperability XML API or HMAC keys.
Create a storage volume in GCS
You will need:
- The GCS region where your cluster is located, this was specified in STEP1
- The GCS bucket name specified in STEP2
- An HMAC access key and HMAC secret key for the bucket
Connect to your cluster with a SQL client as the admin user and create a STORAGE VOLUME (substitute the details for your bucket and authentication):
CREATE STORAGE VOLUME def_volume
TYPE = S3
LOCATIONS = ("s3://<GCS bucket name collected from the Outputs tab of the deployment details page in Google Cloud Console>")
PROPERTIES
(
    "enabled" = "true",
    "aws.s3.region" = "us-central1",
    "aws.s3.endpoint" = "https://storage.googleapis.com",
    "aws.s3.access_key" = "<HMAC access key>",
    "aws.s3.secret_key" = "<HMAC secret key>"
);
Set the new volume as the default:
SET def_volume AS DEFAULT STORAGE VOLUME;
What's next
At any time, you can connect to the cluster from a JDBC driver or a MySQL client or by using the SQL Editor in the CelerData console. For more information, see Connect to a CelerData cluster.
You can also view and manage the cluster to your needs in the CelerData Cloud BYOC console:
- View a CelerData cluster.
- Scale a CelerData cluster.
- Release a CelerData cluster.
- Suspend and resume a CelerData cluster.
- Open a CelerData cluster.