Use SAML SSO
CelerData supports user authentication using Security Assertion Markup Language (SAML) single sign-on (SSO). SSO enables account administrators to authenticate CelerData members via a specific identity provider (IdP). This allows members to sign in to their CelerData Cloud account without further login credentials after they log in to the IdP.
NOTE
- Only account administrators can configure SSO.
- After SSO is enabled, the creator of an account can sign in to that account by using both their login credentials and SSO. The other members within that account can only sign in to that account by using SSO.
- Currently, CelerData clusters does not support integration with SSO. You need to create users within the cluster using SQL command. For more details, see Manage database users in a CelerData cluster
- Currently, CelerData Cloud account only supports Okta and Google as the IdP.
Enable SSO
The following tutorial provides examples for both Okta and Google.
Step 1: Prepare CelerData Redirect URL
- Sign in to the CelerData Cloud BYOC console as the account administrator.
- In the left-side navigation pane, choose Account > Account settings.
- On the Single sign-on tab of the Account settings page, click Configure to display the Configure Single Sign-On(SSO) dialog box.
- In the Configure Single Sign-On(SSO) dialog box, select an SSO protocol that your IdP supports. Currently, only SAML 2.0 is supported.
- Click the Copy icon next to the CelerData redirect URL field and save the URL properly.
- If you use Google as your IdP, you also need to click the Copy icon next to the CelerData entity ID field and save the entity ID properly.

NOTE
Do not close the CelerData Cloud BYOC console. You will need to complete further configurations on the console in the following steps.
Step 2: Set up your IdP
- Use Okta as IdP
- Use Google as IdP
- Use Azure as IdP
Follow these steps to set up your IdP:
-
Sign in to the Okta Administration console as a member with administrator privileges.
-
In the left-side navigation pane, choose Applications > Applications.
-
On the Applications page, click Create App Integration to display the Create a new app integration dialog box.
-
In the Create a new app integration dialog box, choose your suitable sign-in method. Currently, CelerData supports only SAML 2.0.
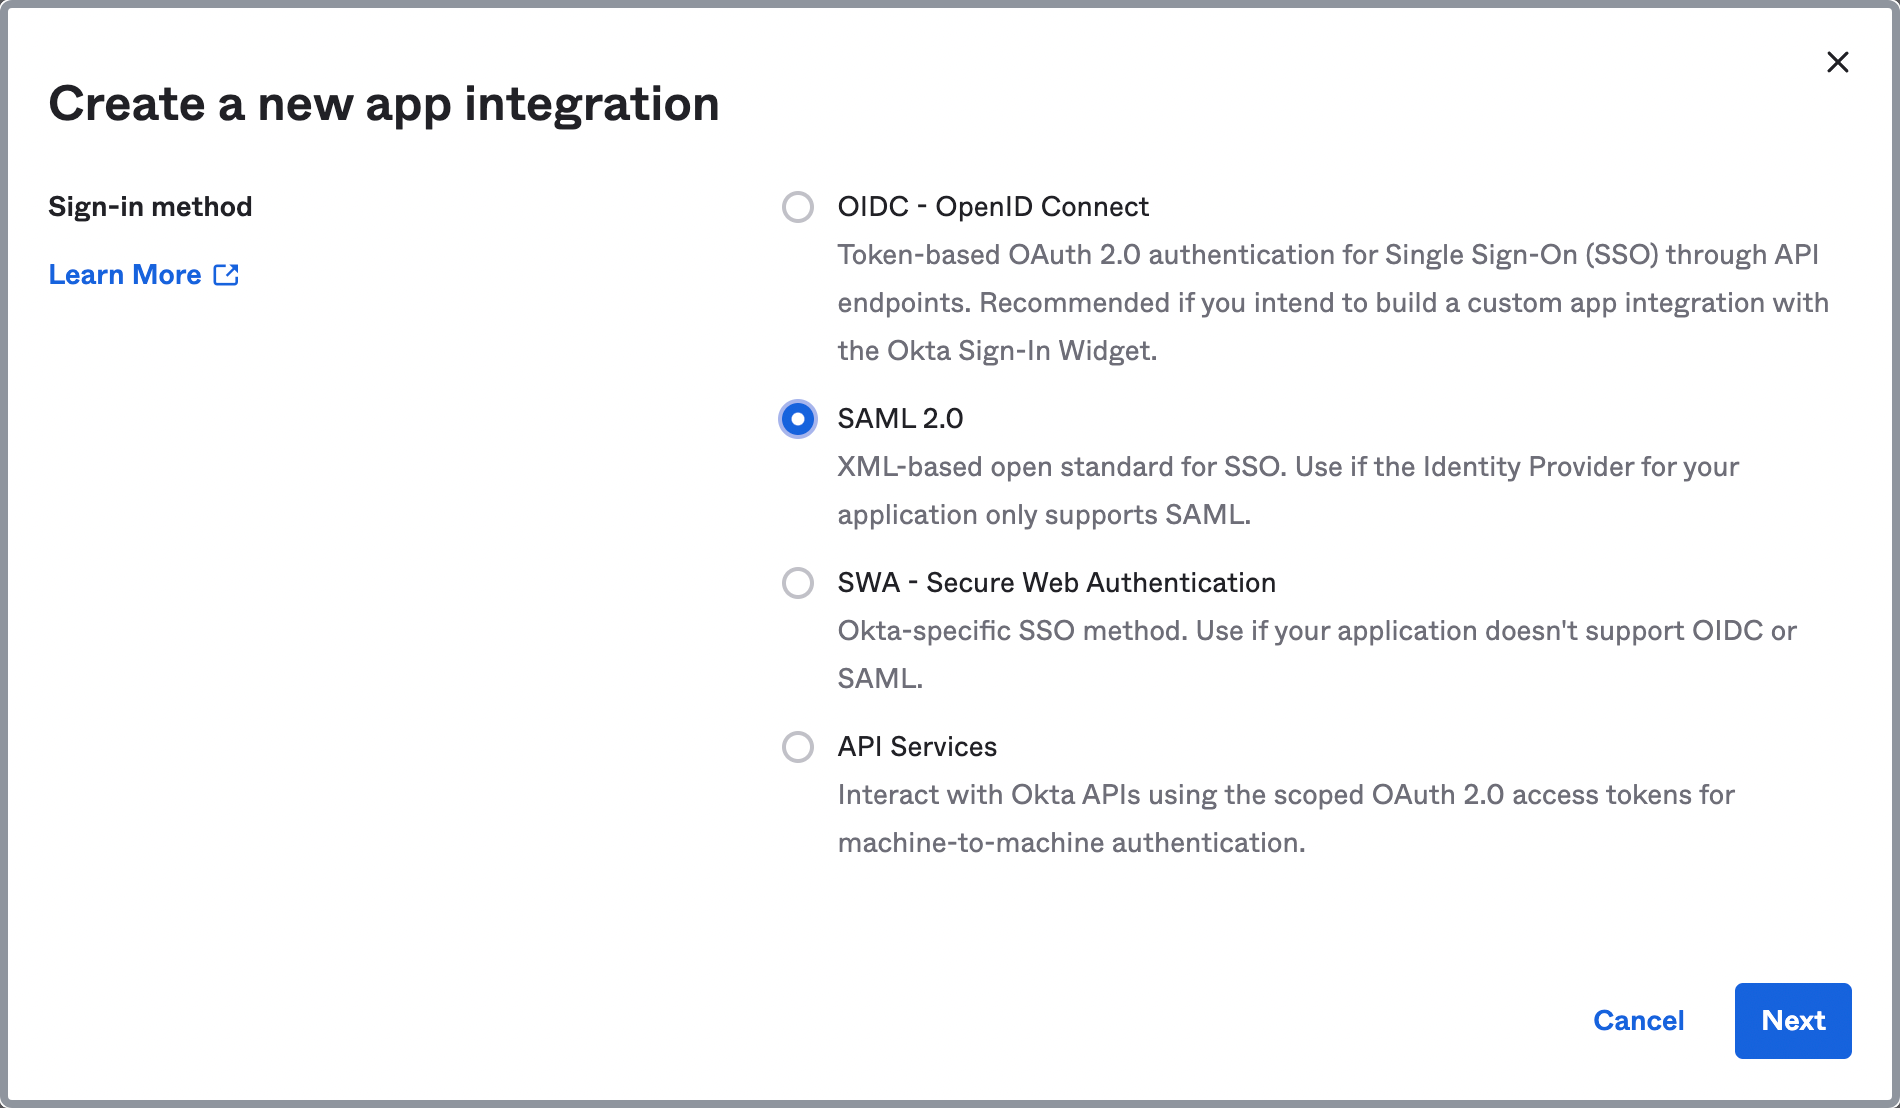
-
Click Next.
-
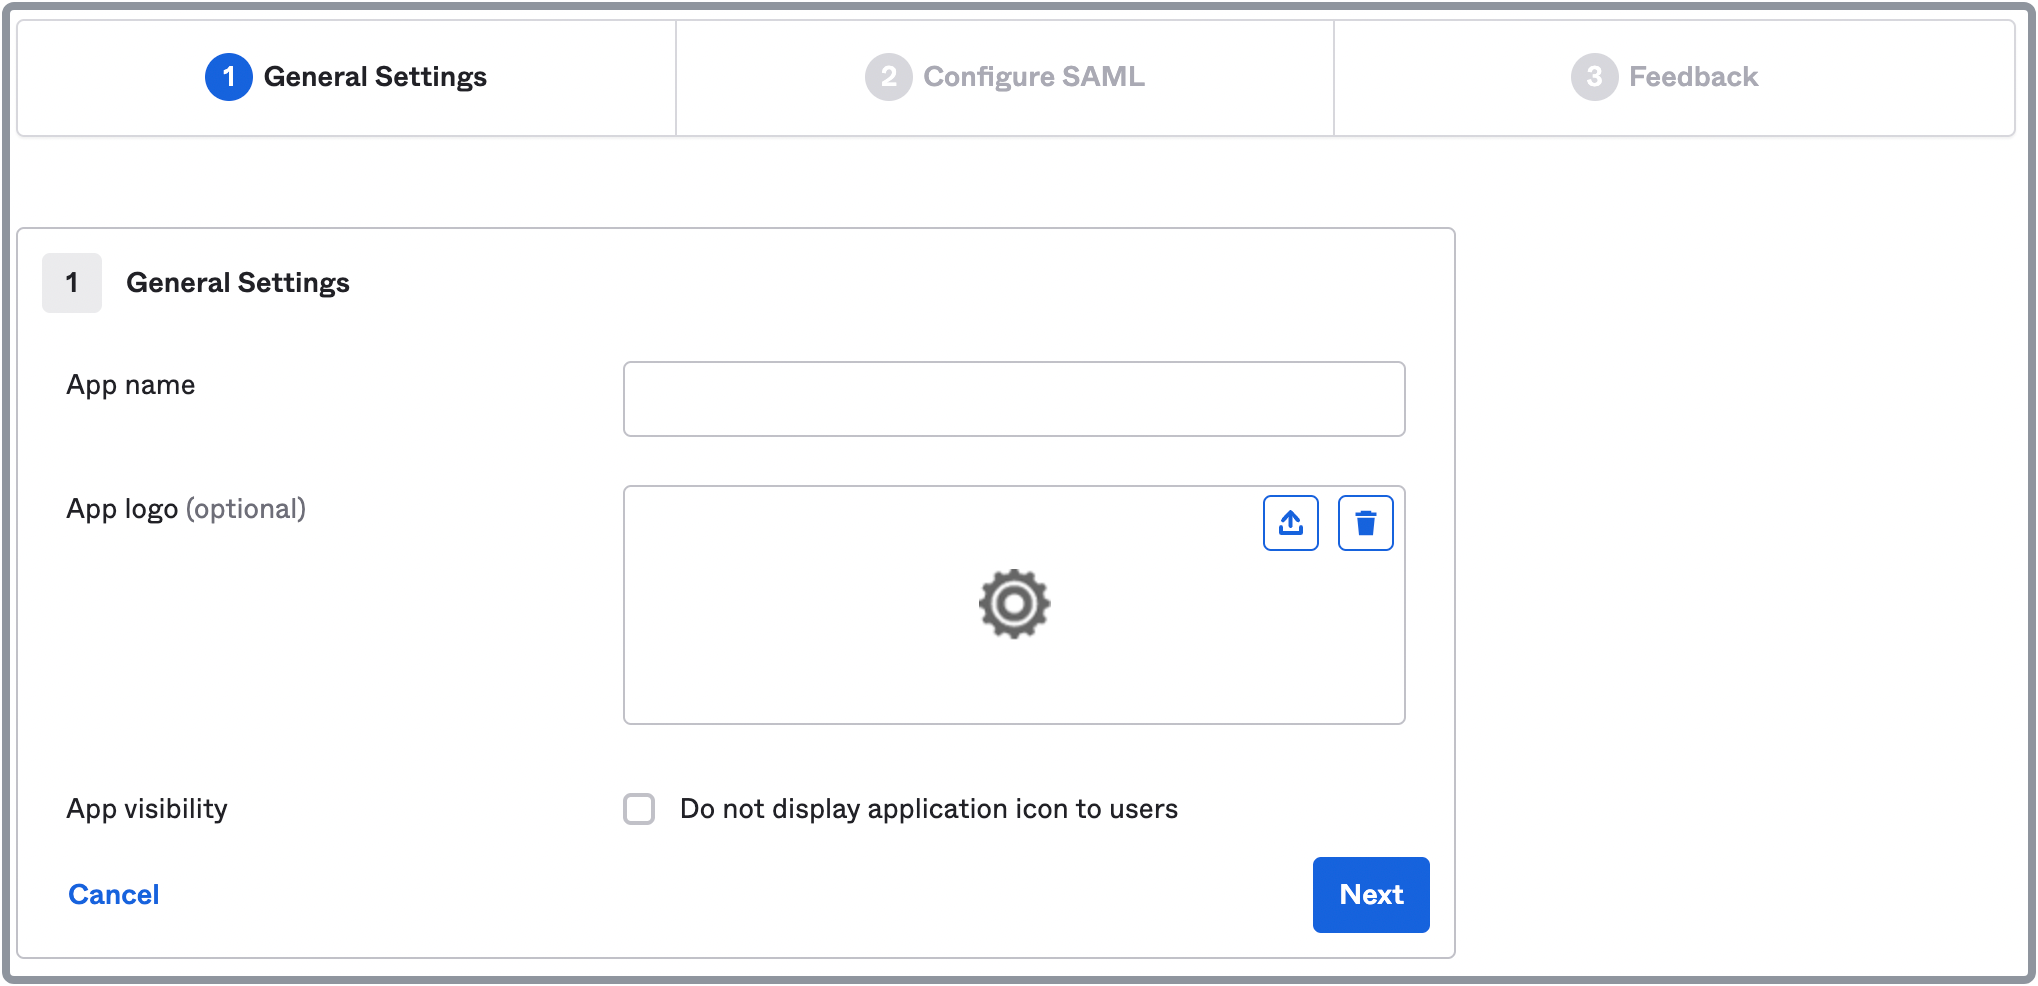
On the General Settings tab of the Create SAML Integration page, enter a name for your application, optionally upload an application logo, specify whether to enable application visibility, and click Next.
-
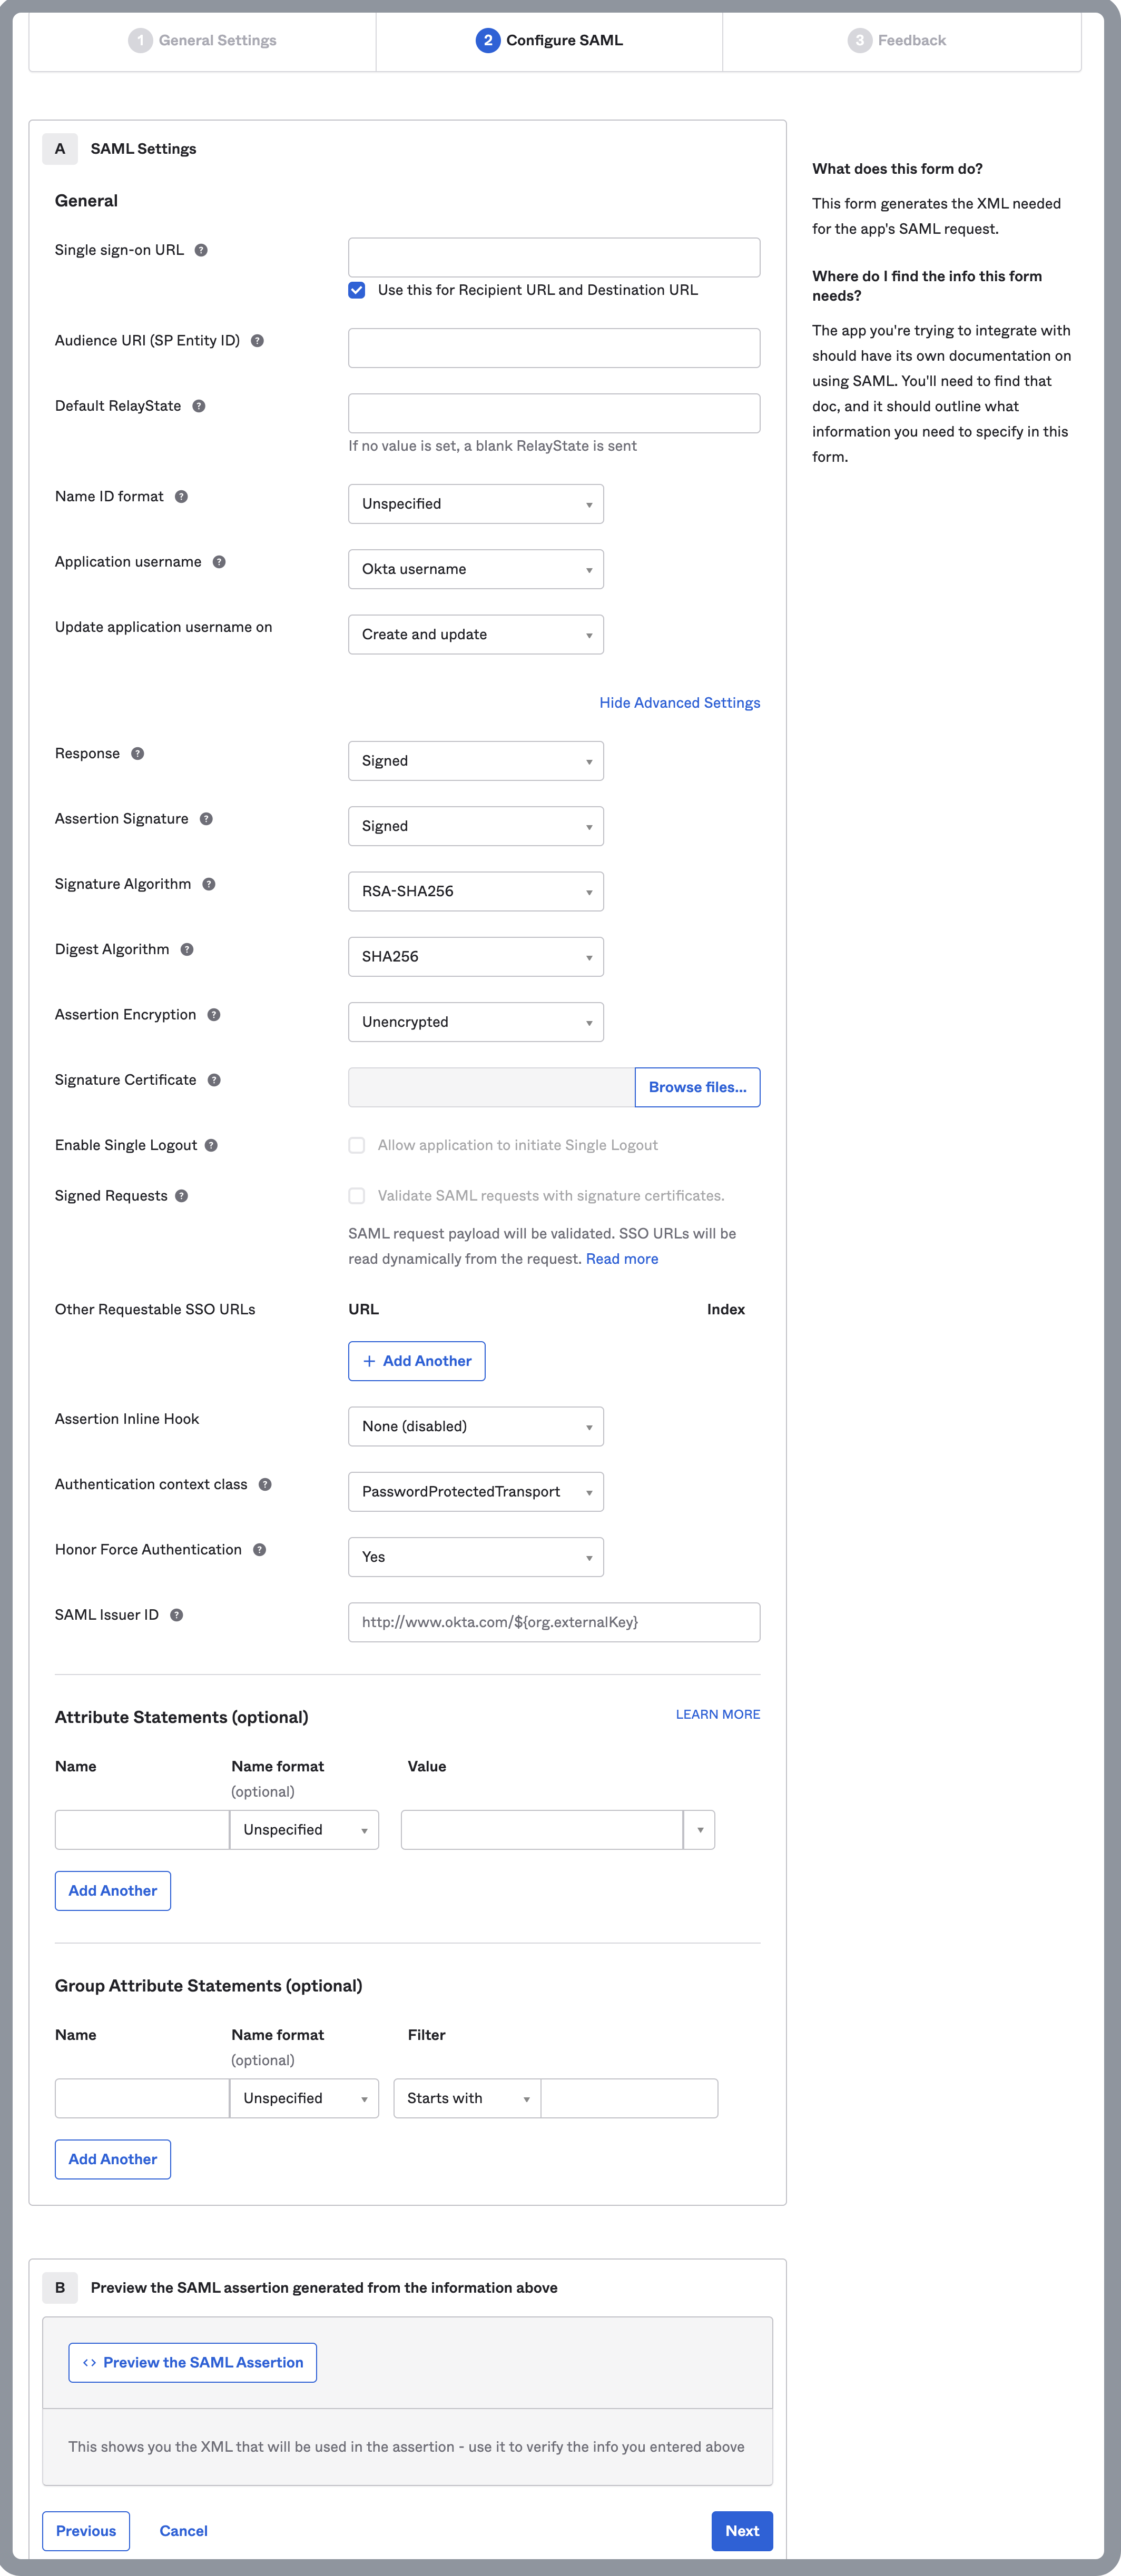
On the Configure SAML tab of the Create SAML Integration page, configure the SAML settings as follows:
a. Paste the CelerData redirect URL you have copied to the Single sign-on URL field.
b. Enter an Audience URI. An audience URI is the application-defined unique identifier that is the intended audience of the SAML assertion. This is most often the SP Entity ID of your application, for example,
urn:celerdata.c. Choose EmailAddress from the Name ID format drop-down list.
d. Choose Email from the Application username drop-down list.
e. Choose Create and update from the Update application username on drop-down list.
f. Click Show Advanced Settings, and enter an SAML Issuer ID. It is a URL that starts with
http://www.okta.com/plus an identifier at the end, for example,http://www.okta.com/celerdata.g. You can leave the items that are not mentioned here unchanged, and click Next.
-
On the Feedback tab of the Create SAML Integration page, choose I'm an Okta customer adding an internal app, and click Finish.
-
In the left-side navigation pane of the Okta console, choose Applications > Applications.
-
On the Applications page, click the application you have created to enter the application detail page.
-
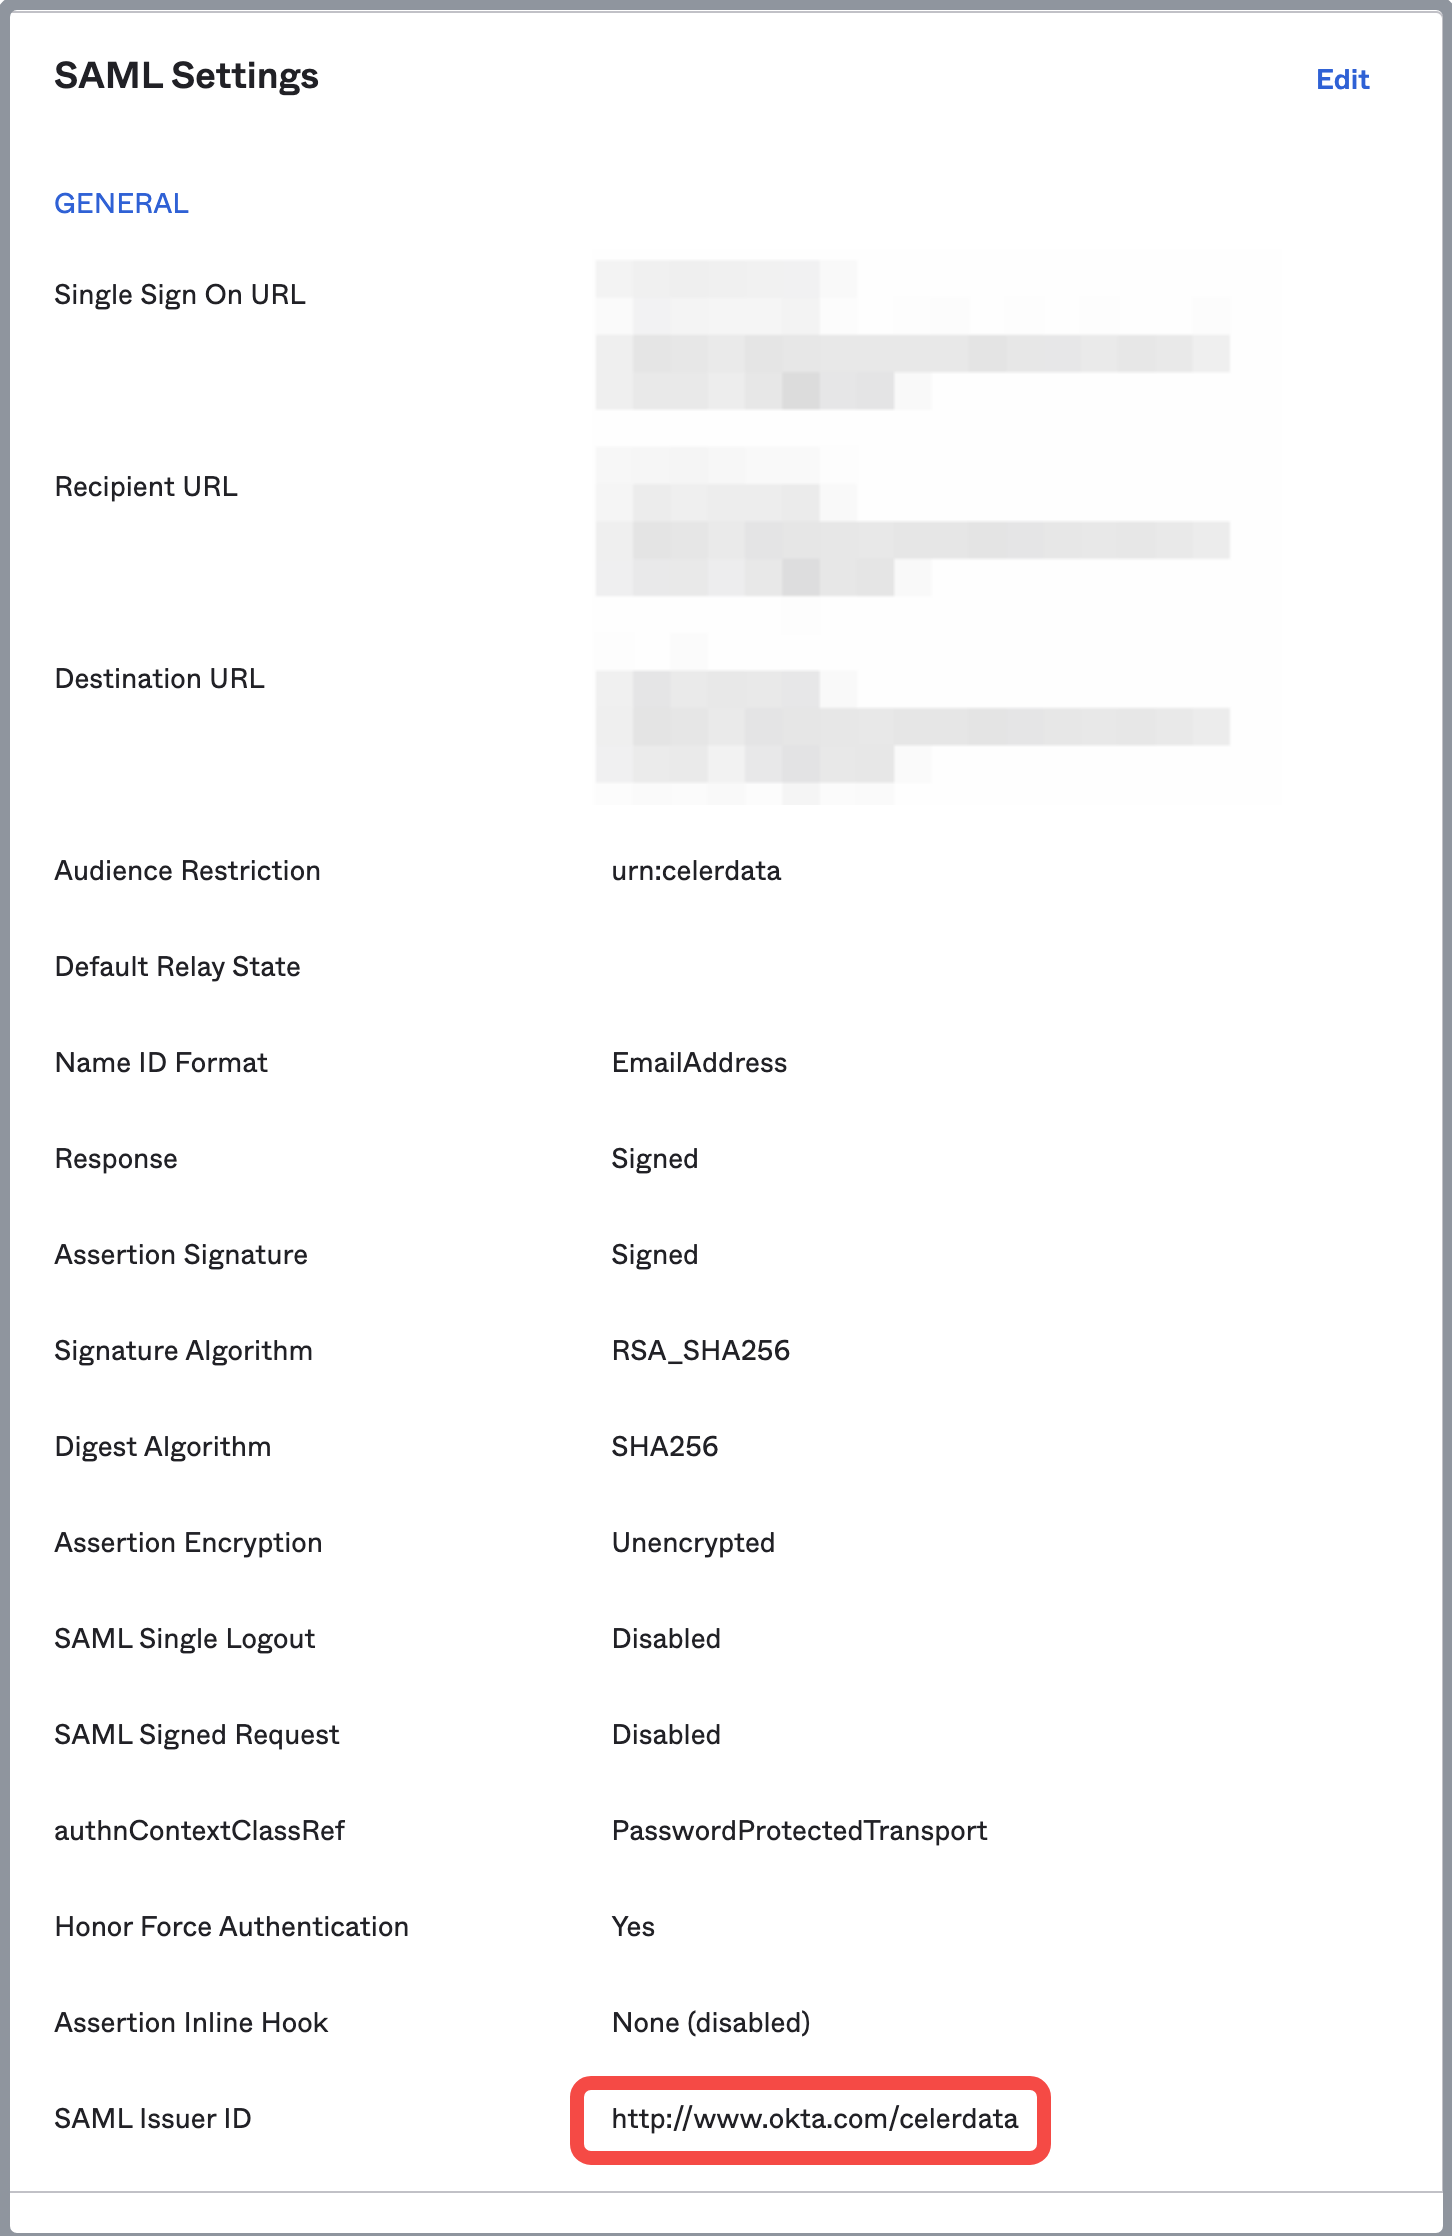
In the SAML Settings section of the General tab, copy the SAML Issuer ID and save it properly.
-
In the App Embed Link section of the General tab, copy the embed link and save it properly.

-
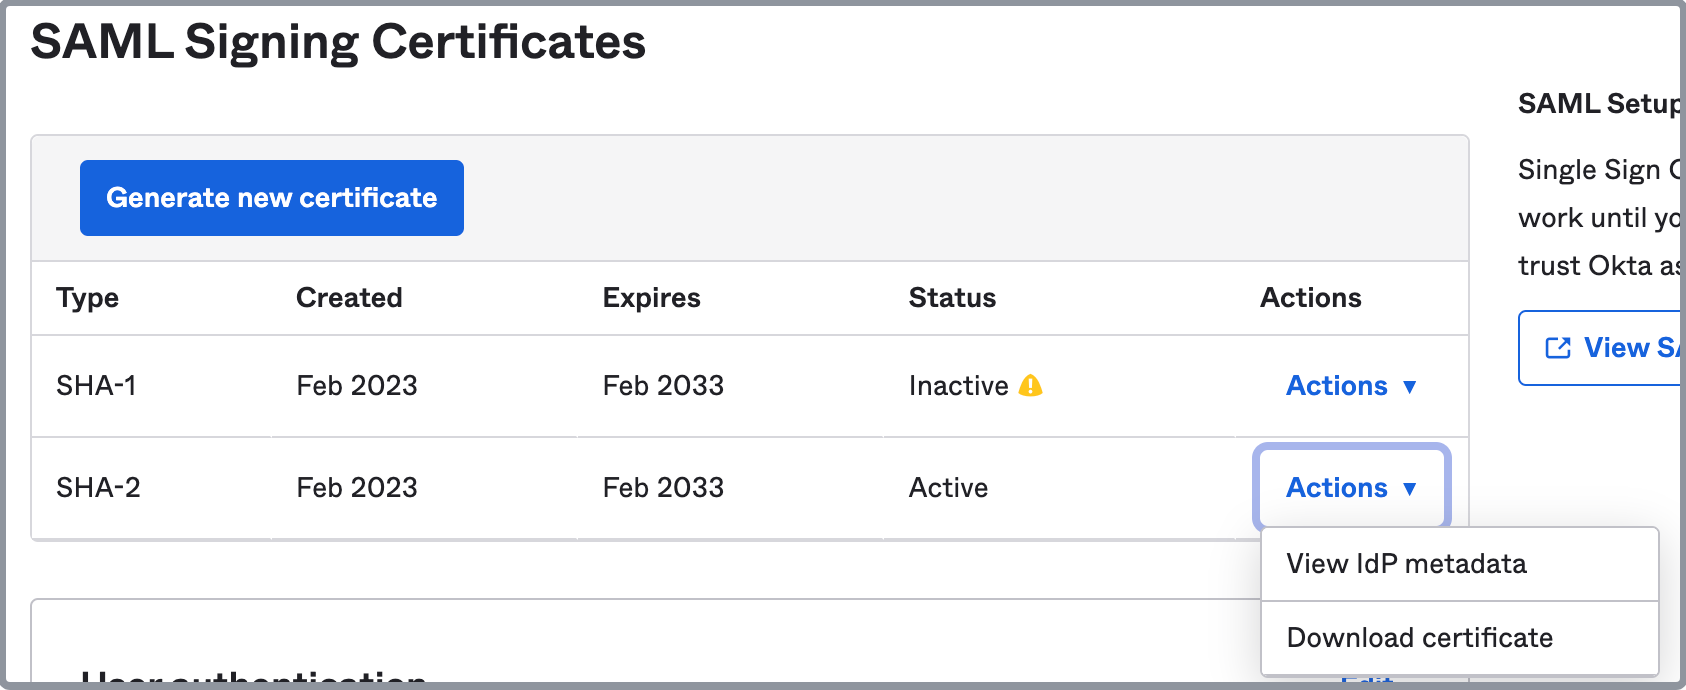
In the SAML Signing Certificates section of the Sign On tab, choose an active certificate, and choose Download certificate from the Actions drop-down list to download the certificate file.
-
Assign users that will access CelerData to the app integration you just created.
Follow these steps to set up your IdP:
-
Sign in to the Google Admin console as a user with administrator privileges.
-
In the left-side navigation pane, choose Apps > Web and mobile apps.
-
On the Web and mobile apps page, click Add app, and select Add custom SAML app.
-
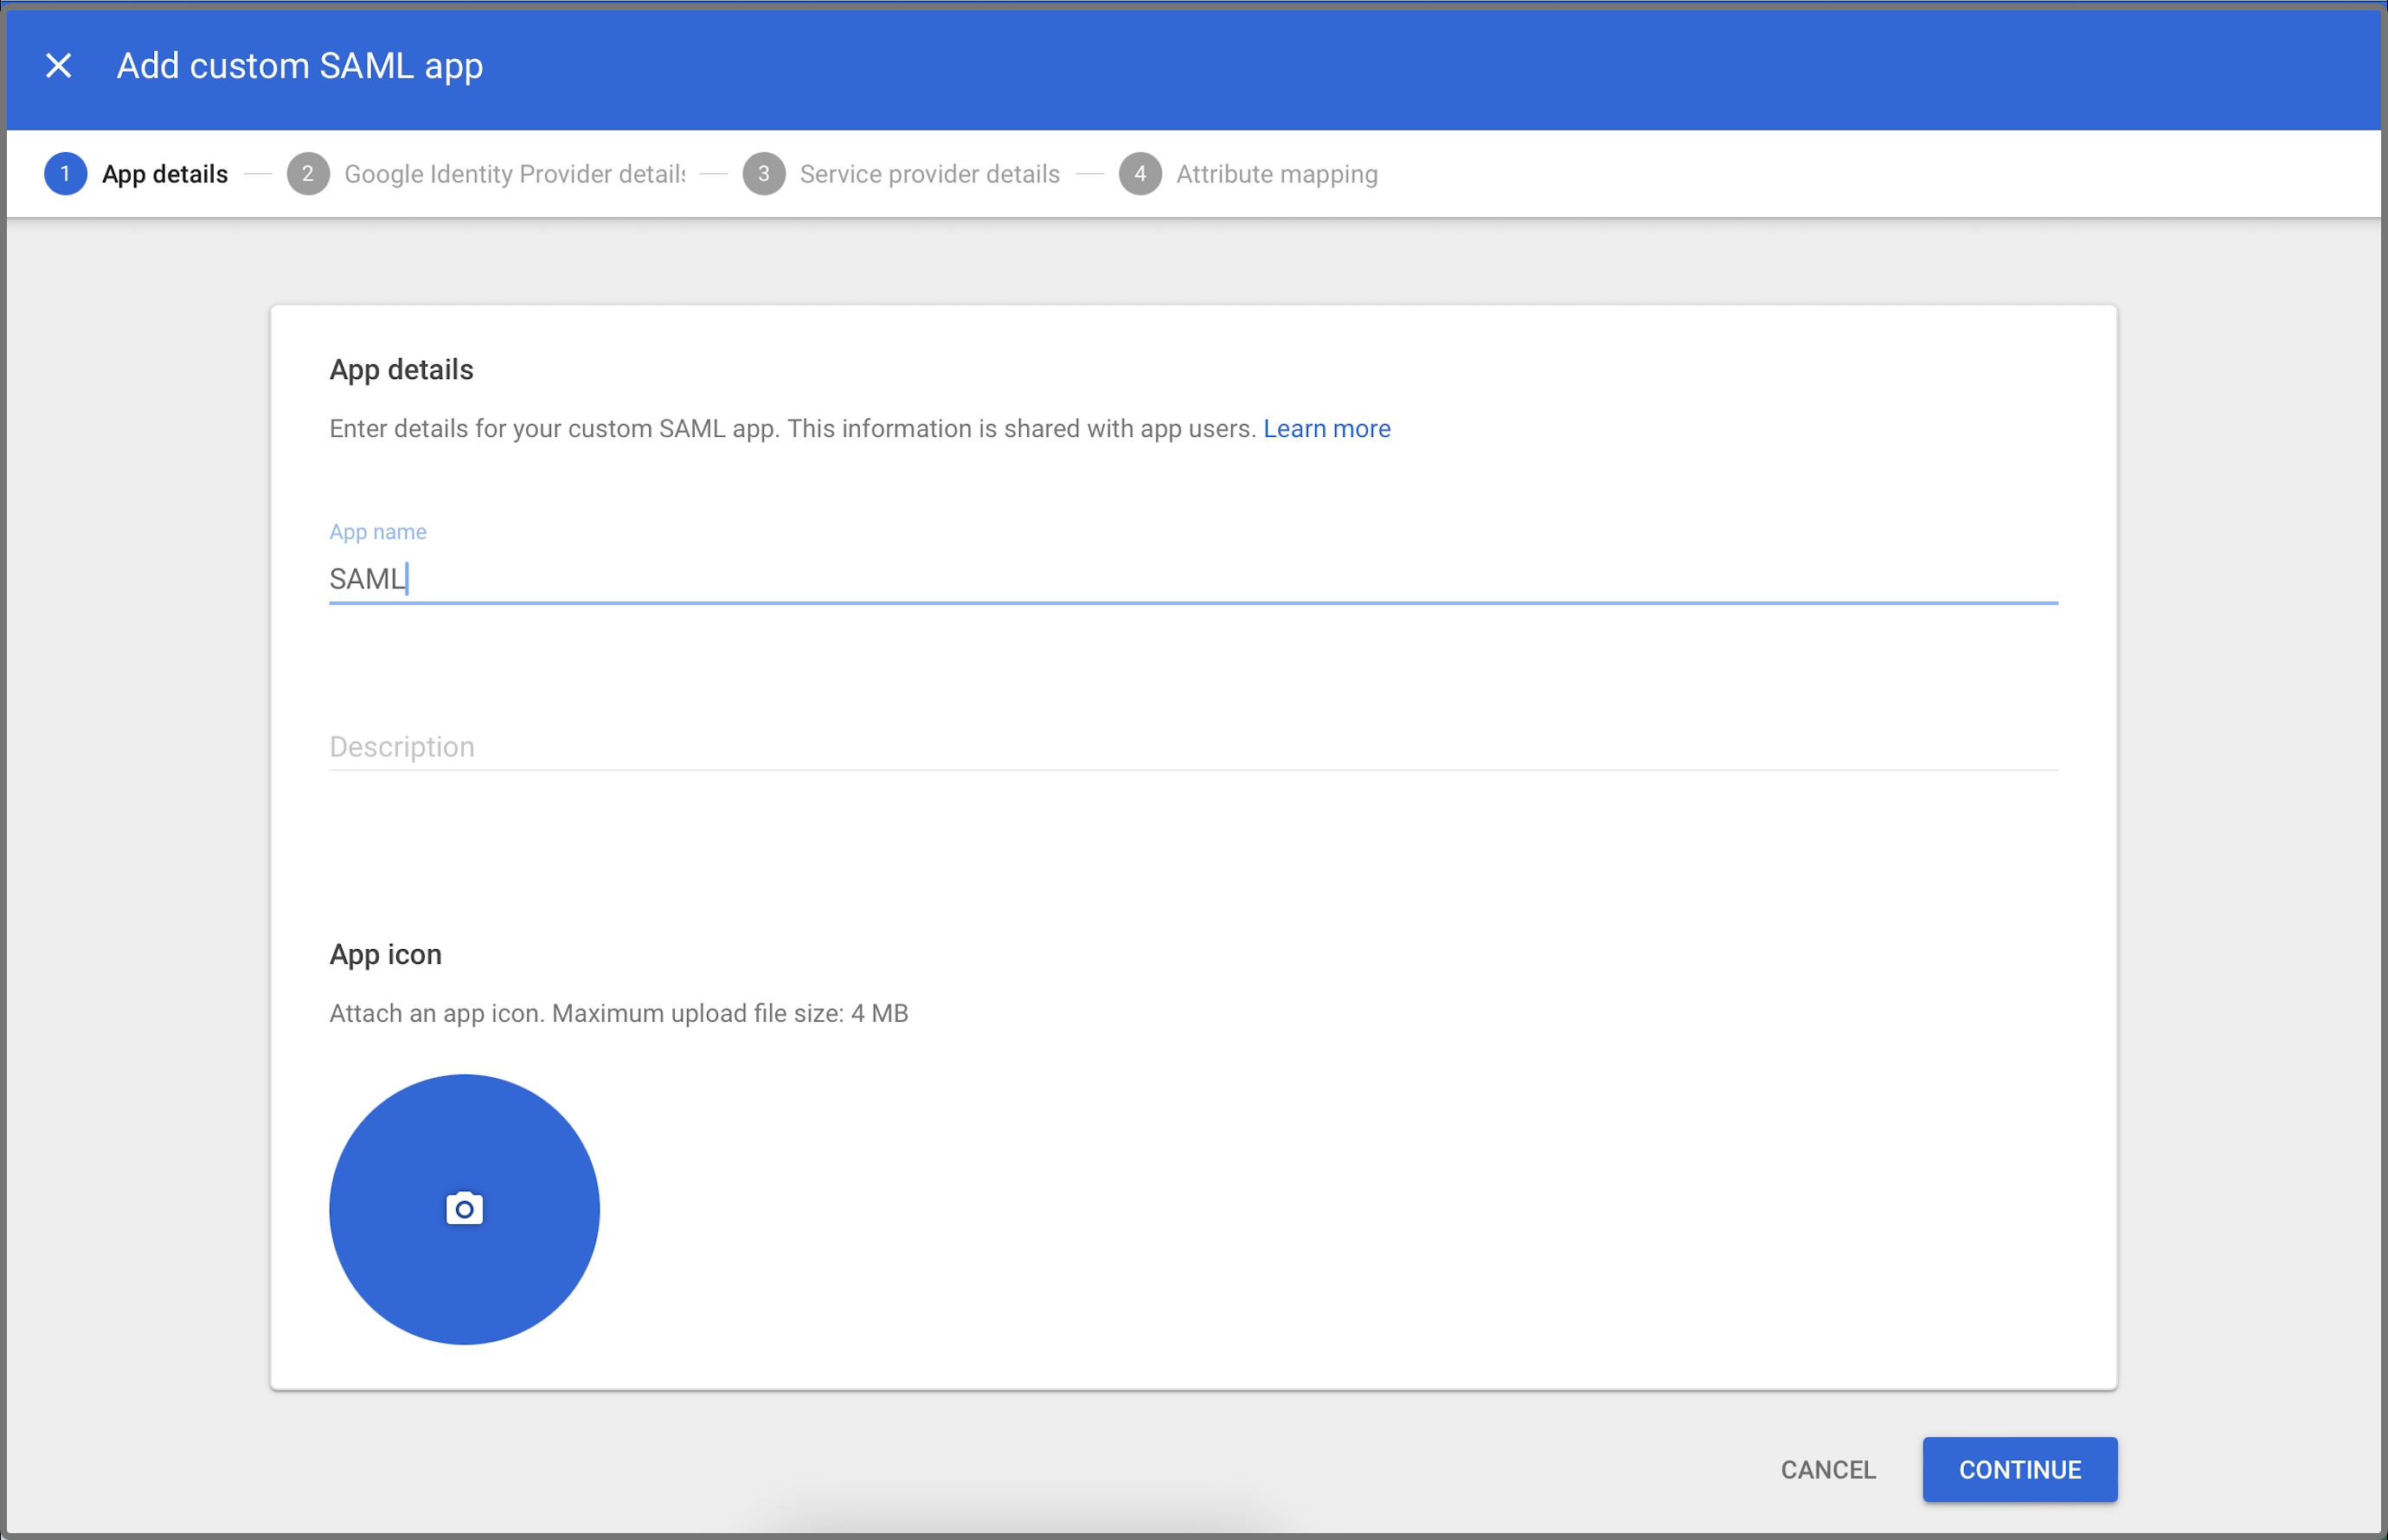
On the App details tab, enter a name for the app, and upload an app icon. Then, click CONTINUE.
-
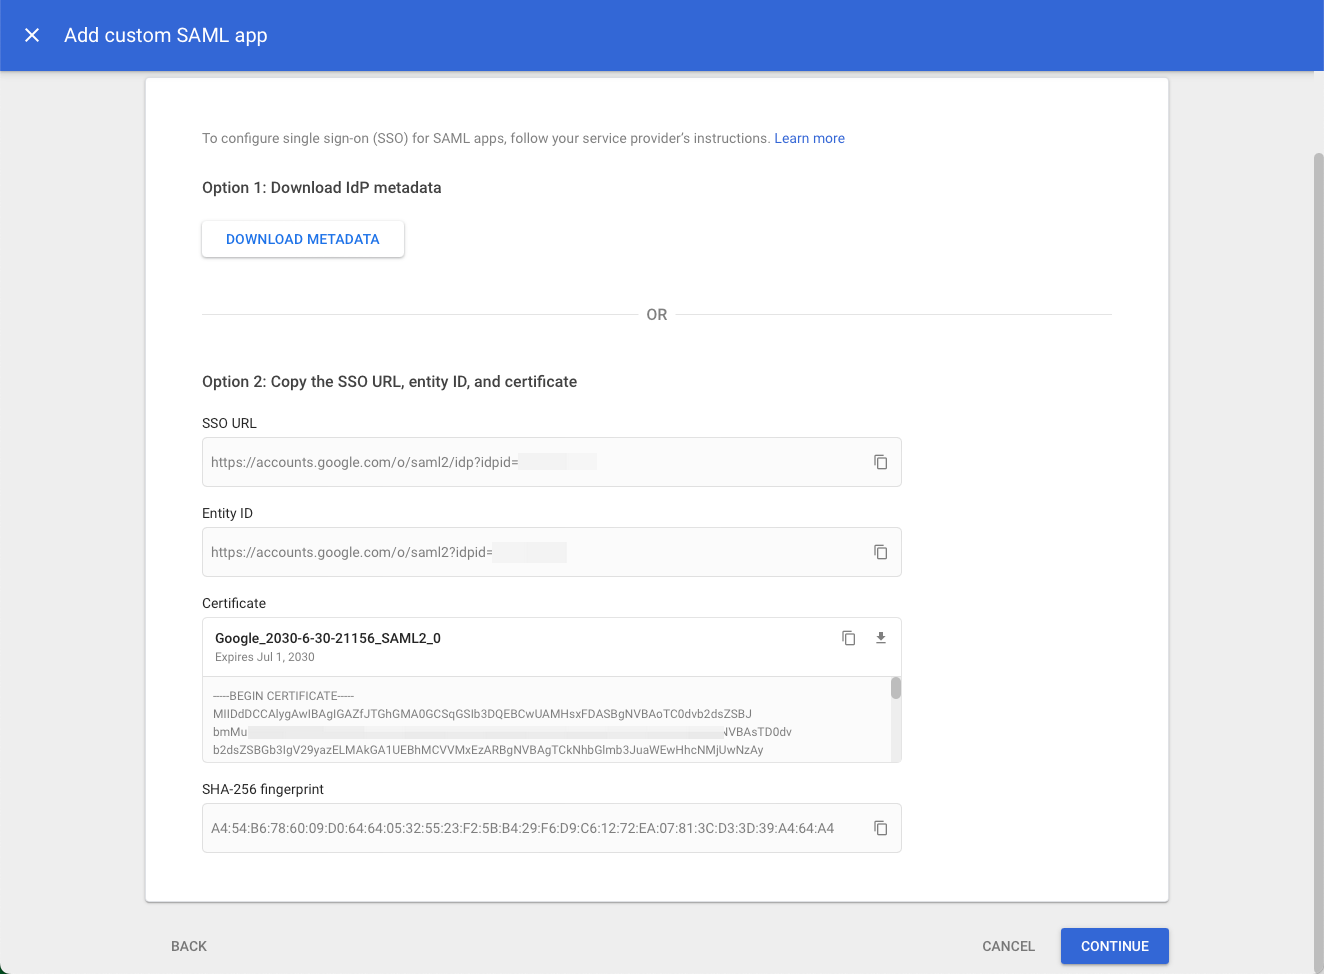
On the Google Identity Provider details tab, click the Copy icons to copy the SSO URL, Entity ID, and Certificate, and save them properly. Then, click CONTINUE.
-
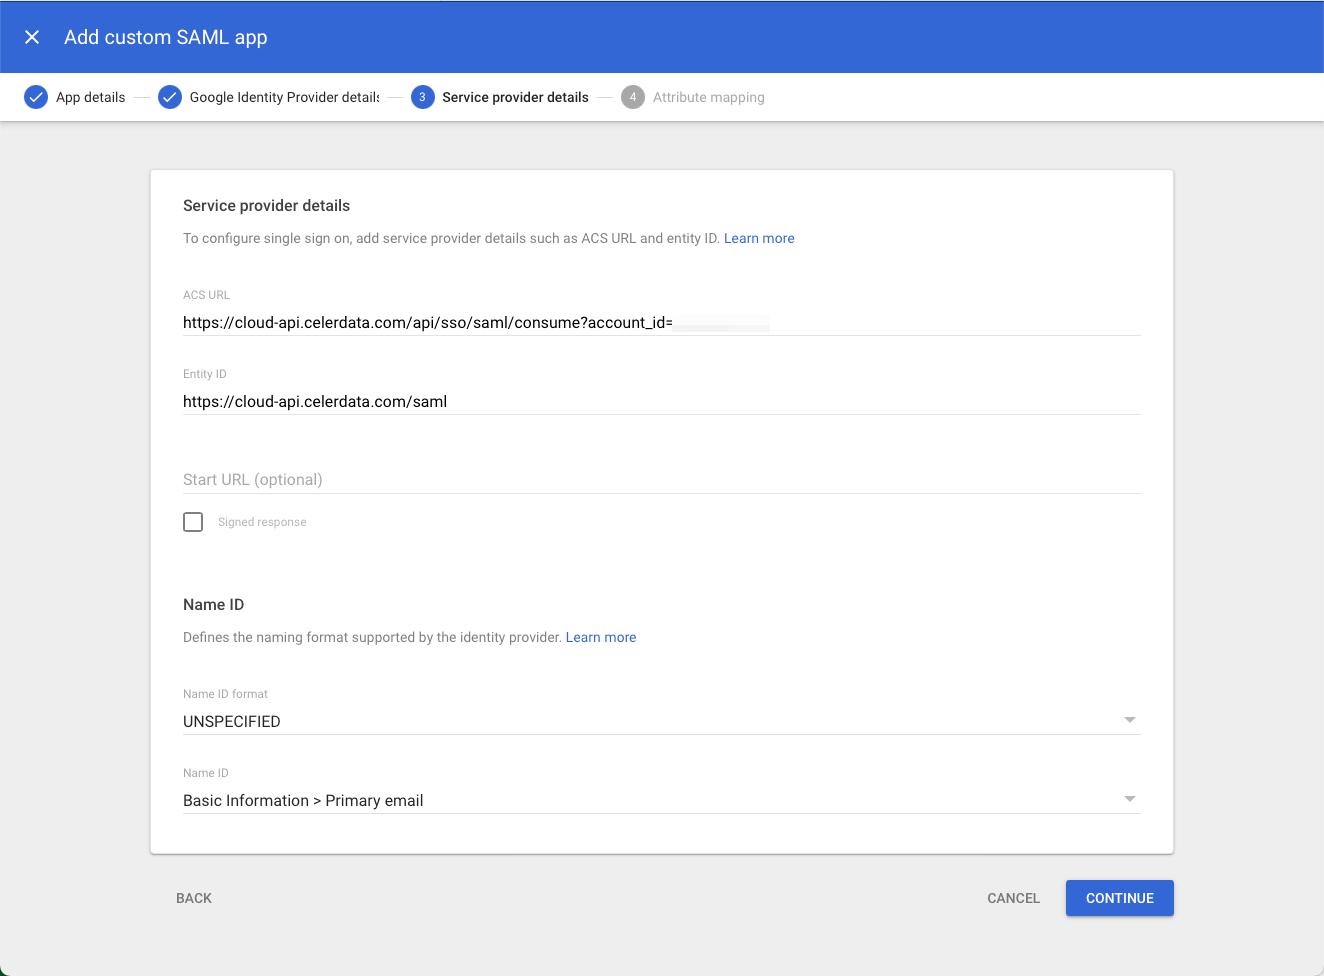
On the Service provider details tab, paste the CelerData redirect URL to the ACS URL field, and the CelerData entity ID to the Entity ID field. Then, you can leave the items that are not mentioned here unchanged, and click CONTINUE.
-
On the Attribute mapping tab, click FINISH.
-
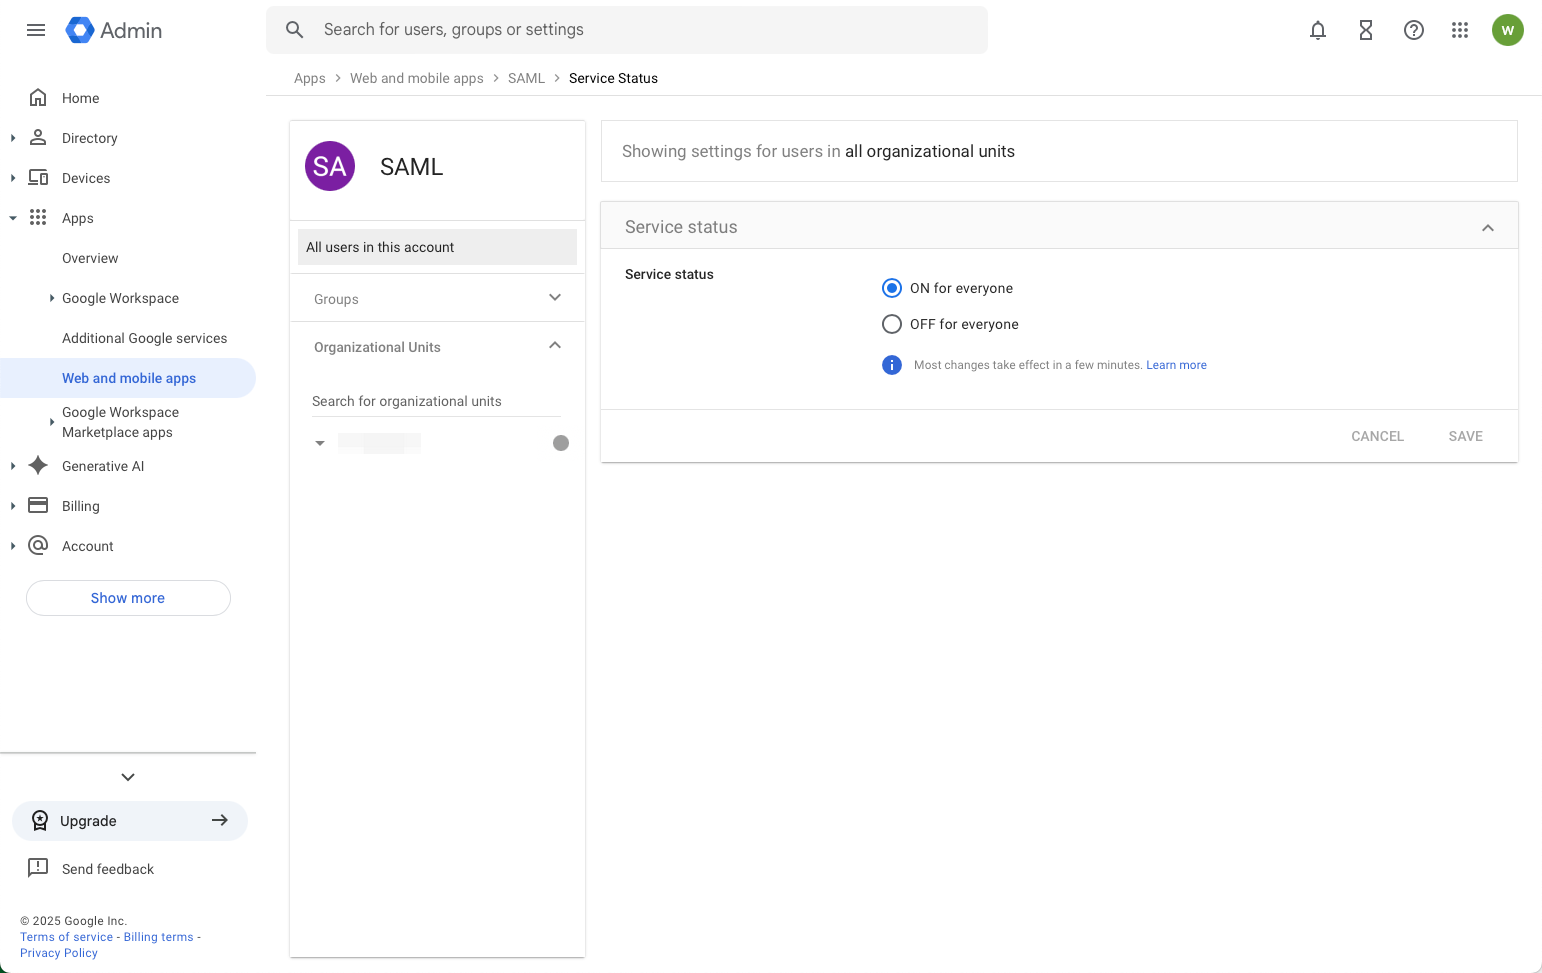
On the Apps > Web and mobile apps > SAML > Service Status page, make sure the Service status of the app you just created is On for everyone.
Follow these steps to set up your IdP:
-
Sign in to the Microsoft Azure portal as a user with administrator privileges.
-
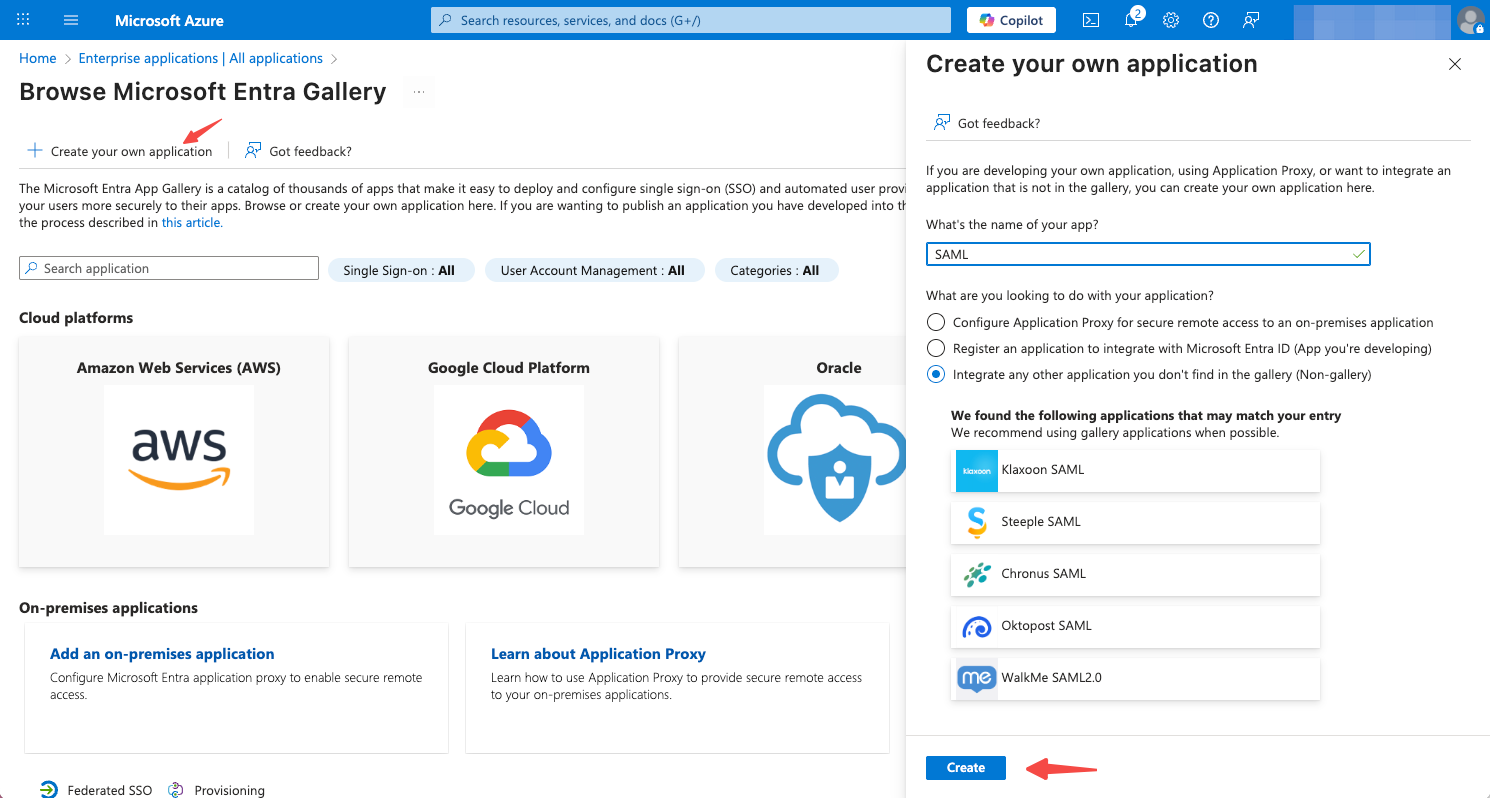
Navigate to the Enterprise applications service page, and click New application. On the new page that appears, click Create your own application.
-
On the Create your own application tab, enter a name for the app, and click Create.
-
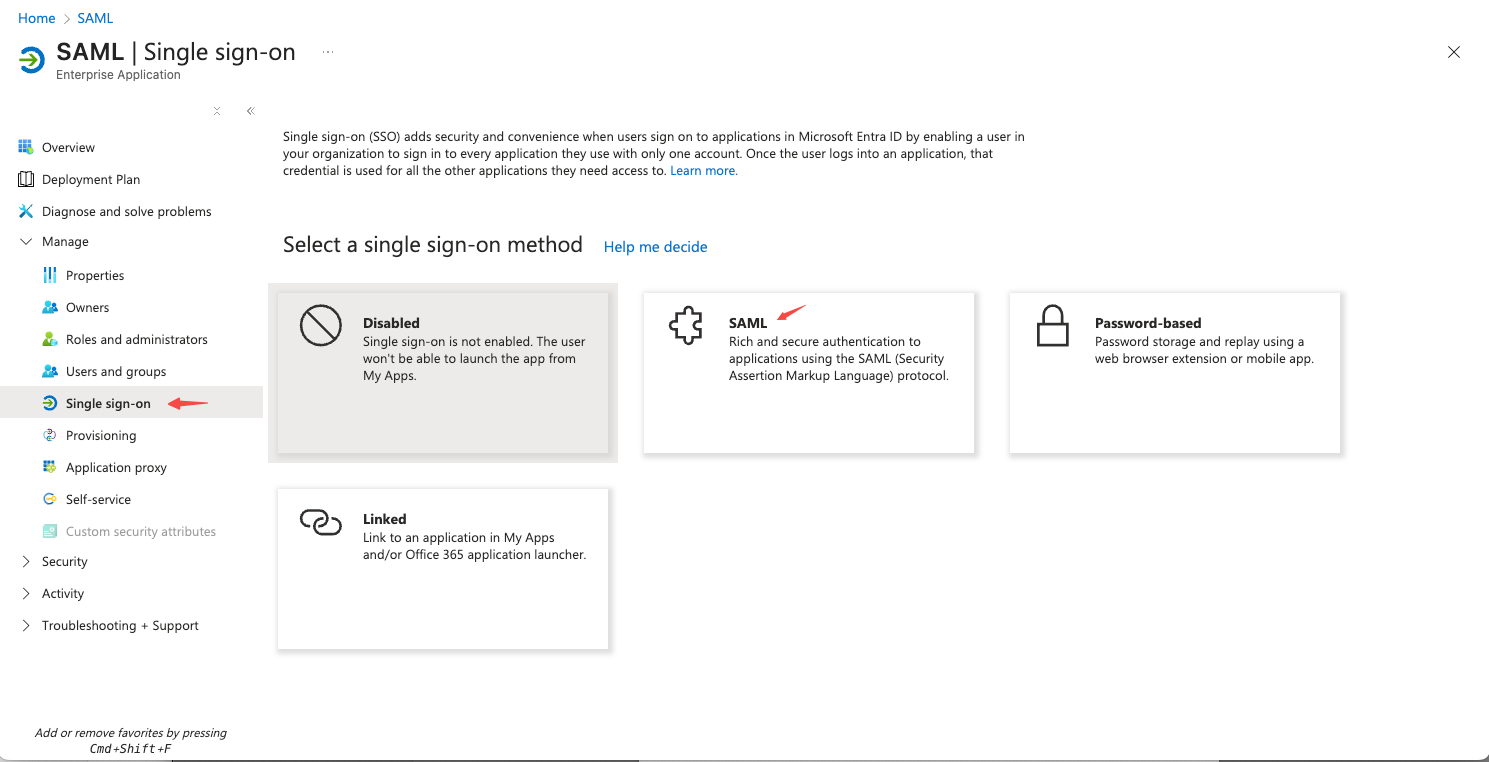
In the left-side navigation pane of the application detail page, choose Manage > Single sign-on. On the Single sign-on page, select SAML to proceed.
-
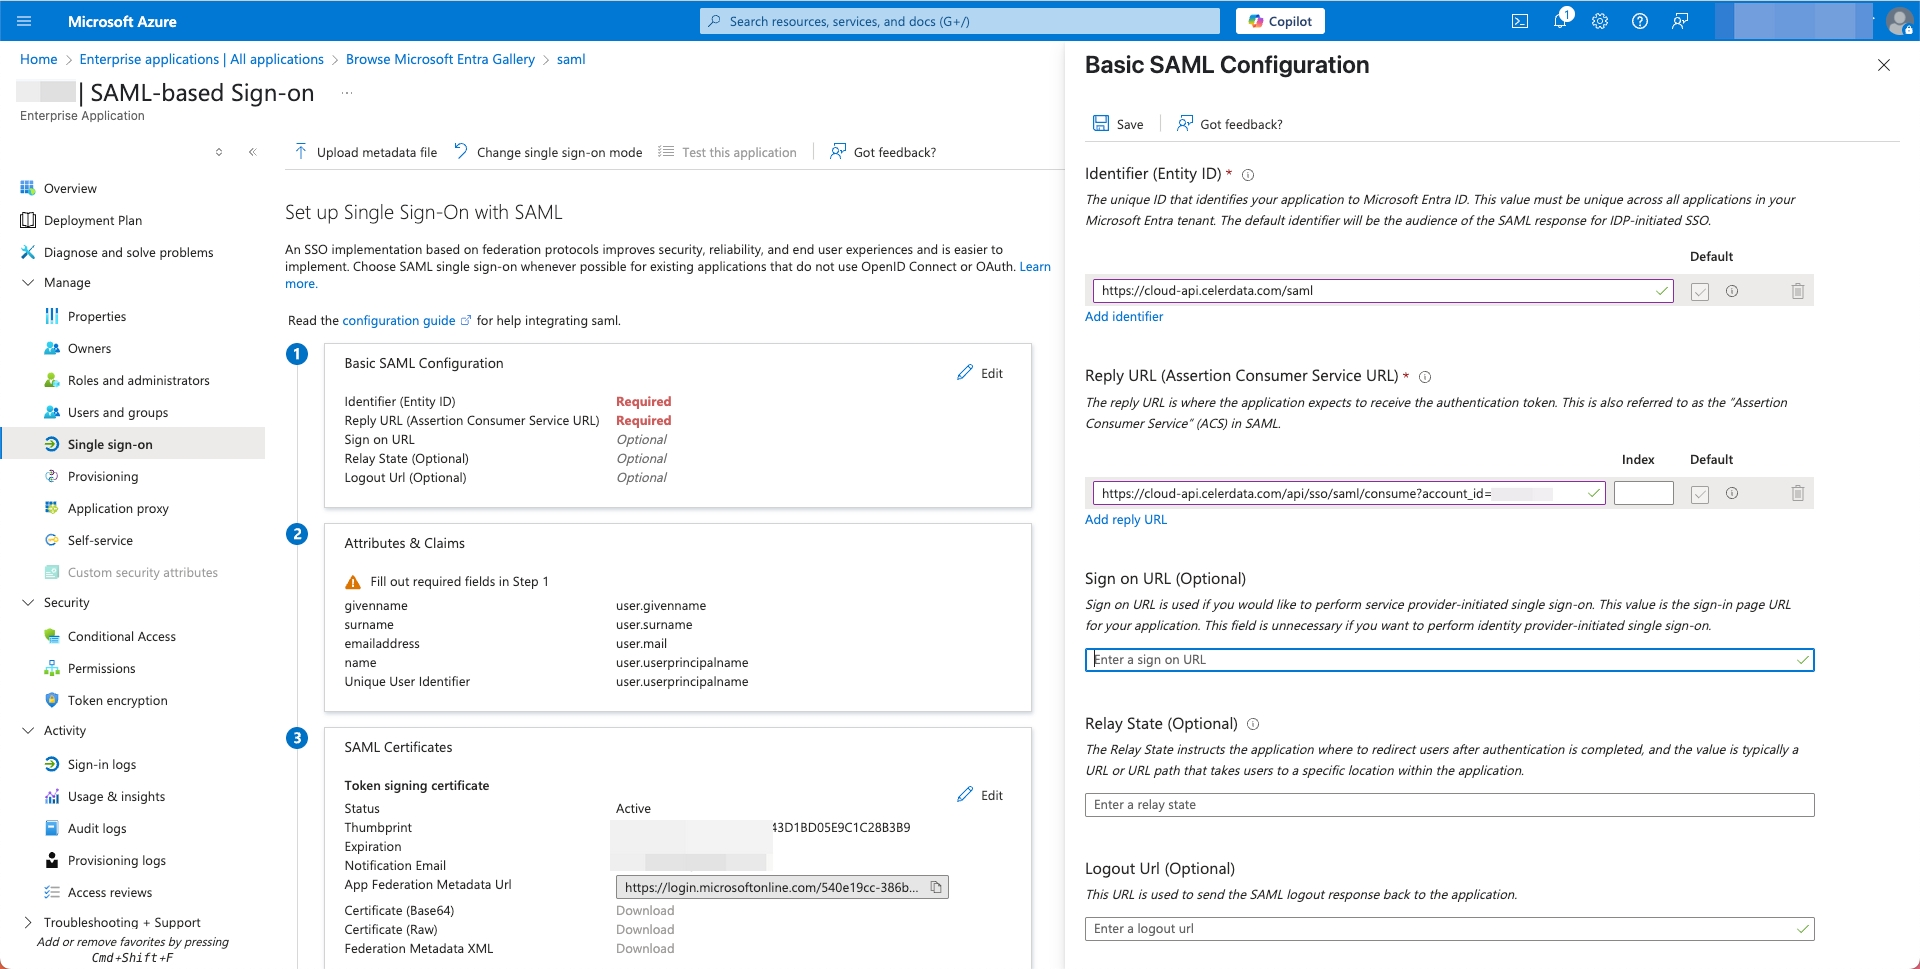
On the Basic SAML Configuration tab of the SAML-based sign-on page, paste the CelerData entity ID to the Identifier (Entity ID) field, and the CelerData redirect URL to the Reply URL (Assertion Consumer Service URL) field. Then, click Save.
-
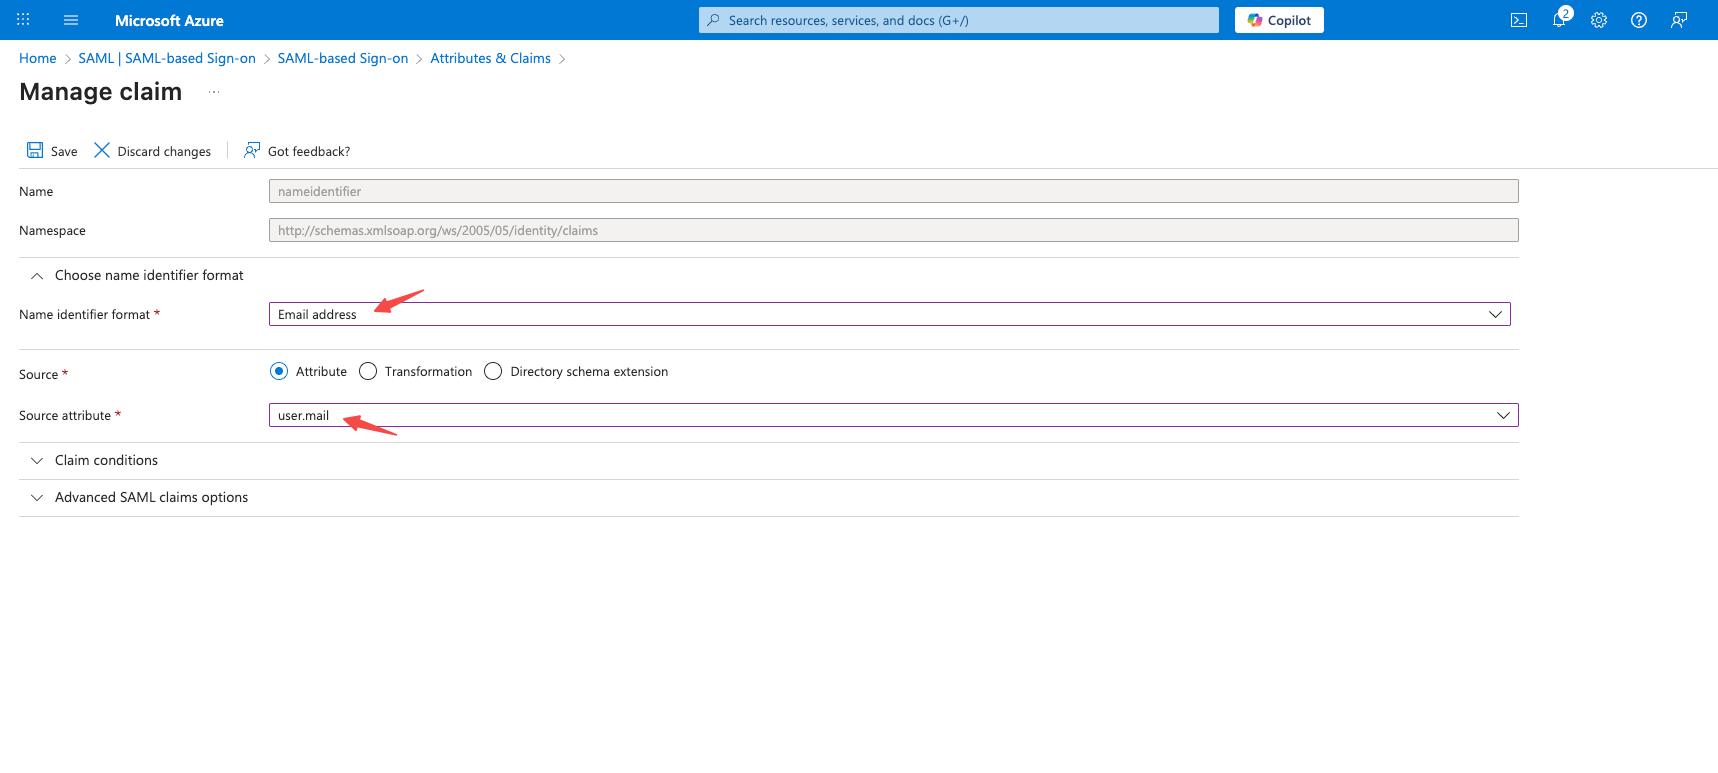
On the Manage claim page that appears, select Email address from the Name identifier format dropdown list, choose Attribute as Source, and select user.mail from the Source attribute dropdown list. Then, click Save.
-
On the SAML-based sign-on page, download the Certificate (Base64), and click the Copy icons to copy the Login URL and Microsoft Entra Identifier, and save them properly.

-
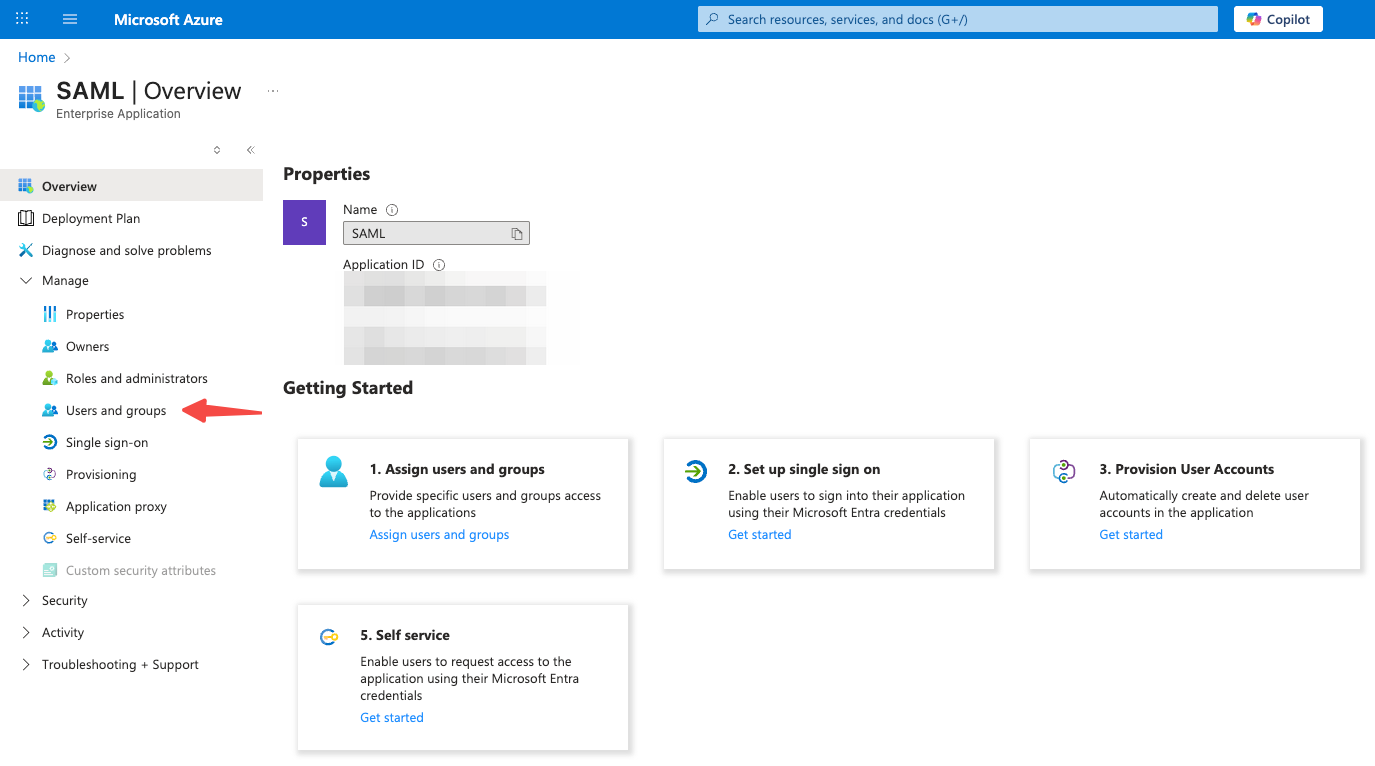
In the left-side navigation pane of the application detail page, choose Manage > Single sign-on. Make sure to assign the users and groups to the application.
Step 3: Configure and enable SSO on CelerData
- Return to the Configure Single Sign-On(SSO) dialog box on your CelerData Cloud BYOC console.
- Paste the App Embed Link of Okta (or the SSO URL of Google, or Login URL of Azure) you have copied to the Single Sign-On URL field.
- Paste the SAML Issuer ID of Okta (or the Entity ID of Google, or Microsoft Entra Identifier of Azure) you have copied to the Entity ID field.
- Paste the content of the certificate file you have downloaded or copied from your IdP to the x.509 Certificate field. The content should be a string that starts with
-----BEGIN CERTIFICATE-----and ends with-----END CERTIFICATE-----. - Click Save.
- On the Single Sign-On (SSO) tab of the Account settings page, find the SSO configuration you have created, and click Enable.
The following table shows the correspondence of information you need across CelerData and Okta:
| Copy from Okta console > Applications > Applications > choose your application > | Paste to CelerData Cloud BYOC console > Account > Account settings > Single sign-on > Configure > Configure Single Sign-On(SSO) > |
|---|---|
| General > SAML Settings > SAML Issuer ID | Entity ID |
| General > App Embed Link > Embed Link | Single Sign-On URL |
| Sign On > SAML Signing Certificates > choose an active certificate > Actions > Download certificate | x.509 Certificate |
Map IdP groups to CelerData roles
CelerData supports mapping IdP groups to CelerData roles to allow account administrators to manage members' privileges from their IdP.
Prerequisites
A CelerData Cloud BYOC service account with the Member Management privilege is required to create System for Cross-domain Identity Management (SCIM). You can follow the steps described in Service Accounts to create a service account, copy and save its Client ID and Client Secret, and grant it the Member Management privilege.
This section uses Okta as an example to demonstrate this process:
Step 1: Create SCIM
-
Sign in to the Okta Administration console as a member with administrator privileges.
-
In the left-side navigation pane, choose Applications > Applications.
-
On the Applications page, click the application you have created for CelerData Cloud BYOC to enter the application detail page.
-
On the General tab, select SCIM in the Provisioning section, and click Save.
-
On the Provisioning tab, click Integration sub-tab, and configure the SCIM integration as follows, and click Save:
a. Enter
https://cloud-api.celerdata.com/api/1.0/sso/scim/v2in the SCIM connector base URL field.b. Enter
userNamein the Unique identifier field for users field.c. Select Push Groups for Supported provisioning actions to enable notifications on group changes.
d. Select OAuth 2 for Authentication Mode to display the OAuth 2 section.
e. Select Client Credentials for Grant Type.
f. Enter
https://cloud-api.celerdata.com/api/1.0/tokenin the Access token endpoint URI field.g. Paste the Client ID and Client Secret of the service account you have created for the IdP in the respective fields.
-
On the Push Groups tab, click Push Groups, select Find groups by name (only groups with specific names will be pushed) or Find groups by rule (groups with specific name patterns will be pushed), specify the names or name patterns of the groups you want to push to CelerData Cloud BYOC, and save the changes.
Step 2: Define groups and role mappings
Follow these steps to create groups and role mappings in CelerData Cloud BYOC:
-
Sign in to the CelerData Cloud BYOC console as the account administrator.
-
In the left-side navigation pane, choose Account > Account settings.
-
On the Single sign-on tab of the Account settings page, click Configure to display the Configure Single Sign-On(SSO) dialog box.
-
Click Advance Settings, and configure groups and role mappings as follows:
a. Select the Default Role for all members in the groups.
b. Click Create New Role Mapping to add a role mapping.
c. In the Group Name (from IDP) field, specify the name of the group that you want to push from the IdP.
d. In the CelerData Roles field, select the privileges you want to grant to the group.
e. Click the save button to save the changes.
-
Click Submit.
By creating the SCIM, your IdP is able to synchronize the updates of group membership to CelerData Cloud BYOC.
Disable SSO
- Sign in to the CelerData Cloud BYOC console as the account administrator.
- In the left-side navigation pane, choose Account > Account settings.
- On the Single Sign-On (SSO) tab of the Account settings page, click Disable.
NOTE
Enabling or disabling SSO will not remove members' passwords to CelerData. After SSO is disabled, members who already have their passwords can still sign in to CelerData with their passwords. However, members who were invited while SSO is enabled do not have passwords. They must reset their passwords by clicking Forget Password when signing in to CelerData.
Modify SSO settings
- Sign in to the CelerData Cloud BYOC console as the account administrator.
- In the left-side navigation pane, choose Account > Account settings.
- On the Single Sign-On (SSO) tab of the Account settings page, click Configure.
- After you have modified the SSO settings, click Save.
NOTE
If you want to remove your SSO settings, you can delete all the settings and click Save. After that, SSO is automatically disabled.
Invite a new member to your account when SSO is enabled
When SSO is enabled, you need to invite a new member both to your IdP and to CelerData. The email address you used for both invitations must be the same.
The member to be invited will receive invitation emails from both the IdP and CelerData. they need first set up a login credential on the IdP, and then sign in to their account with SSO.
Monitor audit logs when using SSO
Enabling, disabling, and edit SSO produce audit logs as follows:
