Load data from Confluent Cloud using Routine Load
This topic introduces how to create a Routine Load job to stream messages (events) from Confluent into CelerData, and familiarizes you with some basic concepts about Routine Load.
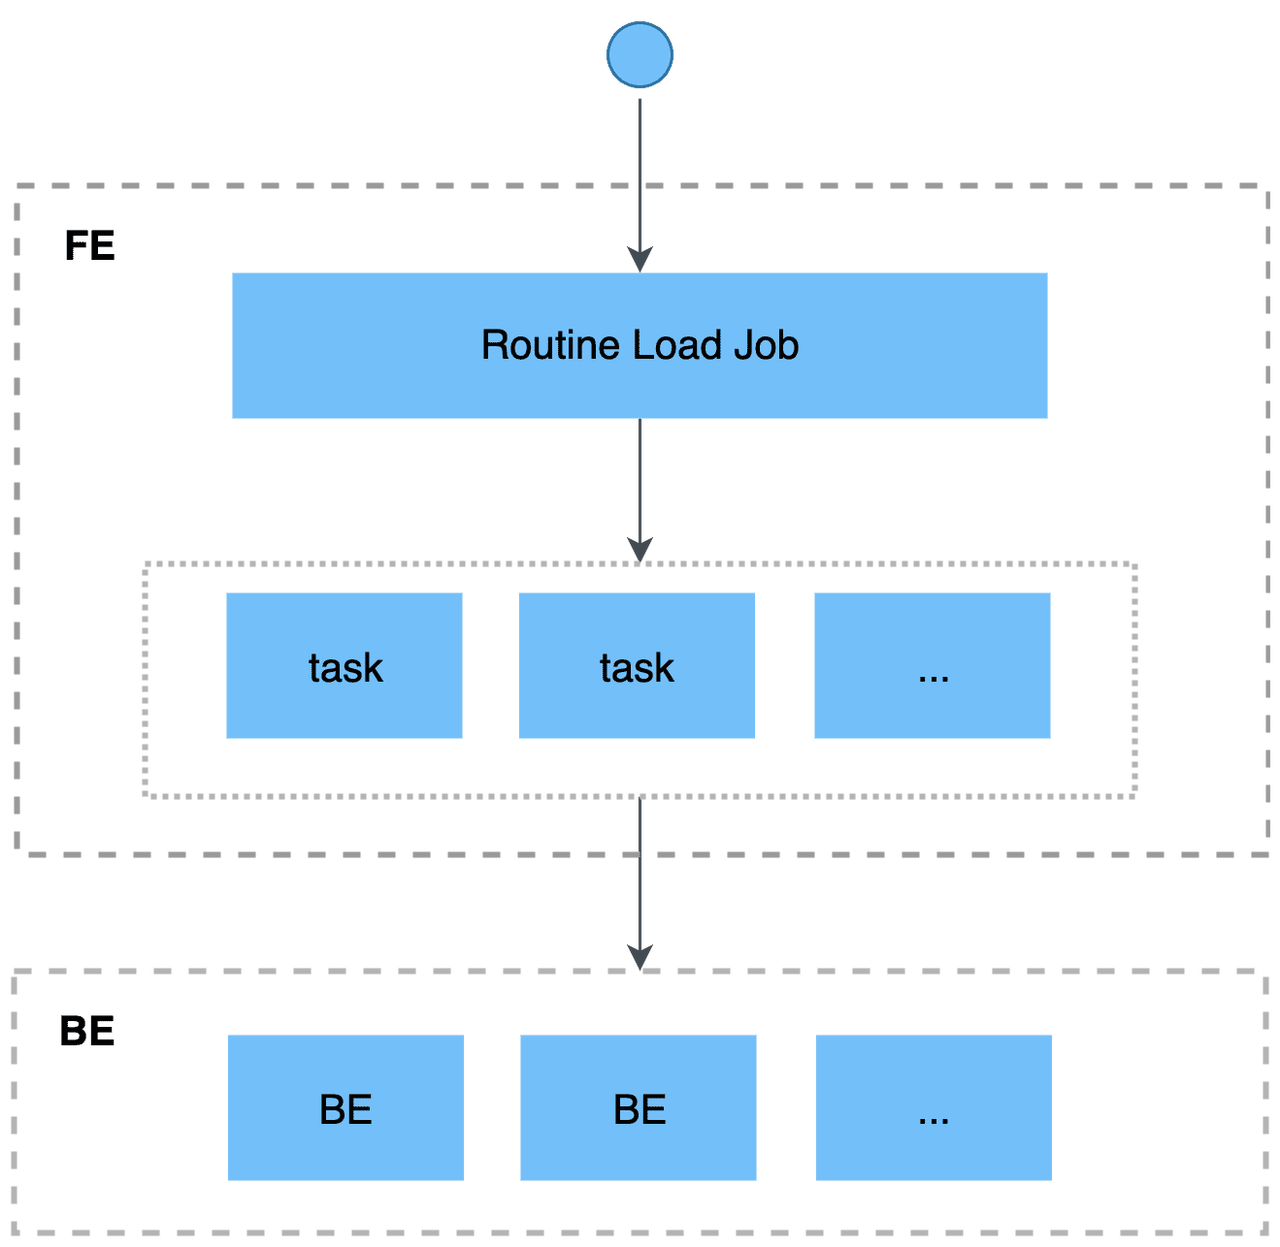
To continuously load messages of a stream into CelerData, you can store the message stream in a Confluent topic, and create a Routine Load job to consume the messages. The Routine Load job persists in CelerData, generates a series of load tasks to consume the messages in all or part of the partitions in the topic, and loads the messages into CelerData.
A Routine Load job supports exactly-once delivery semantics to ensure the data loaded into CelerData is neither lost nor duplicated.
Supported data file formats
Routine Load now supports consuming CSV and JSON format data from a Confluent cluster.
NOTE
As for data in CSV format, CelerData supports UTF-8 encoded strings within 50 bytes as column separators. Commonly used column separators include comma (,), tab and pipe (|).
How it works

Before you begin
Configuring networks for CelerData to access Confluent Cloud cluster
-
Make sure the subnet for CelerData in your VPC can connect to the Internet.
- If CelerData is in a private subnet, make sure that a NAT gateway is configured for the private subnet so that CelerData can connect to the internet.
- If CelerData is in a public subnet, CelerData can connect to the internet by default.
-
For security purposes, please add the following outbound rule to the security group for your VPC, so that CelerData in your VPC can access Confluent cloud.

-
Set Port range to
9092.Note
Make sure the port is the port of your Bootstrap server on Confluent cloud.
-
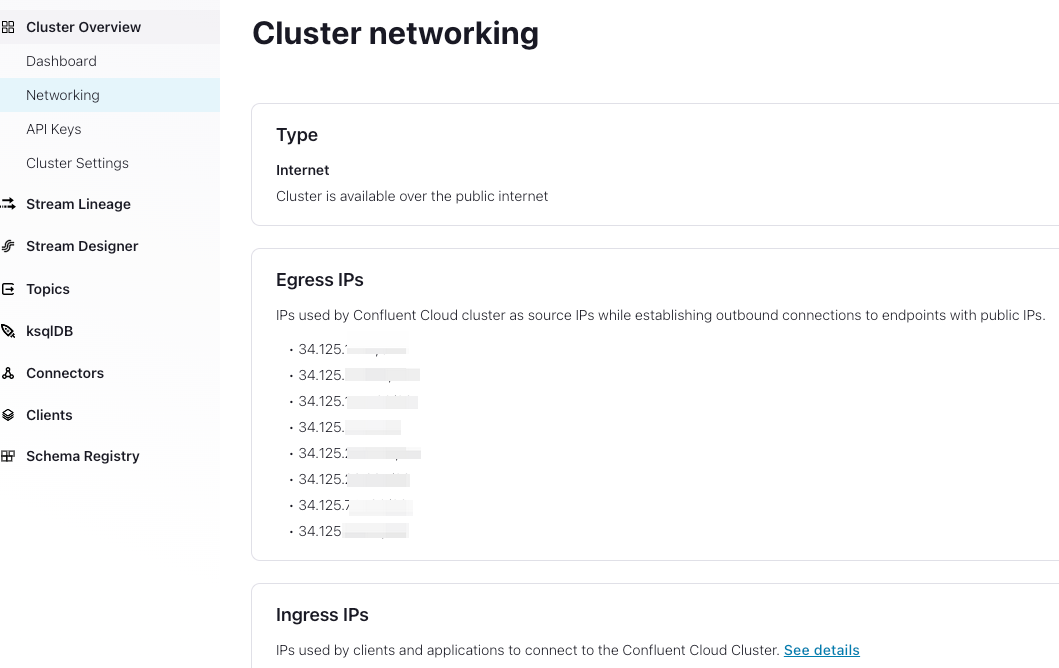
Set Destination. You can find Confluent Cloud cluster Egress IPs through
Cluster Overview > Networking > Egress IPson Confluent Cloud according to Get started with Static Egress IP Addresses. Remember that you should set all the Confluent Cloud cluster Egress IPs.

-
-
(Optional) If Confluent enables firewall mechanisms, add the following IP address of your CelerData cluster (FE and BE) to the Access Control List of the Confluent cluster.
-
If CelerData is in a private subnet for your VPC on AWS Add the Elastic IP addresses of your NAT gateway for your CelerData cluster (FEs and BEs) into your Confluent Cloud cluster's ACL. You can find the Elastic IP address through
VPC > NAT Gateways. You need to select the NAT gateway for your private subnet. And then you can find the Elastic IP address as below.
-
If CelerData is in a public subnet for your VPC on AWS Add the Public IP addresses of your CelerData cluster (FEs and BEs) into your Confluent Cloud Cluster's ACL allowlist. You can find the Public IPs on AWS through
EC2 > Instances.
-
Basic operations
Create a Routine Load job
The following two examples show how to consume CSV-formatted and JSON-formatted data in a Confluent Cloud cluster, and load the data into CelerData by creating a Routine Load job. For more information, see CREATE ROUTINE LOAD.
Load CSV-format data
This section describes how to create a Routine Load job to consume CSV-format data in a Confluent Cloud cluster, and load the data into CelerData.
Prepare a dataset
Suppose there is a CSV-format dataset in the topic ordertest1 in a Confluent Cloud cluster Every message in the dataset includes six fields, which represent order ID, payment date, customer name, nationality, gender, and price.
2020050802,2020-05-08,Johann Georg Faust,Deutschland,male,895
2020050802,2020-05-08,Julien Sorel,France,male,893
2020050803,2020-05-08,Dorian Grey,UK,male,1262
2020050901,2020-05-09,Anna Karenina",Russia,female,175
2020051001,2020-05-10,Tess Durbeyfield,US,female,986
2020051101,2020-05-11,Edogawa Conan,japan,male,8924
Create a table
According to the fields of CSV-format data, create the table example_tbl1 in the database example_db. The following example creates a table with five fields excluding the field that represents customer gender in the CSV-format data.
CREATE TABLE example_db.example_tbl1
(
    `order_id` bigint NOT NULL COMMENT "Order ID",
    `pay_dt` date NOT NULL COMMENT "Payment date",
    `customer_name` varchar(26) NULL COMMENT "Customer name",
    `nationality` varchar(26) NULL COMMENT "Nationality",
    `price`double NULL COMMENT "Price"
)
ENGINE=OLAP
PRIMARY KEY (order_id,pay_dt)
DISTRIBUTED BY HASH(`order_id`);
Submit a Routine Load job
Execute the following statement to submit a Routine Load job named example_tbl1_ordertest1 to consume the messages in the topic ordertest1 and load the data into the table example_tbl1. The load job consumes the messages from the initial offset in the specified partitions of the topic.
CREATE ROUTINE LOAD example_db.example_tbl1_ordertest1 ON example_tbl1
COLUMNS TERMINATED BY ",",
COLUMNS (order_id, pay_dt, customer_name, nationality, temp_gender, price)
PROPERTIES
(
    "desired_concurrent_number" = "5"
)
FROM KAFKA
(
    "kafka_broker_list" ="<kafka_broker1_ip>:<kafka_broker1_port>,<kafka_broker2_ip>:<kafka_broker2_port>",
    "kafka_topic" = "ordertest1",
    "kafka_partitions" ="0,1,2,3,4",
    "property.kafka_default_offsets" = "OFFSET_BEGINNING",
    "property.security.protocol"="SASL_SSL",
    "property.sasl.mechanism"="PLAIN",
    "property.sasl.username"="***",
    "property.sasl.password"="***"
);
After submitting the load job, you can execute the SHOW ROUTINE LOAD statement to check the status of the load job.
-
Load job name
There could be multiple load jobs on a table. Therefore, we recommend you name a load job with the corresponding topic and the time when the load job is submitted. This helps you distinguish the load job on each table.
-
Column separator
The property
COLUMN TERMINATED BYdefines the column separator of the CSV-format data. The default is\t. -
Kafka broker list
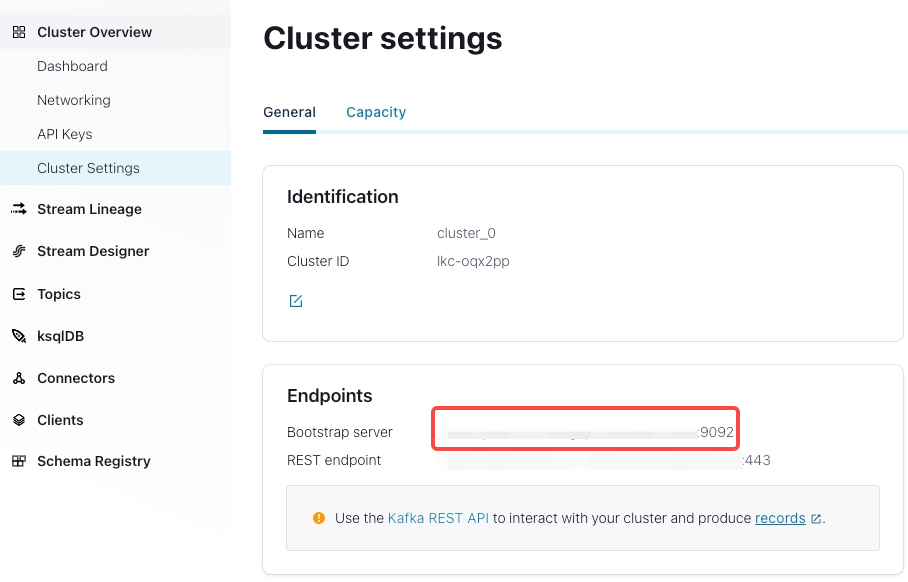
"kafka_broker_list" ="<kafka_broker1_ip>:<kafka_broker1_port>,<kafka_broker2_ip>:<kafka_broker2_port>",A list of host and port pairs for establishing the connection to the Confluent Cloud cluster. You can find it in
Cluster Overview > Cluster Settings.
-
Topic partition and offset
You can specify the properties
kafka_partitionsandkafka_offsetsto specify the partitions and offsets to consume the messages. For example, if you want the load job to consume messages from the partitions"0,1,2,3,4"of the topicordertest1all with the initial offsets, you can specify the properties as follows:"kafka_partitions" ="0,1,2,3,4",
"kafka_offsets" ="OFFSET_BEGINNING,OFFSET_BEGINNING,OFFSET_BEGINNING,OFFSET_END,OFFSET_END"You can also set the default offsets of all partitions with the property
property.kafka_default_offsets."kafka_partitions" ="0,1,2,3,4",
"property.kafka_default_offsets" = "OFFSET_BEGINNING"For more information, see CREATE ROUTINE LOAD.
-
Data mapping and transformation
To specify the mapping and transformation relationship between the CSV-format data, and the CelerData table, you need to use the
COLUMNSparameter.-
Data mapping
CelerData extracts the columns in the CSV-format data and maps them in sequence onto the fields declared in the
COLUMNSparameter. CelerData extracts the fields declared in theCOLUMNSparameter and maps them by name onto the columns of the CelerData table. -
Data transformation
The example excludes the column that represents customer gender from the CSV-format data. Therefore, the field
temp_genderin theCOLUMNSparameter is used as a placeholder for this field. The other fields are mapped to the columns of the CelerData tableexample_tbl1directly.NOTE
You do not need to specify the
COLUMNSparameter if the names, number, and order of the columns in the CSV-format data completely correspond to those of the CelerData table.
-
-
Task concurrency
When there are many topic partitions and enough BE nodes, you can accelerate the loading by increasing task concurrency.
To increase the actual load task concurrency, you can increase the value of
desired_concurrent_numberwhen you create a routine load job. You can also set the dynamic FE configuration itemmax_routine_load_task_concurrent_numto a larger value. This FE configuration item specifies the default maximum load task currency.The actual task concurrency is defined by the minimum value among the number of BE nodes that are alive, the number of the pre-specified topic partitions, and the values of
desired_concurrent_numberandmax_routine_load_task_concurrent_num.In the example, the number of BE nodes that are alive is
5, the number of the pre-specified topic partitions is5, and the value ofmax_routine_load_task_concurrent_numis5. To increase the actual load task concurrency, you can increase the value ofdesired_concurrent_numberfrom the default value3to5.For more information about the properties, see CREATE ROUTINE LOAD.
-
Encryption and authentication
"property.security.protocol"="SASL_SSL",
"property.sasl.mechanism"="PLAIN",
"property.sasl.username"="***",
"property.sasl.password"="***"-
property.security.protocol: You can useSASL_SSL, because Confluent Cloud usesSASL_SSLas the default security protocol.Notice
We do not recommend using
SASL_PLAINTEXTin production environment. -
property.sasl.mechanism: You can usePLAINwhich is a simple username/password authentication mechanism. -
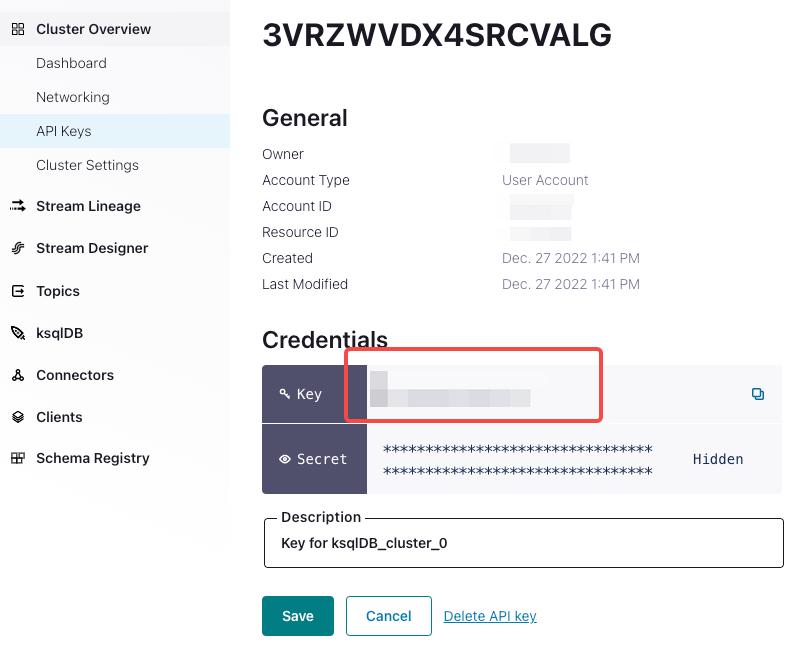
property.sasl.username: API key for the Confluent Cloud cluster. You can find it inCluster Overview > API Keys.
-
property.sasl.password: API secret for the Confluent Cloud cluster. You can find it in the txt file that you downloaded when creating the cluster.
-
Load JSON-format data
This section describes how to create a Routine Load job to consume JSON-format data in a Confluent Cloud cluster, and load the data into CelerData.
Prepare a dataset
Suppose there is a JSON-format dataset in the topic ordertest2 in a Confluent Cloud cluster. The dataset includes six keys that represent commodity ID, customer name, nationality, payment time, and price. Besides, you want to transform the payment time key into the DATE type, and load it into the pay_dt column in the CelerData table.
{"commodity_id": "1", "customer_name": "Mark Twain", "country": "US","pay_time": 1589191487,"price": 875}
{"commodity_id": "2", "customer_name": "Oscar Wilde", "country": "UK","pay_time": 1589191487,"price": 895}
{"commodity_id": "3", "customer_name": "Antoine de Saint-Exupéry","country": "France","pay_time": 1589191487,"price": 895}
CAUTION
Each JSON object in a row must be in one message, otherwise a JSON parsing error is returned.
Create a table
According to the keys of the JSON-format data, create the table example_tbl2 in the database example_db.
CREATE TABLE `example_tbl2`
(
`commodity_id` varchar(26) NULL COMMENT "Commodity ID",
`customer_name` varchar(26) NULL COMMENT "Customer name",
`country` varchar(26) NULL COMMENT "Country",
`pay_time` bigint(20) NULL COMMENT "Payment time",
`pay_dt` date NULL COMMENT "Payment date",
`price`double SUM NULL COMMENT "Price"
)
ENGINE=OLAP
PRIMARY KEY(`commodity_id`,`customer_name`,`country`,`pay_time`,`pay_dt`)
DISTRIBUTED BY HASH(`commodity_id`);
Submit a Routine Load job
Execute the following statement to submit a Routine Load job named example_tbl2_ordertest2 to consume the messages in the topic ordertest2 and load the data into the table example_tbl2. The load task consumes the messages from the initial offset in the specified partitions of the topic.
CREATE ROUTINE LOAD example_db.example_tbl2_ordertest2 ON example_tbl2
COLUMNS(commodity_id, customer_name, country, pay_time, price, pay_dt=from_unixtime(pay_time, '%Y%m%d'))
PROPERTIES
(
"desired_concurrent_number"="5",
"format" ="json",
"jsonpaths" ="[\"$.commodity_id\",\"$.customer_name\",\"$.country\",\"$.pay_time\",\"$.price\"]"
)
FROM KAFKA
(
"kafka_broker_list" ="<kafka_broker1_ip>:<kafka_broker1_port>,<kafka_broker2_ip>:<kafka_broker2_port>",
"kafka_topic" = "ordertest2",
"kafka_partitions" ="0,1,2,3,4",
"property.kafka_default_offsets" = "OFFSET_BEGINNING",
"property.security.protocol"="SASL_SSL",
"property.sasl.mechanism"="PLAIN",
"property.sasl.username"="***",
"property.sasl.password"="***"
);
After submitting the load job, you can execute the SHOW ROUTINE LOAD statement to check the status of the load job.
- Data format
You need to specify "format"="json" in the clause PROPERTIES to define that the data format is JSON.
-
Data mapping and transformation
To specify the mapping and transformation relationship between the JSON-format data, and the CelerData table, you need to specify the parameter
COLUMNSand propertyjsonpaths. The order of fields specified in theCOLUMNSparameter must match that of the JSON-format data, and the name of fields must match that of the CelerData table. The propertyjsonpathsis used to extract the required fields from the JSON data. These fields are then named by the propertyCOLUMNS.Because the example needs to transform the payment time field to the DATE data type, and load the data into the
pay_dtcolumn in the CelerData table, you need to use thefrom_unixtimefunction. The other fields are mapped to fields of the tableexample_tbl2directly.-
Data mapping
CelerData extracts the
nameandcodekeys of JSON-format data and maps them onto the keys declared in thejsonpathsproperty. CelerData extracts the keys declared in thejsonpathsproperty and maps them in sequence onto the fields declared in theCOLUMNSparameter. CelerData extracts the fields declared in theCOLUMNSparameter and maps them by name onto the columns of the CelerData table. -
Data transformation
Because the example needs to transform the key
pay_timeto the DATE data type, and load the data into thepay_dtcolumn in the CelerData table, you need to use thefrom_unixtimefunction in theCOLUMNSparameter. The other fields are mapped to the fields of the tableexample_tbl2directly. Therefore, the example excludes the column of customer gender from the JSON-format data, the fieldtemp_genderin theCOLUMNSparameter is used as a placeholder for this field. The other fields are mapped to columns of the CelerData tableexample_tbl1directly.NOTE
You do not need to specify the
COLUMNSparameter if the names and number of the keys in the JSON object completely match those of fields in the CelerData table.
-
Check a load job and task
Check a load job
Execute the SHOW ROUTINE LOAD statement to check the status of the load job example_tbl2_ordertest2. CelerData returns the execution state State, the statistical information (including the total rows consumed and the total rows loaded) Statistics, and the progress of the load job progress.
If the state of the load job is automatically changed to PAUSED, it is possibly because the number of error rows has exceeded the threshold. For detailed instructions on setting this threshold, see CREATE ROUTINE LOAD. You can check the files ReasonOfStateChanged and ErrorLogUrls to identify and troubleshoot the problem. Having fixed the problem, you can then execute the RESUME ROUTINE LOAD statement to resume the PAUSED load job.
If the state of the load job is CANCELLED, it is possibly because the load job encounters an exception (such as the table has been dropped). You can check the files ReasonOfStateChanged and ErrorLogUrls to identify and troubleshoot the problem. However, you cannot resume a CANCELLED load job.
MySQL [example_db]> SHOW ROUTINE LOAD FOR example_tbl2_ordertest2 \G
*************************** 1. row ***************************
                  Id: 63013
                Name: example_tbl2_ordertest2
          CreateTime: 2022-08-10 17:09:00
           PauseTime: NULL
             EndTime: NULL
              DbName: default_cluster:example_db
           TableName: example_tbl2
               State: RUNNING
      DataSourceType: KAFKA
      CurrentTaskNum: 3
       JobProperties: {"partitions":"*","partial_update":"false","columnToColumnExpr":"commodity_id,customer_name,country,pay_time,pay_dt=from_unixtime(`pay_time`, '%Y%m%d'),price","maxBatchIntervalS":"20","whereExpr":"*","dataFormat":"json","timezone":"Asia/Shanghai","format":"json","json_root":"","strict_mode":"false","jsonpaths":"[\"$.commodity_id\",\"$.customer_name\",\"$.country\",\"$.pay_time\",\"$.price\"]","desireTaskConcurrentNum":"3","maxErrorNum":"0","strip_outer_array":"false","currentTaskConcurrentNum":"3","maxBatchRows":"200000"}
DataSourceProperties: {"topic":"ordertest2","currentKafkaPartitions":"0,1,2,3,4","brokerList":"<kafka_broker1_ip>:<kafka_broker1_port>,<kafka_broker2_ip>:<kafka_broker2_port>"}
    CustomProperties: {"security.protocol":"SASL_SSL","sasl.username":"******","sasl.mechanism":"PLAIN","kafka_default_offsets":"OFFSET_BEGINNING","sasl.password":"******"}
           Statistic: {"receivedBytes":230,"errorRows":0,"committedTaskNum":1,"loadedRows":2,"loadRowsRate":0,"abortedTaskNum":0,"totalRows":2,"unselectedRows":0,"receivedBytesRate":0,"taskExecuteTimeMs":522}
            Progress: {"0":"1","1":"OFFSET_ZERO","2":"OFFSET_ZERO","3":"OFFSET_ZERO","4":"OFFSET_ZERO"}
ReasonOfStateChanged:
        ErrorLogUrls:
            OtherMsg:
CAUTION
You cannot check a load job that has stopped or has not yet started.
Check a load task
Execute the SHOW ROUTINE LOAD TASK statement to check the load tasks of the load job example_tbl2_ordertest2, such as how many tasks are currently running, the topic partitions that are consumed and the consumption progress DataSourceProperties, and the corresponding Coordinator BE node BeId.
MySQL [example_db]> SHOW ROUTINE LOAD TASK WHERE JobName = "example_tbl2_ordertest2" \G
*************************** 1. row ***************************
              TaskId: 18c3a823-d73e-4a64-b9cb-b9eced026753
               TxnId: -1
           TxnStatus: UNKNOWN
               JobId: 63013
          CreateTime: 2022-08-10 17:09:05
   LastScheduledTime: 2022-08-10 17:47:27
    ExecuteStartTime: NULL
             Timeout: 60
                BeId: -1
DataSourceProperties: {"1":0,"4":0}
             Message: there is no new data in kafka, wait for 20 seconds to schedule again
*************************** 2. row ***************************
              TaskId: f76c97ac-26aa-4b41-8194-a8ba2063eb00
               TxnId: -1
           TxnStatus: UNKNOWN
               JobId: 63013
          CreateTime: 2022-08-10 17:09:05
   LastScheduledTime: 2022-08-10 17:47:26
    ExecuteStartTime: NULL
             Timeout: 60
                BeId: -1
DataSourceProperties: {"2":0}
             Message: there is no new data in kafka, wait for 20 seconds to schedule again
*************************** 3. row ***************************
              TaskId: 1a327a34-99f4-4f8d-8014-3cd38db99ec6
               TxnId: -1
           TxnStatus: UNKNOWN
               JobId: 63013
          CreateTime: 2022-08-10 17:09:26
   LastScheduledTime: 2022-08-10 17:47:27
    ExecuteStartTime: NULL
             Timeout: 60
                BeId: -1
DataSourceProperties: {"0":2,"3":0}
             Message: there is no new data in kafka, wait for 20 seconds to schedule again
Pause a load job
You can execute the PAUSE ROUTINE LOAD statement to pause a load job. The state of the load job will be PAUSED after the statement is executed. However, it has not stopped. You can execute the RESUME ROUTINE LOAD statement to resume it. You can also check its status with the SHOW ROUTINE LOAD statement.
The following example pauses the load job example_tbl2_ordertest2:
PAUSE ROUTINE LOAD FOR example_tbl2_ordertest2;
Resume a load job
You can execute the RESUME ROUTINE LOAD statement to resume a paused load job. The state of the load job will be NEED_SCHEDULE temporarily (because the load job is being re-scheduled), and then become RUNNING. You can check its status with the SHOW ROUTINE LOAD statement.
The following example resumes the paused load job example_tbl2_ordertest2:
RESUME ROUTINE LOAD FOR example_tbl2_ordertest2;
Alter a load job
Before altering a load job, you must pause it with the PAUSE ROUTINE LOAD statement. Then you can execute the ALTER ROUTINE LOAD. After altering it, you can execute the RESUME ROUTINE LOAD statement to resume it, and check its status with the SHOW ROUTINE LOAD statement.
Suppose the number of the BE nodes that are alive increases to 6 and the topic partitions to be consumed is "0,1,2,3,4,5,6,7". If you want to increase the actual load task concurrency, you can execute the following statement to increase the number of desired task concurrency desired_concurrent_number to 6 (greater than or equal to the number of BE nodes that are alive), and specify the topic partitions and initial offsets.
NOTE
Because the actual task concurrency is determined by the minimum value of multiple parameters, you must make sure that the value of the FE dynamic parameter
max_routine_load_task_concurrent_numis greater than or equal to6.
ALTER ROUTINE LOAD FOR example_tbl2_ordertest2
PROPERTIES
(
    "desired_concurrent_number" = "6"
)
FROM kafka
(
    "kafka_partitions" = "0,1,2,3,4,5,6,7",
    "kafka_offsets" = "OFFSET_BEGINNING,OFFSET_BEGINNING,OFFSET_BEGINNING,OFFSET_BEGINNING,OFFSET_END,OFFSET_END,OFFSET_END,OFFSET_END"
);
Stop a load job
You can execute the STOP ROUTINE LOAD statement to stop a load job. The state of the load job will be STOPPED after the statement is executed, and you cannot resume a stopped load job. You cannot check the status of a stopped load job with the SHOW ROUTINE LOAD statement.
The following example stops the load job example_tbl2_ordertest2:
STOP ROUTINE LOAD FOR example_tbl2_ordertest2;
FAQ
-
Issue description: The Routine Load job reports an error like
no partition in this topicinReasonOfStateChangedfield when running SQL statementshow routine load <my_job>.ErrorReason{errCode = 4, msg='Job failed to fetch all current partition with error [failed to send proxy request to TNetworkAddress(hostname:10.0.1.2, port:8060) err failed to send proxy request to TNetworkAddress(hostname:10.0.1.2, port:8060) err [no partition in this topic]]'}Possible causes: The
kafka_topicproperty is not correct. For example, the topic does not exist, or thekafka_partitionsproperty is not set correctly. -
Issue description: The Routine Load job reports an error like
failed to get partition meta: Local: Broker transport failureinReasonOfStateChangedfield when running SQL statementSHOW ROUTINE LOAD <my_job>.ErrorReason{errCode = 4, msg='Job failed to fetch all current partition with error [failed to send proxy request to TNetworkAddress(hostname:10.0.1.2, port:8060) err failed to send proxy request to TNetworkAddress(hostname:10.0.1.2, port:8060) err [failed to get partition meta: Local: Broker transport failure]]'}Possible causes: SSL channel cannot be established.
Solutions: You can perform troubleshooting by disabling the SSL certificate verification from CelerData to Confluent cloud.
"property.enable.ssl.certificate.verification"="false"Notice
- It is not safe, you must turn it off in your production environment.
- You should generate a new pair of temporary API keys on Confluent Cloud as the
username/passwordproperties for security purposes, because the username/password are not safe through the internet when the SSL certificate verification is disabled.
If the Routine Load job then successfully loads data into CelerData, it means that there might be some problems with the SSL certificate. For example, CelerData cannot find the CA root certificate automatically. So you can manually specify the CA root certificate for CelerData by adding the property below. For more information about the CA root certificate, see librdkafka - INTRODUCTION.md # SSL.
"property.ssl.ca.location"="/etc/ssl/certs/ca-bundle.crt"