Connect from a client application to a CelerData cluster
You can connect to CelerData clusters from your client application to query and visualize the data in your data lakes and relational databases.
The connection methods vary depending on your cloud provider. Currently, CelerData supports the following cloud providers:
AWS
Connect from a client application on a public network
If you want to connect your client applications on a public network to your CelerData cluster, you must specify the public subnet ID, and configure the security group with inbound rules that allow client access.
Follow these steps to add an inbound rule to the security group of the VPC that hosts your CelerData cluster:
-
Sign in to the AWS VPC console as a user with administrator privileges.
-
In the upper-right corner of the page, select your AWS region.
-
In the left-side navigation pane, choose Security > Security groups.
-
On the Security groups page, click the security group ID of the VPC that hosts your CelerData cluster.
-
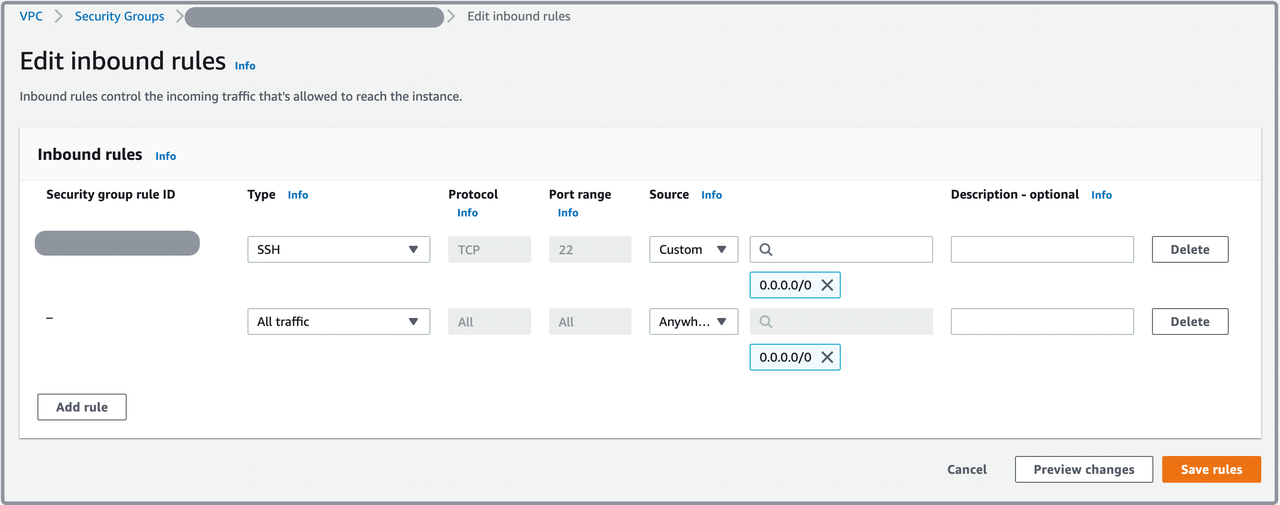
On the detail page of the security group, click Edit inbound rules on the Inbound rules tab.
-
On the Edit inbound rules page, click Add rule to add an inbound rule.
-
Edit the inbound rule:
If you want to expose your CelerData cluster to all applications on public networks, you can edit it as follows:
a. Set Type to All traffic.
b. Set Source to Anywhere-IPv4.
If you want to expose your CelerData cluster to a specific application on public networks, you can edit it as follows:
a. Set Type to All traffic.
b. Set Source to Custom and specify the IP address of your application.
-
Click Save rules.

Connect from a client application on a private subnet
If you want to connect to your CelerData cluster from a client application that is in a custom VPC, you must configure the VPC that hosts the FEs in your CelerData cluster to allow the client application to request port 9030.
You can connect your CelerData cluster from your client application using the same VPC that hosts the FE node, or from another custom VPC via VPC peering connection.
Create a VPC peering connection
Follow these steps to create a VPC peering connection:
- Sign in to the AWS VPC console as a user with administrator privileges.
- In the navigation pane, choose Virtual private cloud > Peering connections.
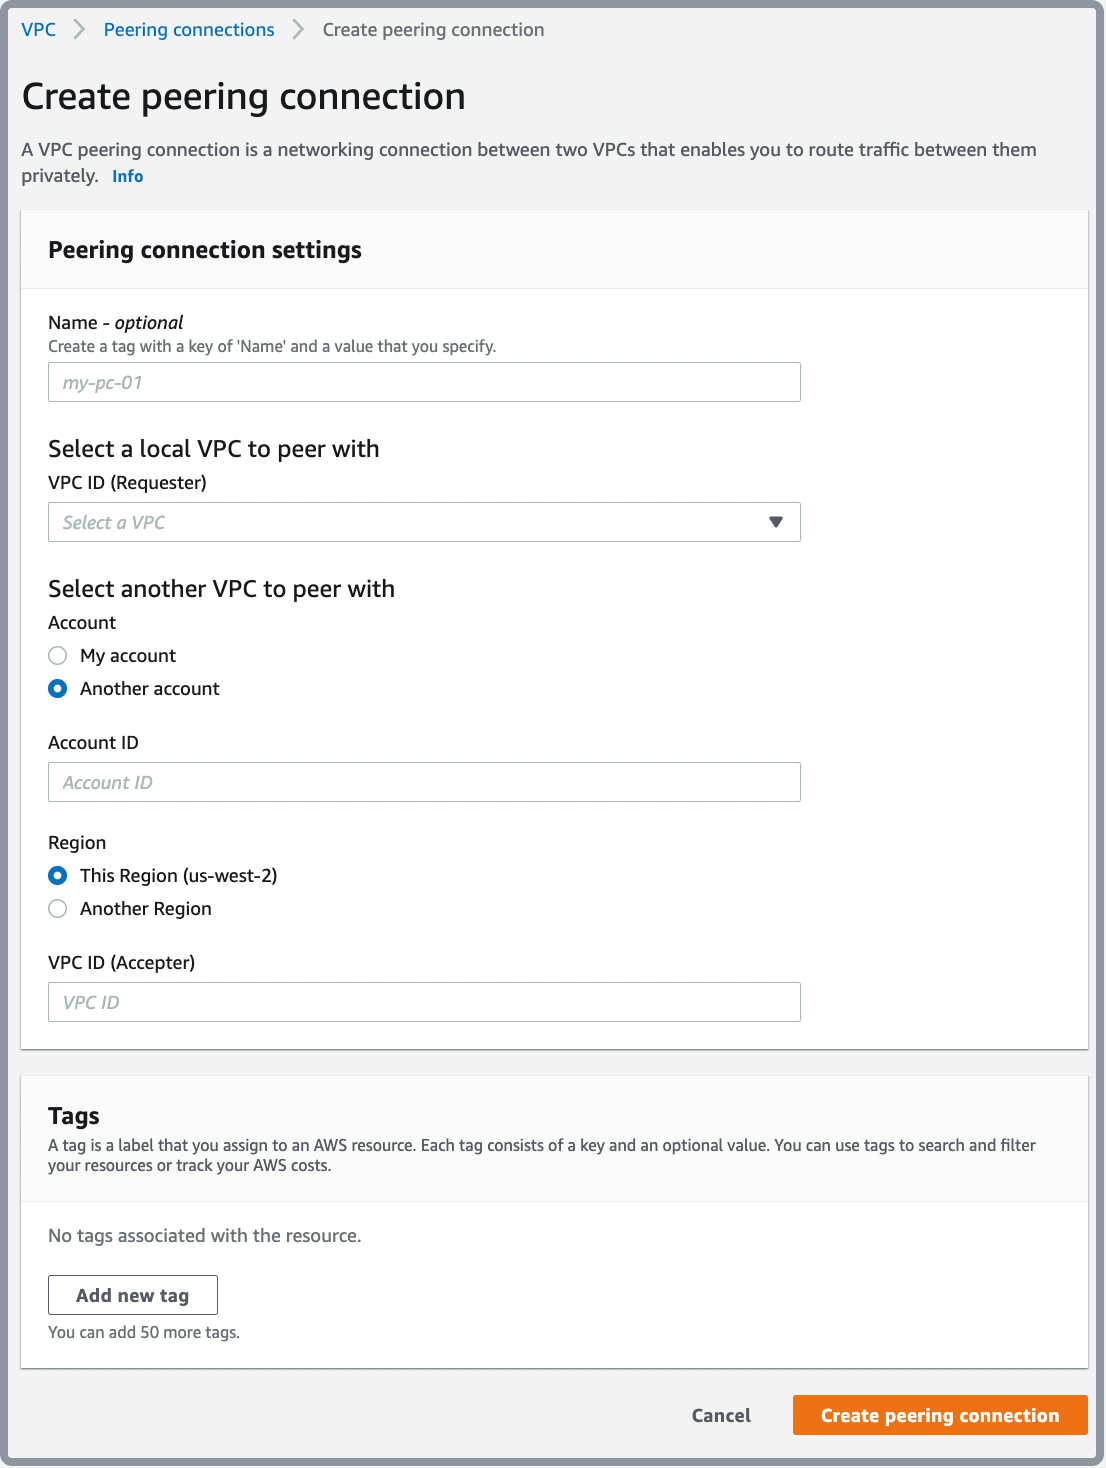
- Choose Create peering connection.
- Configure the information as follows, and choose Create Peering Connection when you are done:
- Peering connection name tag: You can optionally name your VPC peering connection.
- VPC (Requester): Select the VPC in your account with which to create the VPC peering connection.
- Account: Choose My account to create a peering connection with a VPC within this account, or choose Another account to create a peering connection with a VPC from another account.
- Account ID: Enter the AWS account ID of the owner of the accepter VPC if you choose Another account.
- Region: Choose This Region if the accepter VPC resides in the same region. If it resides in a different region, choose Another region, and select the region in which the accepter VPC resides.
- VPC (Accepter): Enter the ID of the VPC with which to create the VPC peering connection.
- In the confirmation dialog box, choose OK.

Accept a peering connection
Follow these steps to accept a VPC peering connection:
- Sign in to the AWS VPC console as a user with administrator privileges.
- In the upper-right corner of the page, select the region of the accepter VPC.
- In the navigation pane, choose Virtual private cloud > Peering connections.
- Select the pending VPC peering connection (the status is
pending-acceptance), and choose Actions, Accept Request. - In the confirmation dialog box, choose Yes, Accept.
Azure
Connect from a client application on a public network
To allow your client application on a public network to access your CelerData cluster deployed on Azure, follow these steps to add an inbound security rule to the network security group of the virtual network that hosts your CelerData cluster:
-
Sign in to the Microsoft Azure portal.
-
Navigate to the Network security groups service page, and click the network security group that your CelerData cluster belongs to.
-
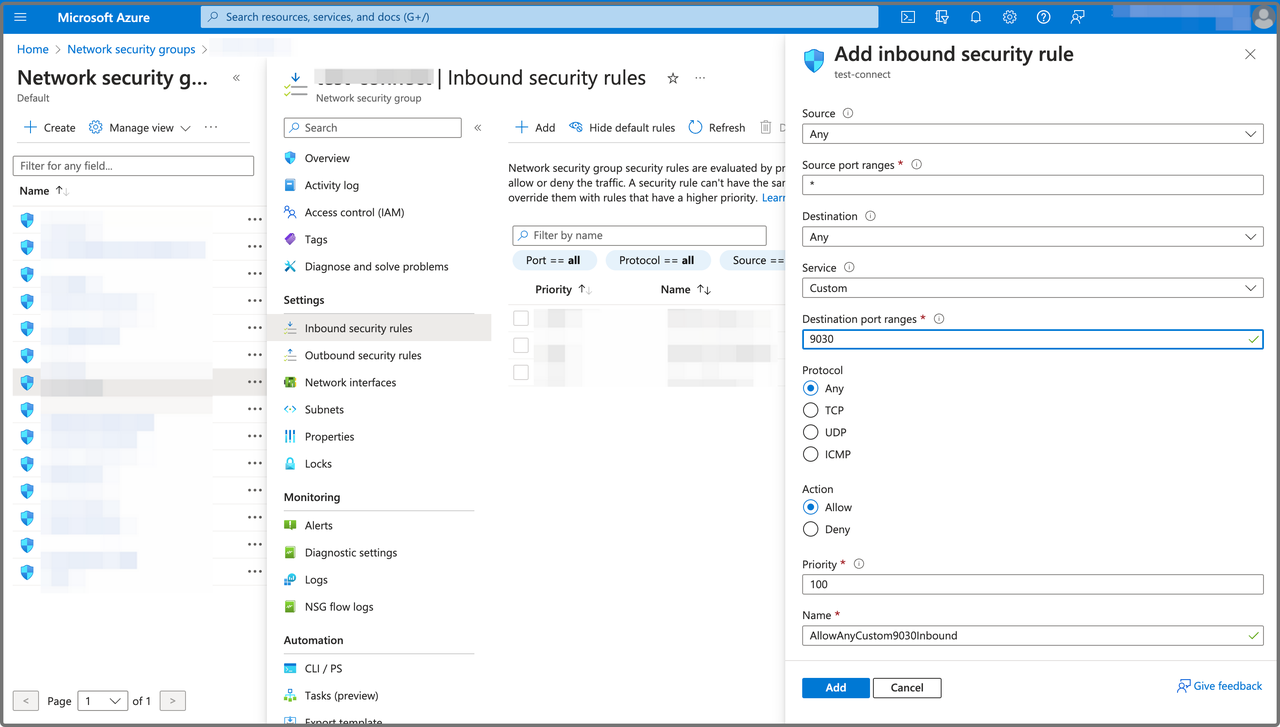
On the page that appears, choose Inbound security rules in the left-side pane, and click Add to add a new inbound security rule.
-
In the right-side pane that appears, configure the inbound security rule:
If you want to expose your CelerData cluster to all applications on public networks, you can edit it as follows:
a. Select Any from the Source drop-down list.
b. Enter * in the Source port ranges field.
c. Enter 9030 in the Destination port ranges field.
If you want to expose your CelerData cluster to a specific application on public networks, you can edit it as follows:
a. Select IP Address from the Source drop-down list.
b. Specify the IP address of your application in the Source IP addresses/CIDR ranges field.
c. Enter * in the Source port ranges field.
d. Enter 9030 in the Destination port ranges field.
For other fields, you can use the default settings.
- Click Add to add the inbound security rule.

Connect from a client application on a private subnet
If you want to connect to your CelerData cluster from a client application that is in a custom virtual network, you must configure the virtual network that hosts the FEs in your CelerData cluster to allow the client application to request port 9030.
You can connect your CelerData cluster from your client application using the same virtual network that hosts the FE nodes, or from another custom virtual network via virtual network peering.
Create a VPC peering connection
Follow these steps to create a VPC peering connection:
-
Sign in to the Microsoft Azure portal.
-
Navigate to the Virtual networks service page, and click the virtual network that hosts your CelerData cluster.
-
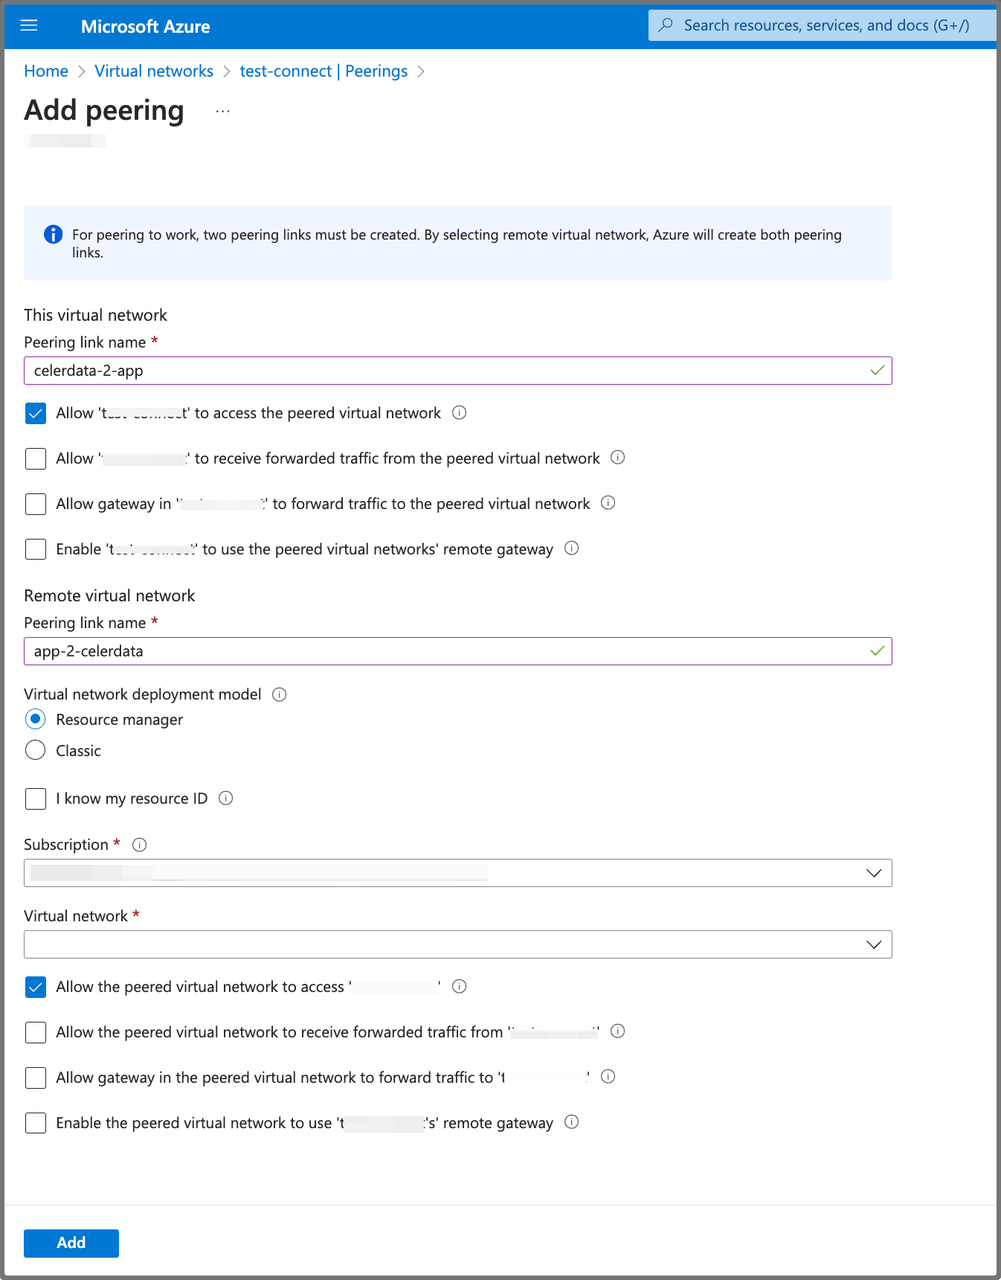
On the page that appears, choose Peerings in the left-side pane, and click Add to add a virtual network peering.
-
On the Add peering page, configure the virtual network peering:
a. Enter a name for the peering link in the Peering link name field for This virtual network.
b. Choose Allow
<your_virtual_network_name>to access the peered virtual network.c. Enter a name for the peering link in the Peering link name field for Remote virtual network.
d. Select the deployment model of the virtual network you want to peer with in the Virtual network deployment model section.
e. Select the subscription of the virtual network you want to peer with from the Subscription drop-down list.
f. Select the virtual network you want to peer with from the Virtual network drop-down list.
NOTE
If you do not have read access to the virtual network or subscription you want to peer with, but only the resource ID of the virtual network, you must choose I know my resource ID, and specify the resource ID of the virtual network you want to peer with in the Resource ID field.
g. Choose Allow the peered virtual network to access
<your_virtual_network_name>. -
Click Add to add the virtual network peering.

GCP
Connect from a client application on a public network
Connecting a client application on a public network to your CelerData cluster on Google Cloud means that the application can directly connect to your cluster through the public Network Load Balancer (NLB). If the VPC network for your CelerData cluster has a route with the Destination IP range set to 0.0.0.0/0 and the Next hop set to the Default internet gateway, the CelerData Cloud BYOC console will automatically create a public NLB when you deploy the cluster. This allows access from the public internet.
If the route configuration does not match this setup, the CelerData Cloud BYOC console will create a private NLB that cannot be accessed directly from the public internet. This type of NLB is referred to as a private NLB.
IMPORTANT
Using a public NLB is recommended only for testing purposes, as it may be insecure for production environments.
To connect your client application on a public network to your CelerData cluster, you must configure a route with the Destination IP range set to 0.0.0.0/0 and the Next hop set to the Default internet gateway, and set up an ingress firewall rule that allows client access.
Follow these steps to add an ingress firewall rule to allow client access from the public internet for the VPC hosting your CelerData cluster:
- Sign in to your project in the Google Cloud console.
- Expand the left-side navigation menu, and choose VPC Network > Firewall.
- Click Create firewall rule.
- On the Create a firewall rule page, follow these steps:
- For Name: Enter a name for the rule.
- For Network, select the VPC for cluster deployment.
- For Direction of traffic, select Ingress.
- For Targets, select All instances in the network.
- For Source IPv4 ranges:
- If you want to expose your cluster to all applications on the public network, specify
0.0.0.0/0. - If you want to expose your cluster to a specific application on the public network, you can specify the IP addresses of your application.
- If you want to expose your cluster to all applications on the public network, specify
- For Protocol and ports, select Specified protocols and ports, choose TCP, and enter the ports
443(for Stream Load) and9030(for SQL access).
- Click Create.
Connecting from a Client Application on a Private Subnet
If your client application is in a custom VPC, you need to configure the VPC hosting the FE nodes (or NLB specifically) of your CelerData cluster to allow access on ports 9030 and 443, as described in the previous section.
You can connect to your CelerData cluster from either the same VPC that hosts the FE nodes, or another custom VPC via VPC Network Peering.
Setting Up a VPC Network Peering
To create a VPC peering connection, follow these steps:
- Sign in to your project in the Google Cloud console.
- Expand the left-side navigation menu, and choose VPC Network > VPC network peering.
- Click CREATE PEERING CONNECTION, then click CONTINUE on the new page.
- On the Create peering connection page, follow these steps:
- For Peering connection name, enter a name for the peering connection.
- For Your VPC network, select the custom VPC you want to peer with.
- For Peered VPC network
- If the VPC is in the same project, select In project [YOUR-PROJECT-NAME], and select the VPC network for your CelerData cluster to peer with in VPC network name.
- If the VPC is in a different project, select In another project, specify the project ID, and select the VPC network for your CelerData cluster to peer with in VPC network name.
- After creating the peering connection from your custom VPC to the CelerData cluster's VPC, create another peering connection from the CelerData cluster's VPC to your custom VPC.
Once both peering connections are created, the VPC network peering will be successfully established. The Status will be displayed as Active.