Manage permissions with Apache Ranger
Apache Ranger provides a centralized security management framework that allows users to customize access policies through a visual web page. This helps determine which roles can access which data and exercise fine-grained data access control for various components and services in the Hadoop ecosystem.
Apache Ranger provides the following core modules:
- Ranger Admin: the core module of Ranger with a built-in web page. Users can create and update security policies on this page or through a REST interface. Plugins of various components of the Hadoop ecosystem poll and pull these policies on a regular basis.
- Agent Plugin: plugins of components embedded in the Hadoop ecosystem. These plugins pull security policies from Ranger Admin on a regular basis and store the policies in local files. When users access a component, the corresponding plugin assesses the request based on the configured security policy and sends the authentication results to the corresponding component.
- User Sync: used to pull user and user group information, and synchronize the permission data of users and user groups to Ranger's database.
In addition to its built-in RBAC privilege system, StarRocks (the database engine that powers CelerData) can also integrate with Apache Ranger for access control. Currently, you can:
- Create access policies, masking policies, and row-level filter policies through Apache Ranger.
- Use Ranger audit logs.
- Reuse existing access control policies and enable audit logs for external data sources.
- Enable secure connection via Trust Store or Key Store.
Ranger Servers that use Kerberos for authentication are not supported.
This topic introduces how to integrate your CelerData cluster with Apache Ranger and control cluster permissions via Ranger. For information on how to create security policies on Ranger to manage data security, see the Apache Ranger official website.
For the resource objects and privileges you can configure, see privilege items.
Permission control method
StarRocks integrated with Apache Ranger provides the following permission control methods:
- Global access control: Use Ranger to uniformly manage access to StarRocks internal tables, external tables, and other objects. Access control is performed according to the access policies configured in StarRocks Service.
- Use Ranger to manage access to StarRocks internal tables and objects. For external catalogs, reuse the policies of the corresponding external service on Ranger (such as the Hive Service) for access control. StarRocks can match Ranger services with external catalogs.
- Use StarRocks built-in RBAC system to manage access to StarRocks internal tables and objects. Reuse the policies of external services on Ranger to manage access to external data sources.
Authentication process
- When users initiate a query, StarRocks parses the query to understand the required privileges and passes user information and required privileges to Apache Ranger. Ranger determines whether the privileges are valid based on the access policy configured in the corresponding service. If the user has access privileges, StarRocks returns the query data; if not, StarRocks returns an error.
- You can also use LDAP for user authentication, then use Ranger to synchronize LDAP users and configure access rules for them. StarRocks can also complete user login authentication through LDAP.
Integrate StarRocks with Ranger
Prerequisites
Apache Ranger 2.1.0 or later is required. For the instructions on how to install Apache Ranger, see Ranger quick start.
(Optional) Install ranger-starrocks-plugin
The main purpose of this step is to use Ranger's resource name autocomplete feature. When authoring policies in Ranger Admin, users need to enter the name of the resources whose access needs to be protected. To make it easier for users to enter the resource names, Ranger Admin provides the autocomplete feature, which looks up the available resources in the service that match the input entered so far and automatically completes the resource name. If you do not have the permissions to operate the Ranger server or do not need this feature, you can skip this step.
-
Create the
starrocksfolder in the Ranger Admin directoryews/webapp/WEB-INF/classes/ranger-plugins.mkdir {path-to-ranger}/ews/webapp/WEB-INF/classes/ranger-plugins/starrocks -
Download the Ranger plugin and mysql-connector-j , and place them in the
starrocksfolder. -
Restart Ranger Admin.
-
For Ranger 0.5.x:
ranger-admin restart -
For Ranger 2.x and later:
./ews/ranger-admin-services.sh restart
-
Configure StarRocks Service on Ranger Admin
This step configures the StarRocks Service on Ranger so that users can perform access control on StarRocks objects through Ranger.
-
Download ranger-servicedef-starrocks.json to your Ranger server, and make necessary modifications in the file.
- If you do not need Ranger's autocomplete feature (which means you did not install the
ranger-starrocks-plugin), you must setimplClassto empty ("implClass": "",). - If you need Ranger's autocomplete feature (which means you have installed the
ranger-starrocks-plugin), you must setimplClasstoorg.apache.ranger.services.starrocks.RangerServiceStarRocks("implClass": "org.apache.ranger.services.starrocks.RangerServiceStarRocks",).
- If you do not need Ranger's autocomplete feature (which means you did not install the
-
Add StarRocks Service by running the following command as a Ranger administrator.
curl -u <ranger_adminuser>:<ranger_adminpwd> \
-X POST -H "Accept: application/json" \
-H "Content-Type: application/json" http://<ranger-ip>:<ranger-port>/service/plugins/definitions -d@ranger-servicedef-starrocks.json -
Access
http://<ranger-ip>:<ranger-host>/login.jspto log in to the Apache Ranger Web UI. The STARROCKS service appears on the page.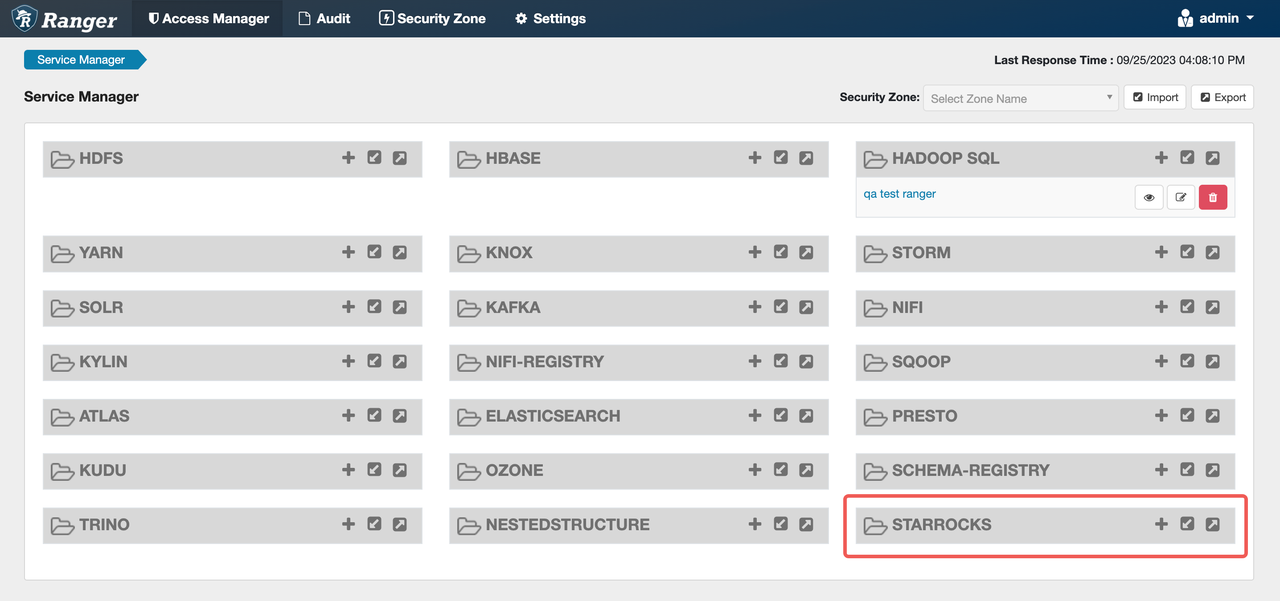
-
Click the plus sign (
+) after STARROCKS to configure StarRocks Service, and configure as follows: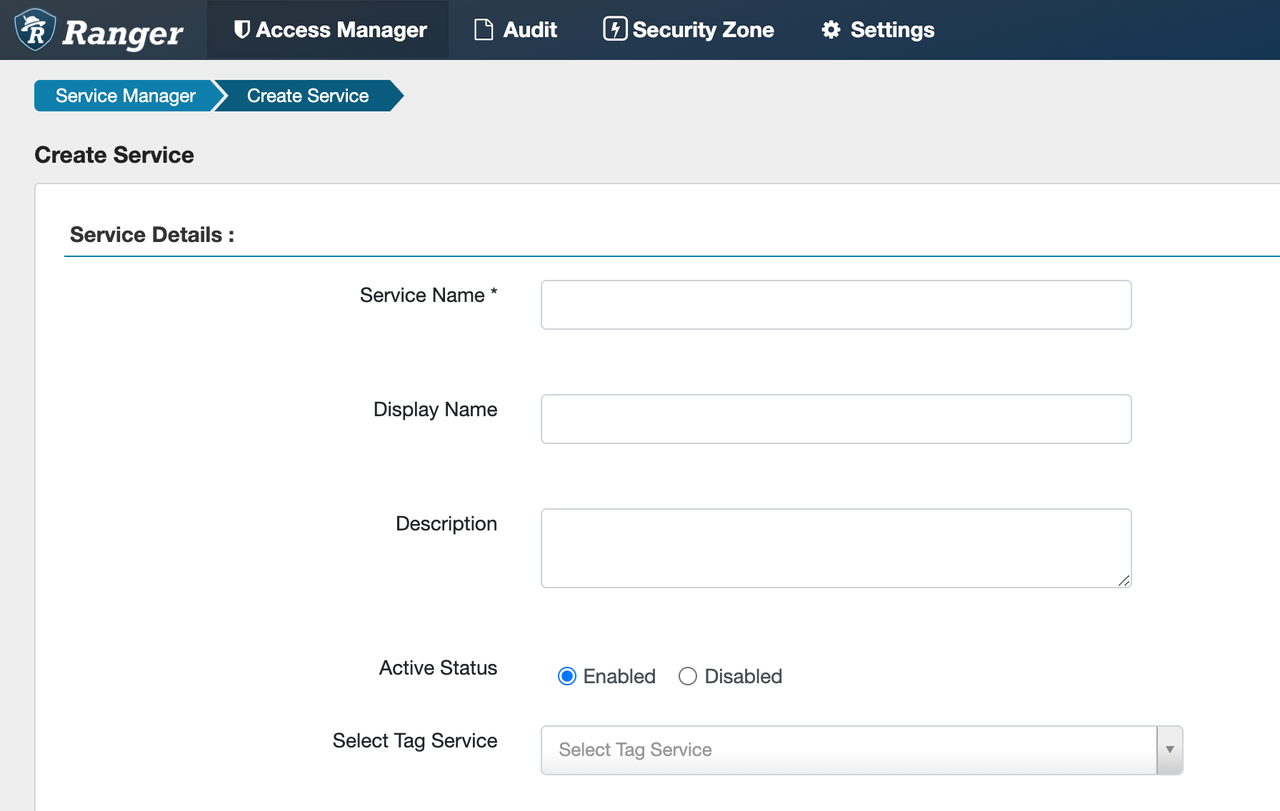
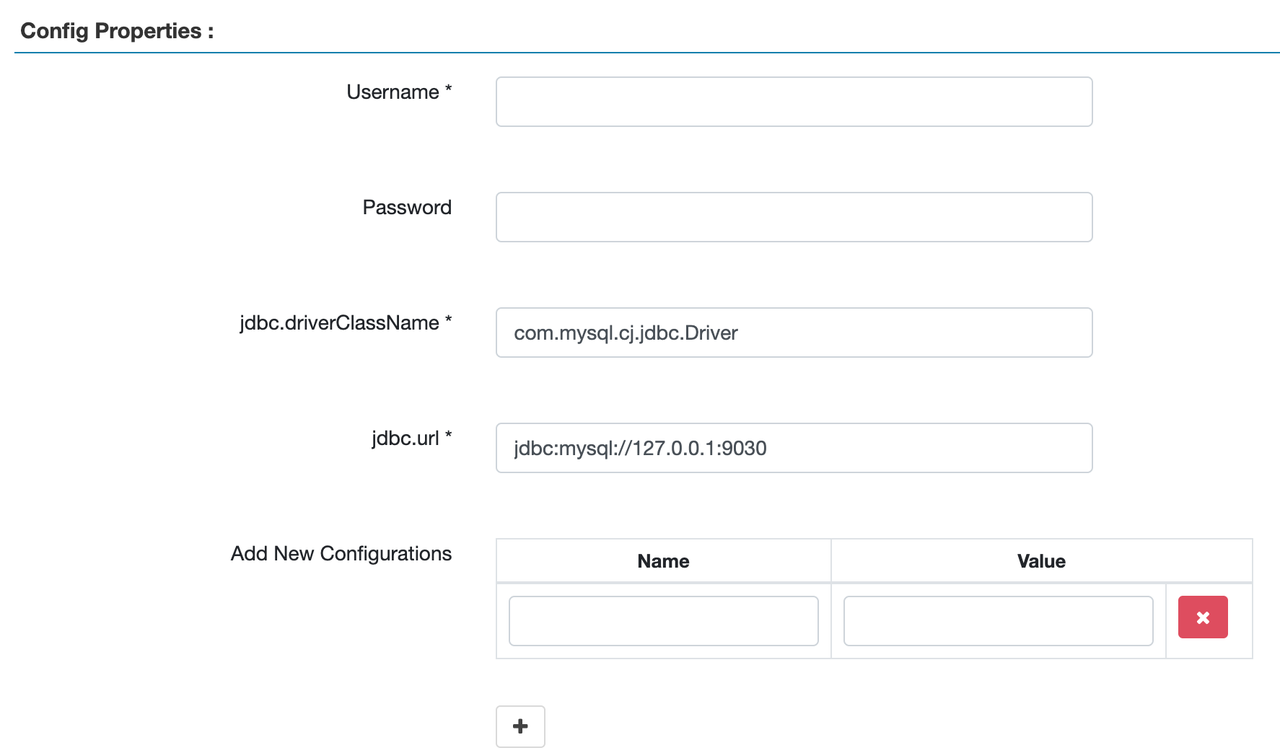
Service Name: You must enter a service name.Display Name: Optionally enter the name you want to display for the service under STARROCKS. If it is not specified,Service Namewill be displayed.UsernameandPassword: The username and password of the cluster user used to auto-complete object names when creating policies. These two parameters do not affect the connectivity between StarRocks and Ranger. If you want to use auto-completion feature, configure at least one user with thedb_adminrole activated.jdbc.url: Enter the StarRocks FE IP address and query port.
The following image shows a configuration example.
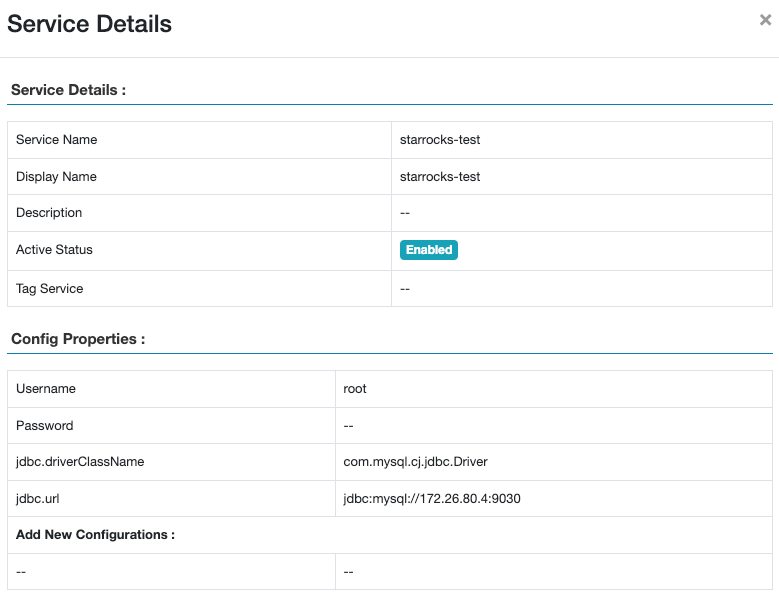
The following image shows the added service.

-
Click Test connection to test the connectivity, and save it after the connection is successful.
Prepare files
Prepare the files listed below, make necessary modifications, and upload the files to the remote storage bucket (container) referenced in the data credential of the cluster you want to integrate Ranger with.
For external catalogs, you can reuse the access policies of external services on Ranger (such as Hive Service) for access control. StarRocks supports matching external catalogs with Ranger external services. When users access an external table, the system implements access control by reusing the access policy of the Ranger Service that corresponds to that external table.
ranger-starrocks-security.xml
- Required: Yes
- Description: The configuration file used in conjunction between StarRocks and Apache Ranger.
- Download link: ranger-starrocks-security.xml
- Modify the following configurations:
ranger.plugin.starrocks.service.name: Change to the name of the StarRocks Service you created in Step 4.ranger.plugin.starrocks.policy.rest.url: Change to the address of the Ranger Admin.
If you need to modify other configurations, refer to official documentation of Apache Ranger. For example, you can modify ranger.plugin.starrocks.policy.pollIntervalM to change the interval for pulling policy changes.
Example:
...
    <property>
        <name>ranger.plugin.starrocks.service.name</name>
        <value>starrocks</value>
        <description>
            Name of the Ranger service containing policies for this StarRocks instance
        </description>
    </property>
...

...
    <property>
        <name>ranger.plugin.starrocks.policy.rest.url</name>
        <value>http://localhost:6080</value>
        <description>
            URL to Ranger Admin
        </description>
    </property>
...
ranger-starrocks-audit.xml
- Required: No
- Description: The configuration file used to enable the Audit Log service of Ranger.
- Download link: ranger-starrocks-audit.xml
- Modify the following configurations:
xasecure.audit.solr.solr_url: Change it to your ownsolr_url.
ranger-policymgr-ssl.xml
- Required: No
- Description: The configuration file used to specify the actual local paths (on the server) of the corresponding files for the Trust Store or Key Store.
- Download link: ranger-policymgr-ssl.xml
Trust Store or Key Store credentials
- Required: No
- Description: The path and credential of the Trust Store or Key Store used to enable secure connection.
- For Trust Store,
truststore.jksandtruststore.jceksare required. - For Key Store,
keystore.jksandkeystore.jceksare required.
- For Trust Store,
ranger-hive-security.xml
- Required: No
- Description: The configuration file used to enable Ranger's access control for Hive Catalog.
- Download link: ranger-hive-security.xml
ranger-hive-audit.xml
- Required: No
- Description: The configuration file used to enable Ranger's Audit Log service for Hive Catalog.
- Download link: ranger-hive-audit.xml
Create a Ranger integration
-
Sign in to the CelerData Cloud BYOC console.
-
In the left-side navigation pane, choose Integration Hub.
-
On the Integration Hub page, click the Apache Ranger card.
-
On the Apache Ranger page, click Create Configuration.
-
On the Create Ranger Configuration dialog box, configure as follows:
a. Enter a name for the configuration in the Name field.
b. Specify the location of
ranger-starrocks-security.xmlyou uploaded to the remote storage.c. (Optional) If you want to use the Audit Log service of Ranger, turn on the switch in the Enable Audit Logs section, and specify the location of
ranger-starrocks-audit.xmlyou uploaded to the remote storage in the Audit XML field.d. (Optional) If you want to enable secure connection for Ranger, turn on the switch in the Secure connection section, select Trust Store or Key Store based on your scenario, specify the location of
ranger-policymgr-ssl.xmlin the Policy Manager SSL XML field, and specify the location of the path and credential of the Trust Store or Key Store.e. (Optional) If you want to reuse Ranger's access control on Hive Catalog, turn on the switch in the Apply to Hive Catalog section, and specify the location of
ranger-hive-security.xmlyou uploaded to the remote storage in the Hive Security XML field.f. (Optional) If you want to use the Ranger's Audit Log service for Hive Catalog, turn on the switch in the Enable audit logs for Hive section, and specify the location of
ranger-hive-audit.xmlyou uploaded to the remote storage in the Hive Audit XML field.noteThe formats of remote storage locations are as follows:
-- AWS S3
s3://bucket_name/path1
-- Google Cloud Storage
gs://bucket_name/path1
-- Azure Blob Storage
azblob://storage_account_name/container_name/path1 -
Click Submit to create the integration.
Apply the integration to your cluster
-
Sign in to the CelerData Cloud BYOC console.
-
On the Clusters page, click the cluster that you want to apply the integration to.
-
On the Cluster parameters tab of the cluster details page, select the Ranger integration you created for the cluster from the Apache Ranger Configurations drop-down list in the Apache Ranger integration section.
-
Click Validate to check whether the configuration can be applied to the cluster.
noteYou can only validate and apply the Ranger configuration when the cluster is in the running state.
-
If the validation succeeds, click Apply to apply the configuration.
-
If you want to reuse Ranger's access control on Hive Catalog, you need to log in to the cluster as a user with the
db_adminrole activated, and configure the external catalog as follows:-
When you create an external catalog, add the property
"ranger.plugin.hive.service.name".CREATE EXTERNAL CATALOG hive_catalog_1
PROPERTIES (
"type" = "hive",
"hive.metastore.type" = "hive",
"hive.metastore.uris" = "thrift://xx.xx.xx.xx:9083",
"ranger.plugin.hive.service.name" = "<ranger_hive_service_name>"
) -
You can also add this property to an existing external catalog.
ALTER CATALOG hive_catalog_1
SET ("ranger.plugin.hive.service.name" = "<ranger_hive_service_name>");
This operation changes the authentication method of an existing catalog to Ranger-based authentication.
-
What to do next
After adding a StarRocks Service, you can click the service to create access control policies for the service and assign different permissions to different users or user groups. When users access StarRocks data, access control will be implemented based on these policies.